
Don’t use simple to-do lists to manage complex projects.
These basic lists leave lots of room for errors, like missed tasks and dependencies. Which lead to project delays, frantic resource shuffling, and frustrated teams and clients.
Instead, use a project timeline that provides a clear, visual roadmap of all parts of the project.
We’ll cover the ins and outs of different types of timelines. And how to build a realistic one that still lets you adapt to unforeseen challenges.
What is a project timeline?
A project timeline is a strategic map that shows how tasks interconnect and how long each one should take. This gives you and your team a clear overview of the project workload from start to finish.
Accurate timelines make it easier to allocate resources, monitor project progress, and identify potential bottlenecks. They’re essential tools for managing stakeholder expectations, keeping projects on track, and ensuring on-time delivery within budget constraints.
Types of project timelines
Project timelines come in a variety of formats. The best choice depends on your specific project needs. Consider your team’s size and work styles, the complexity of the tasks, and how much granularity you need in your project planning and execution.
Gantt chart
- What it looks like: Horizontal task bars are nested under distinct project phases, with each bar’s length showing how long the task should take
- Best for: Complex projects with multiple interconnected tasks, such as construction, software development, or product launches where sequencing is critical
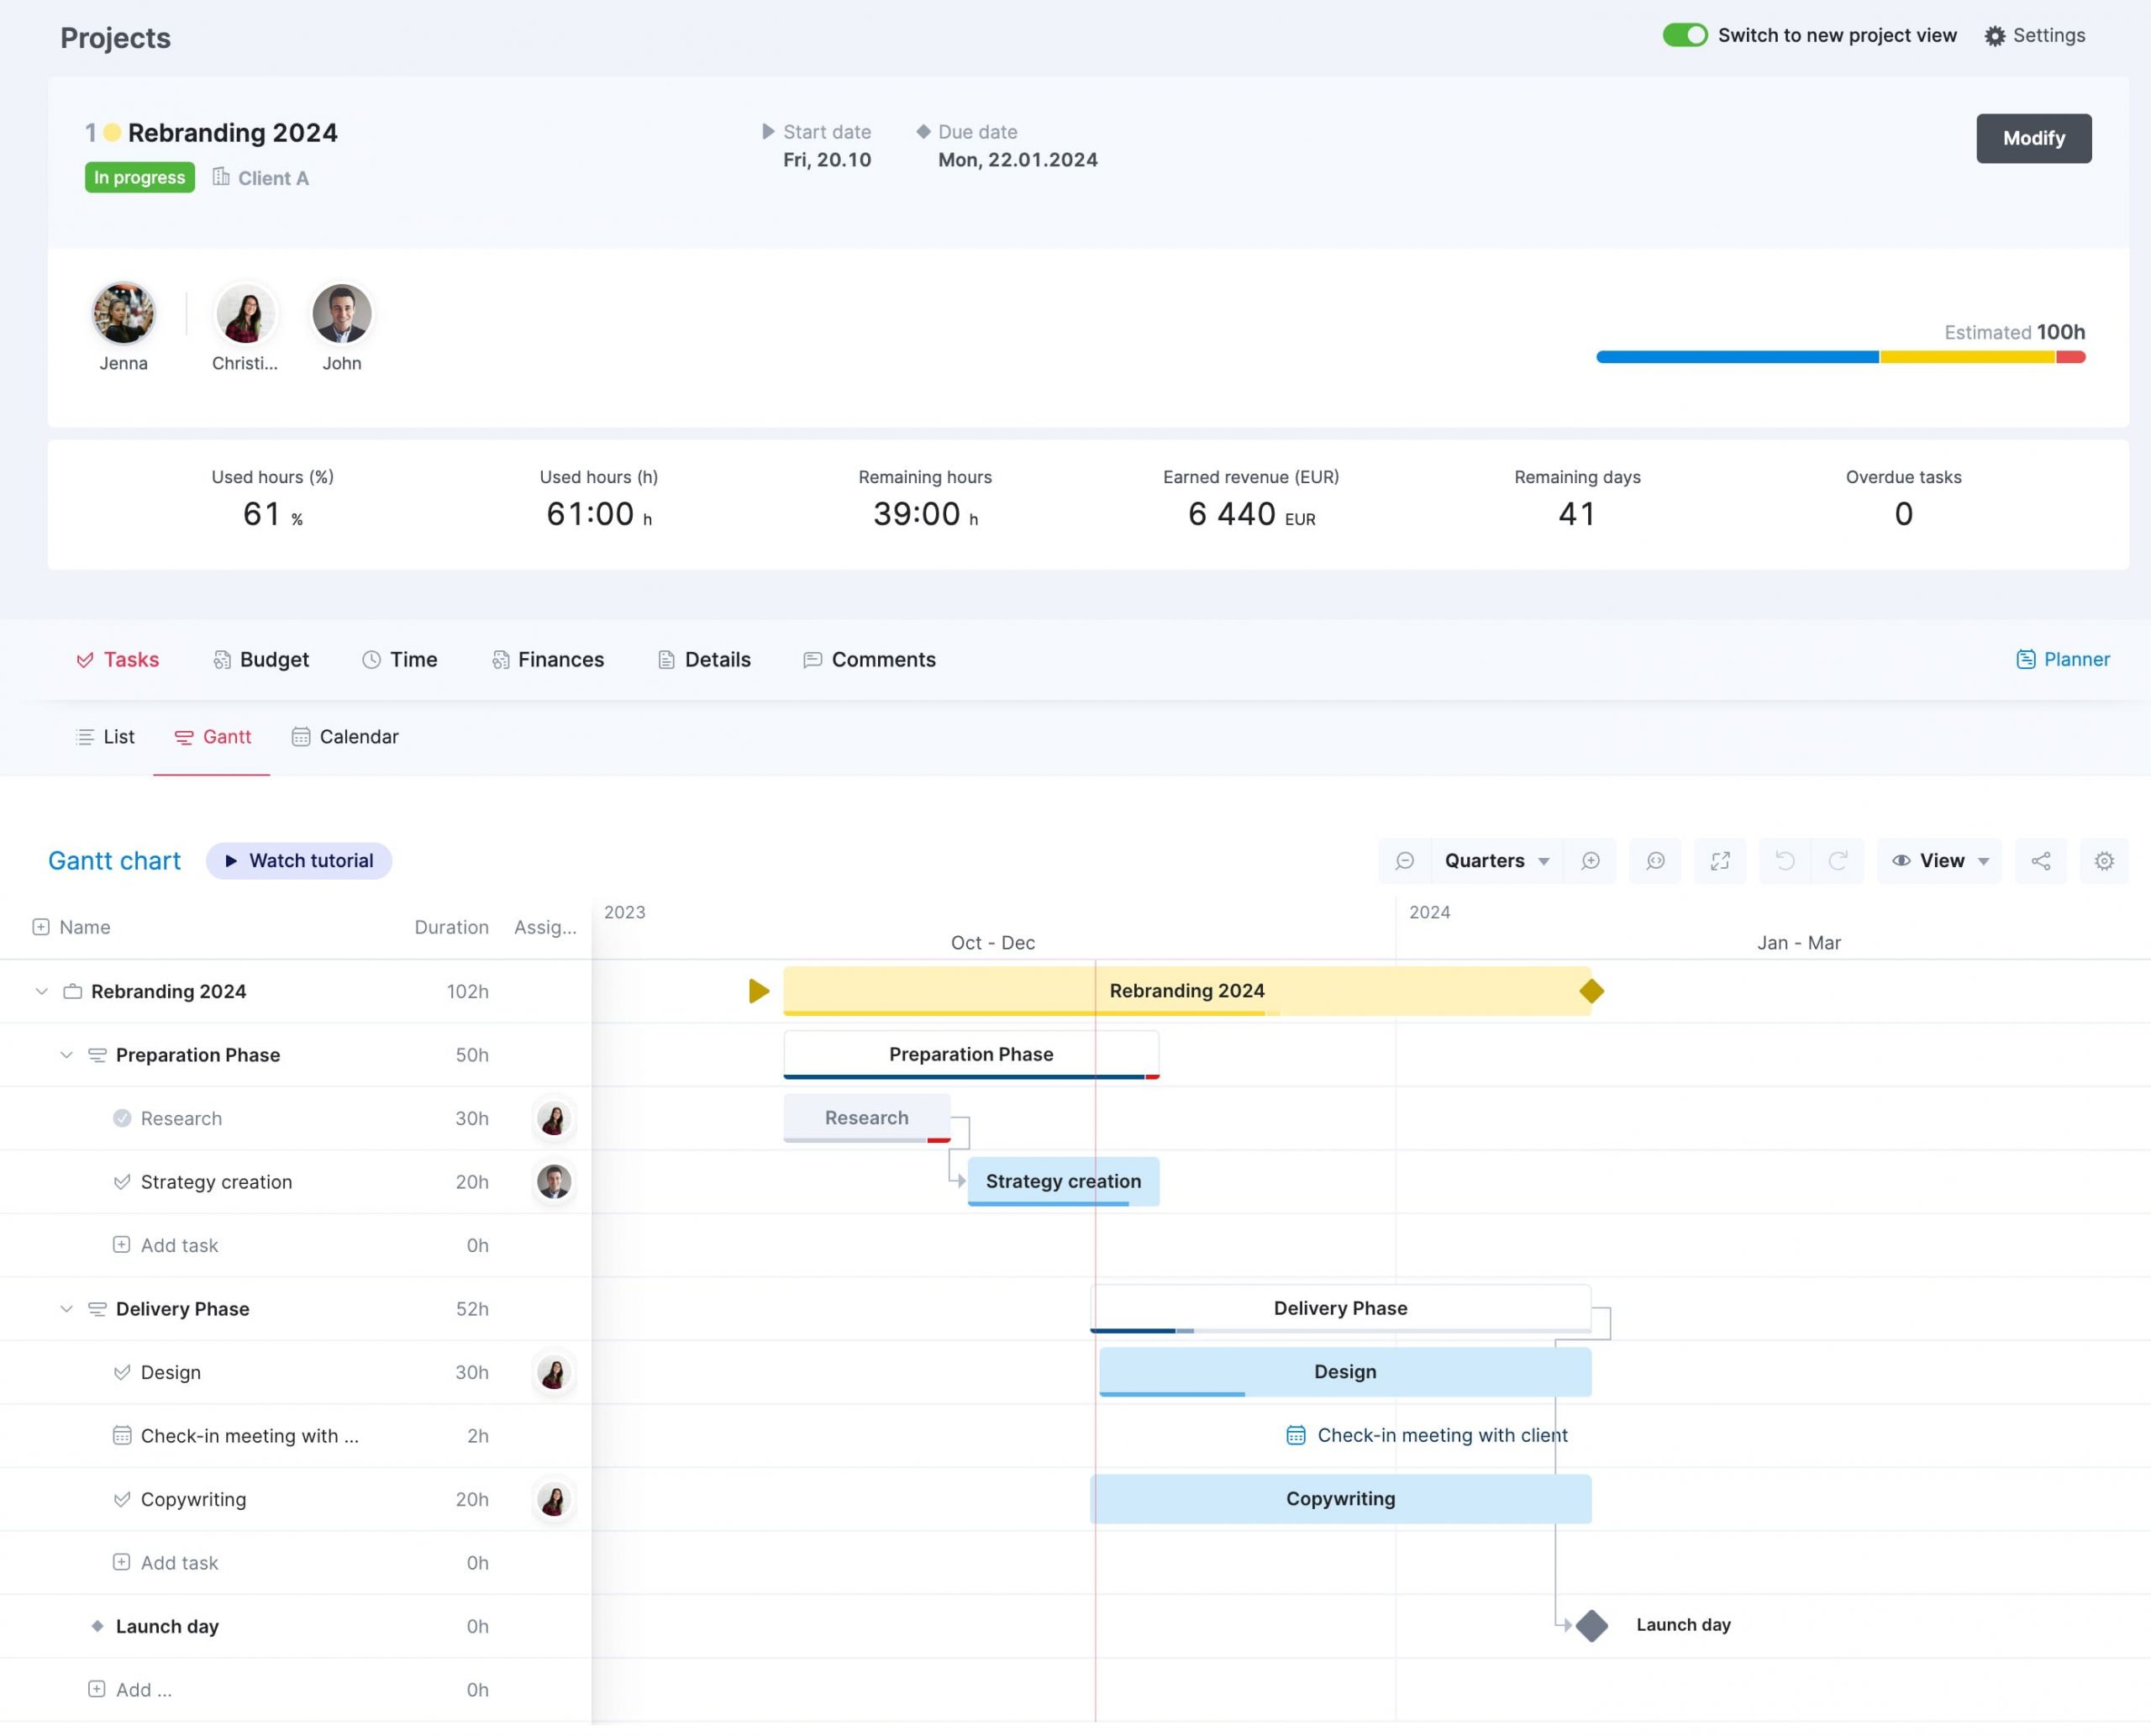
Gantt charts let you clearly visualize the flow of your critical path and activities. Key project events and deadlines are typically marked with special symbols on the chart. These visual cues make it easy to spot important deadlines and track overall project progress.
Gantt charts are particularly useful for tracking dependencies—tasks that can’t start or finish until a separate task is started or finished. In Scoro’s Gantt chart above, dependencies are shown with arrows connecting related tasks.
This way, you can quickly identify and address potential project hold-ups before they totally derail your project.
Kanban board
- What it looks like: Tasks are represented as cards or sticky notes arranged in vertical columns on a board. Each column represents a different workflow stage (e.g., “To Do,” “In Progress,” “Done”)
- Best for: Teams working on ongoing projects or processes with a steady flow of tasks, such as software maintenance, customer support, or content creation
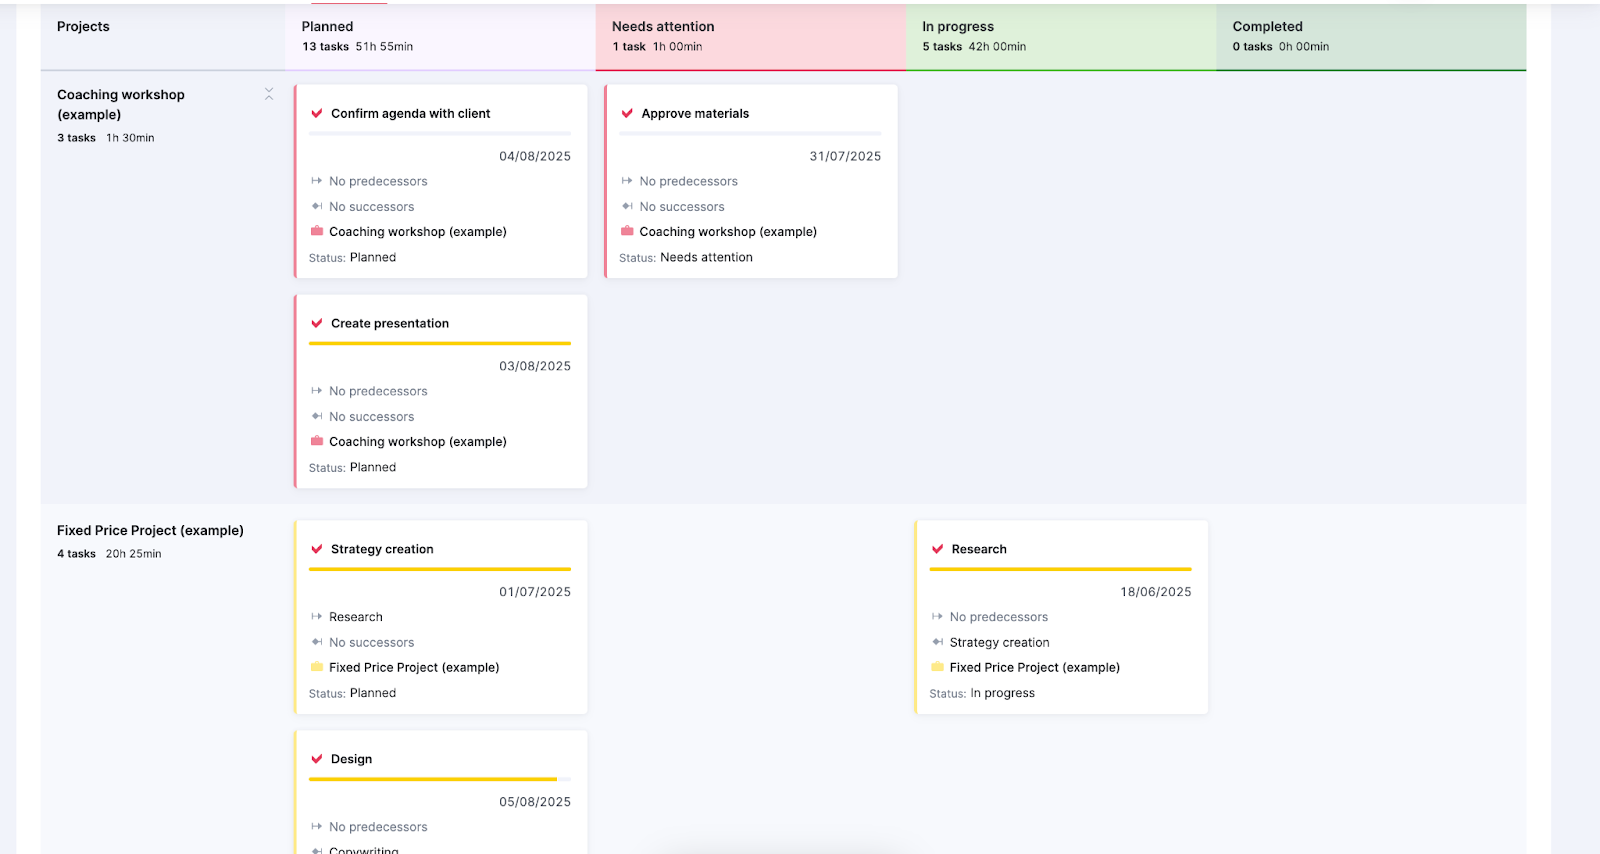
A Kanban board like Scoro’s “Task board” categorizes tasks under columns that represent different stages of completion. Tasks are moved between columns in real time to reflect progress.
Kanban boards are great for highlighting bottlenecks, limiting overutilization, and promoting a flexible workflow that lets your team quickly adapt to changing priorities.
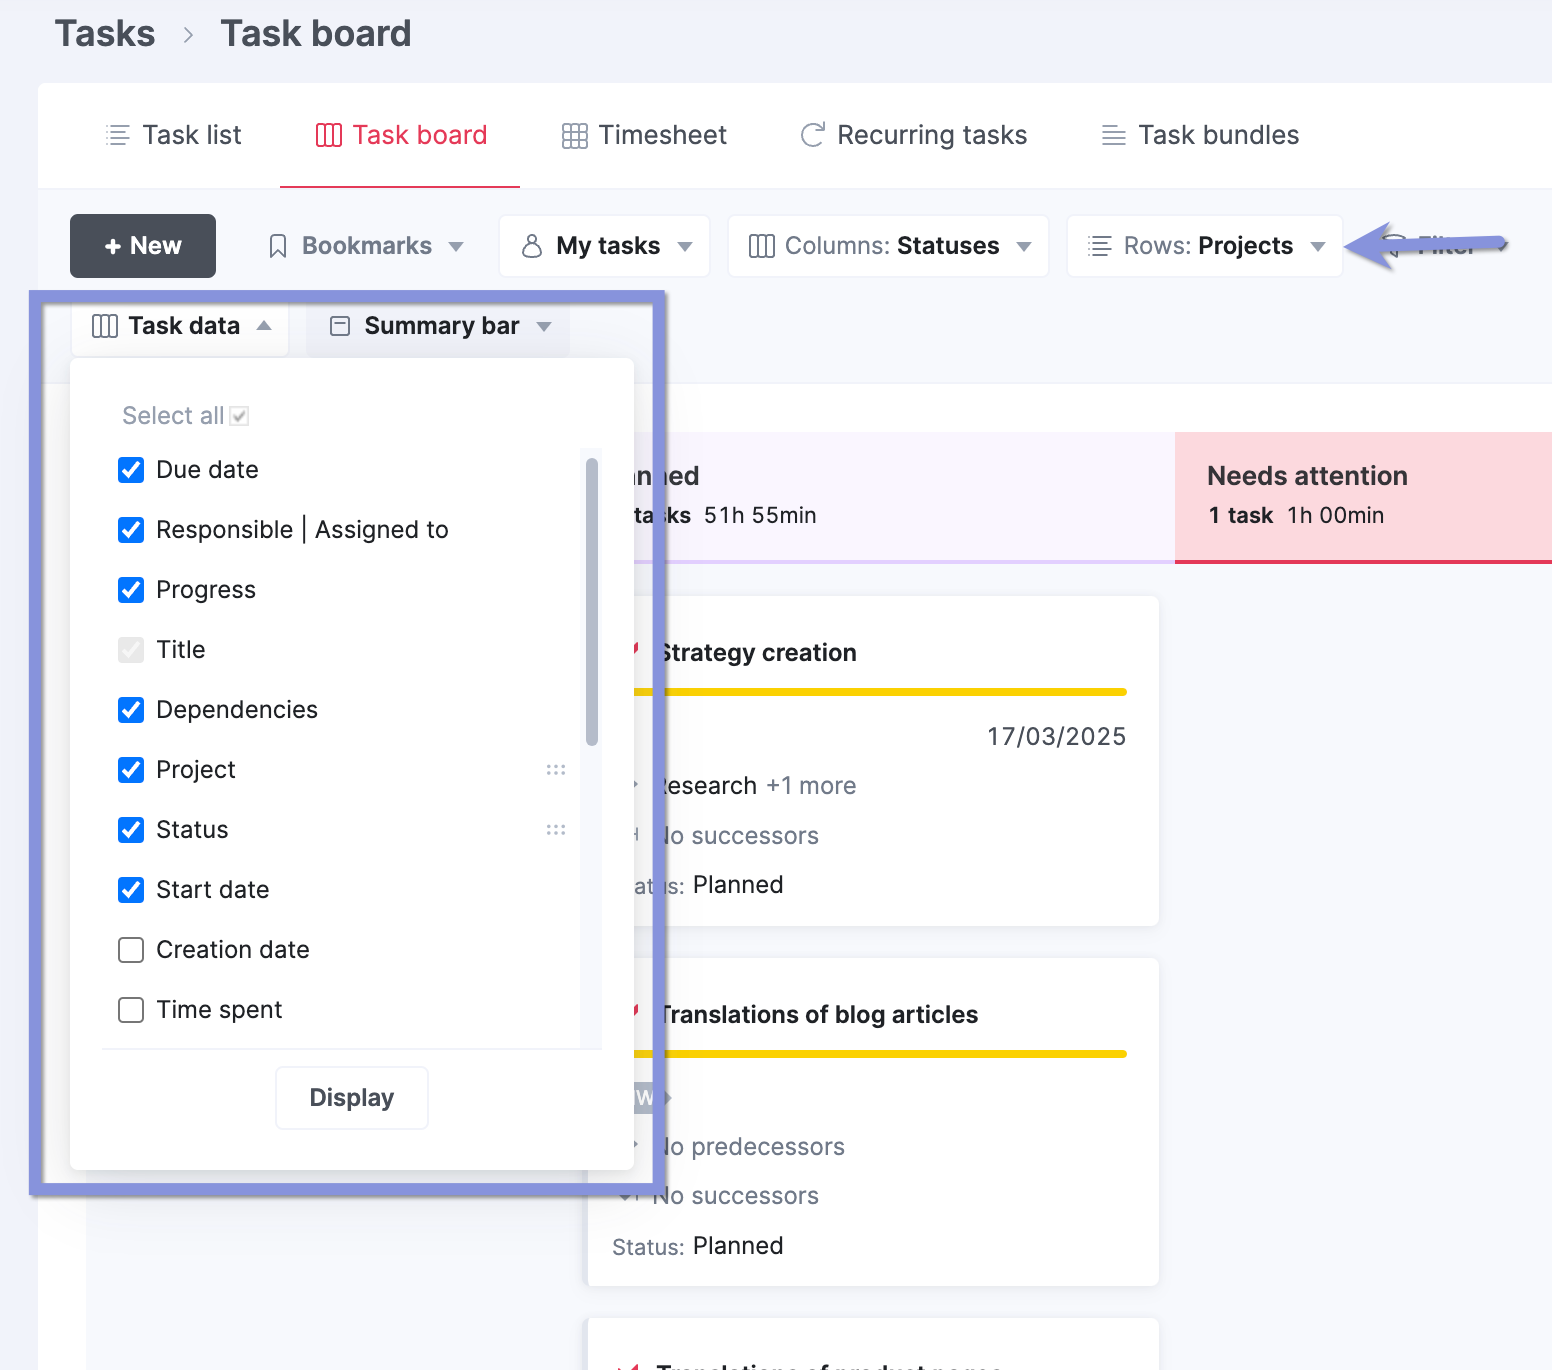
Traditional Kanban boards don’t usually have explicit task dependency features. But Scoro’s “Task board” offers a unique advantage, allowing you to visually represent dependencies between tasks with arrow and diamond markets that show predecessors and successors.
And you can customize what info you see on each card using the “Task data” filter:
Calendar timeline
- What it looks like: Tasks and events are plotted directly onto calendar dates, usually with color-coding and brief descriptions
- Best for: Projects with fixed dates and deadlines, especially those involving multiple stakeholders or team members with different schedules
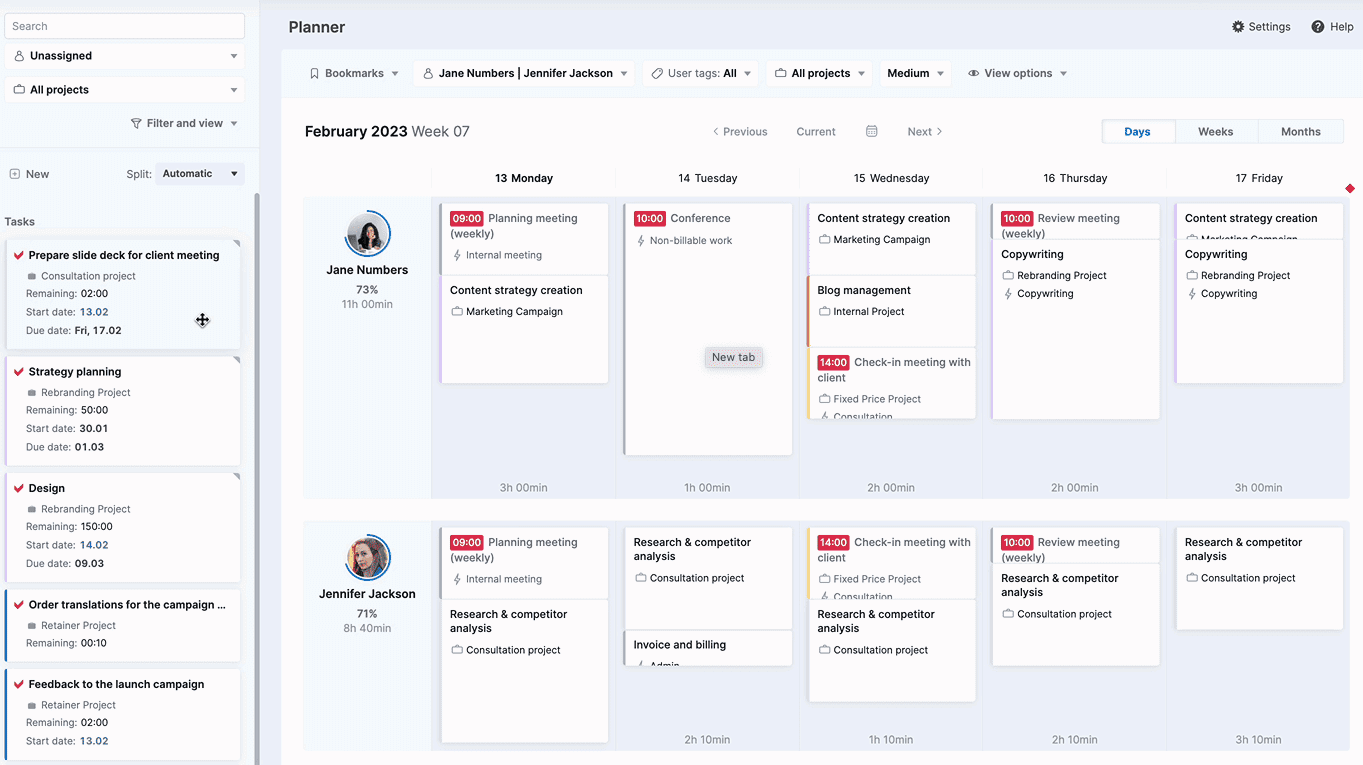
A calendar timeline displays project tasks in a traditional daily, weekly, or monthly calendar format. It shows a familiar, date-based view of project activities that makes it easy to see which days need more work.
While they don’t typically show explicit task dependencies, the calendar’s sequential arrangement of tasks on specific dates implies a natural flow of work.
And you can clearly mark key project milestones and deadlines with special icons, colors, or labels to make them stand out from regular tasks.
They’re especially useful for long-term projects that require a clear month-by-month overview. Like event planning or marketing campaigns. Since you can see your team’s workload distribution over time, you can avoid overbooking and make sure everyone has balanced assignments.
Scoro’s “Planner” tool builds on a traditional calendar, listing out each team member’s current utilization rate and remaining availability alongside their individual schedules. So you can easily keep an eye on their availability without burning them out.
Multi-project timeline view
- What it looks like: Projects are typically displayed as horizontal bars on a shared timeline, with each bar representing the length of a project
- Best for: Organizations managing multiple projects at the same time, especially those with shared teams or interdependencies
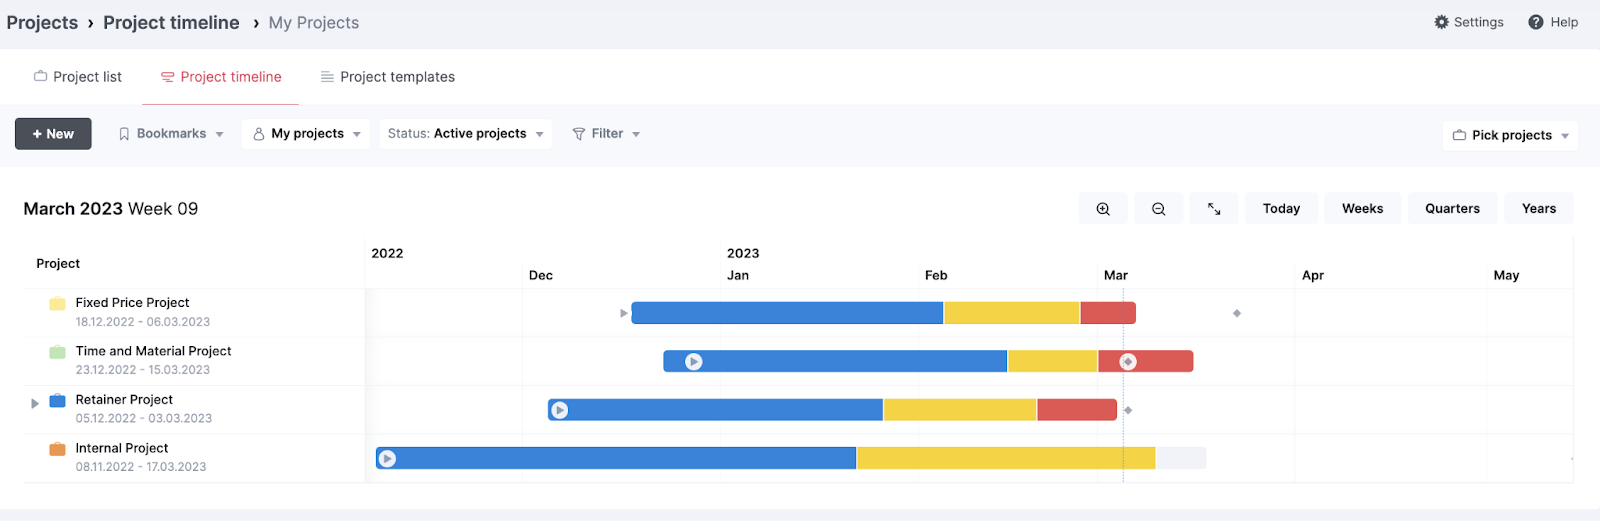
A multi-project timeline view like Scoro’s “Project timeline” lets you keep an eye on both current and upcoming projects, showing their durations, status, and key dates on a single screen. Important milestones are often represented as diamonds on the chart.
Multi-project timelines are great for project portfolio management, identifying potential resource conflicts, and making informed decisions about project priorities and scheduling. Visualizing resource use and deadlines across projects ensures smoother workflows and prevents costly delays.
While multi-project timelines don’t usually show detailed task dependencies, they can reveal project overlaps and scheduling conflicts across multiple projects.
Key benefits of creating project management timelines
According to Wellingtone’s “The State of Project Management” report, just 34% of surveyed organizations “mostly or always” finish projects on time—emphasizing a clear need for a better approach to deadline management.
Enter detailed timelines, which let you visualize the entire project scope and due dates, identify potential bottlenecks, and proactively adjust plans and staffing.
Developing comprehensive timelines also provides valuable data to help you estimate future project lengths more accurately. And lets you start objectively measuring important project management KPIs, such as on-time delivery and overdue task volume.
Timelines also help:
- Enhance stakeholder communication: A clear, visual representation of project progress makes it easier to keep team members on the same page. And regular timeline updates build trust with clients and help manage expectations throughout the project lifecycle.
- Prevent scope creep: By clearly defining project phases and milestones, timelines help teams stay focused on agreed-upon deliverables and quickly determine when new requests fall outside the original scope.
- Optimize resource planning: Timelines let you see when specific roles and skills are needed, helping to balance workloads and avoid over- or under-utilizing team members.
- Improve risk management: Visualizing the timeline lets you pinpoint potential scheduling conflicts and dependencies that could lead to delays before the project kicks off, allowing you to address risks early on.
- Boost team morale: Clear timelines give team members a sense of direction and accomplishment as they complete tasks and reach milestones. They also avoid frustrating hold-ups caused by waiting for others to finish work before they can start their own.
How to create a project timeline
A clear timeline guides your team through each phase and helps them anticipate what’s next.
Whether you’re managing a small team or overseeing multiple complex projects, use these steps to build timelines that keep your team aligned—and keep your projects on track and profitable.
1. Define the project scope
First, clearly outline the project’s objectives, deliverables, and constraints. By establishing these parameters up front, you’ll set the foundation for a realistic, achievable timeline.
A defined project scope also provides a basis for making informed decisions throughout the project.
With everything laid out, it’s easier to push back on scope creep and make sure your team doesn’t get overextended.
Let’s consider a marketing agency tasked with rebranding a client’s product line:
- Objectives: Specific goals to accomplish with the project
- Example: “Modernize the client’s brand identity across all product lines, increasing brand recognition by 25% within six months of launch”
- Deliverables: Tangible outcomes or products your team will produce during the project
- Examples: New logo and visual identity guidelines, designed packaging for the entire product line, updated website design and content
- Constraints: Limitations or restrictions related to time, budget, resources, or external factors that may impact the project’s execution.
- Examples: A fixed project budget of $250,000 for the entire rebranding project, a deadline to launch before the holiday shopping season, and limited availability of the client’s key decision-makers for approvals
Now, the agency has a clear starting point to create a timeline that accurately reflects the project’s core requirements.
2. Break down the project into phases, services, or tasks
With your project’s scope outlined, the next step is to break it down into smaller, manageable parts to ensure no work is overlooked.
Known as creating a Work Breakdown Structure (WBS), this process helps:
- Provide a clear structure for tracking project progress
- Accurately estimate the time and staff you’ll need to complete the project
- Support conflict-free resource scheduling
In general, there are three ways to break down your project:
- Phase-level breakdown: Best for large, complex projects with distinct stages. This approach divides the project into major milestones to give a high-level view of project progress.
- Service-level breakdown: Ideal for projects involving multiple departments or specialized teams. It organizes tasks by the type of work or expertise required, which helps with staffing and team coordination.
- Task-level breakdown: Most suitable for day-to-day operations. This method breaks down work into specific, actionable tasks for clear assignments and progress tracking.
How you break down your project depends on its complexity and your team’s working style. Combine these approaches or pick one—whatever works best for your unique circumstances.
For example, a complex project might use all three: phases to outline the overall progression, service-level to organize different work areas, and task-level for detailed execution planning.
Let’s look at a quick breakdown for a market research project:
| Level of breakdwon | Item | Description |
|---|---|---|
| Phase | Research Planning | Define research objectives, methodology, and target audience |
| Service | Data Collection | Conduct surveys, interviews, and focus groups |
| Task | Develop survey | Create survey questions and structure |
| Task Task | Recruit participants Review survey data | Identify and contact potential survey participants Analyze and interpret collected data |
You can reflect your initial WBS in your Scoro quote.
Head to the “Quotes” module in the navigation bar. And click “+New” to create a new quote.
As you enter different phases, click on the [+] icon on the left-hand side of a quote line to add subheadings for related services and tasks. This gives your project a clear structure. And gives clients the chance to add or remove project activities before it kicks off.
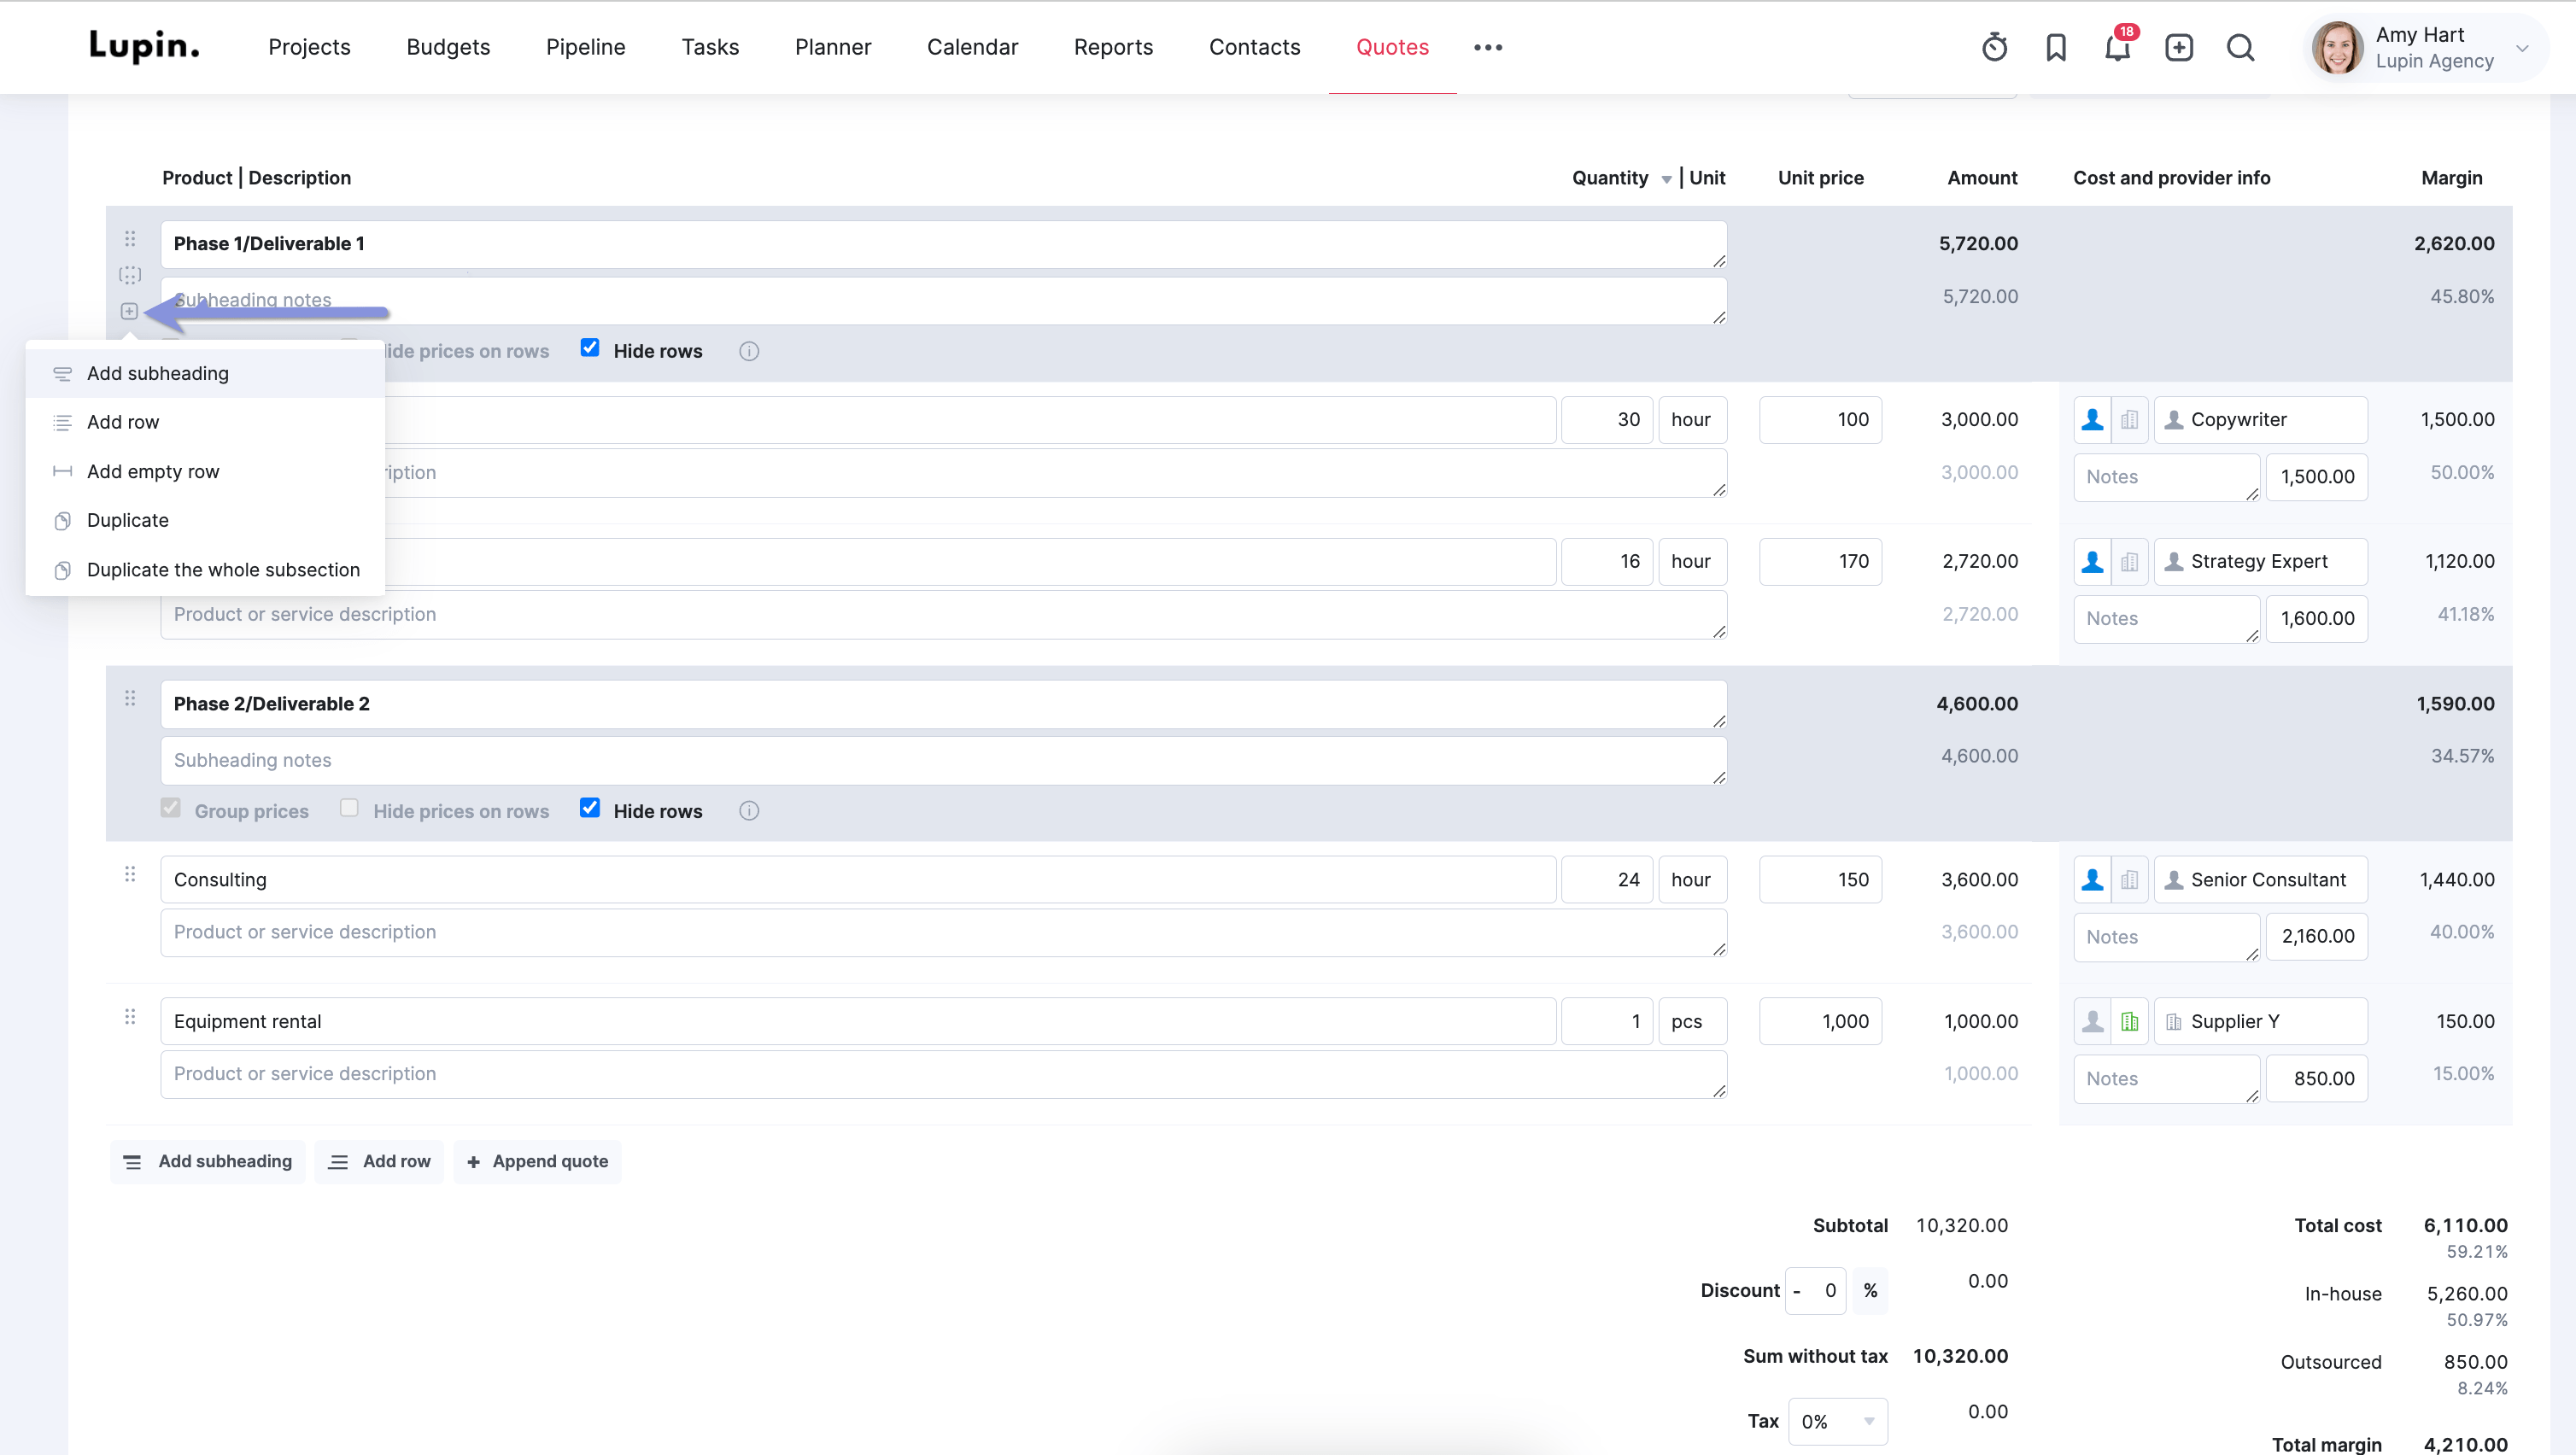
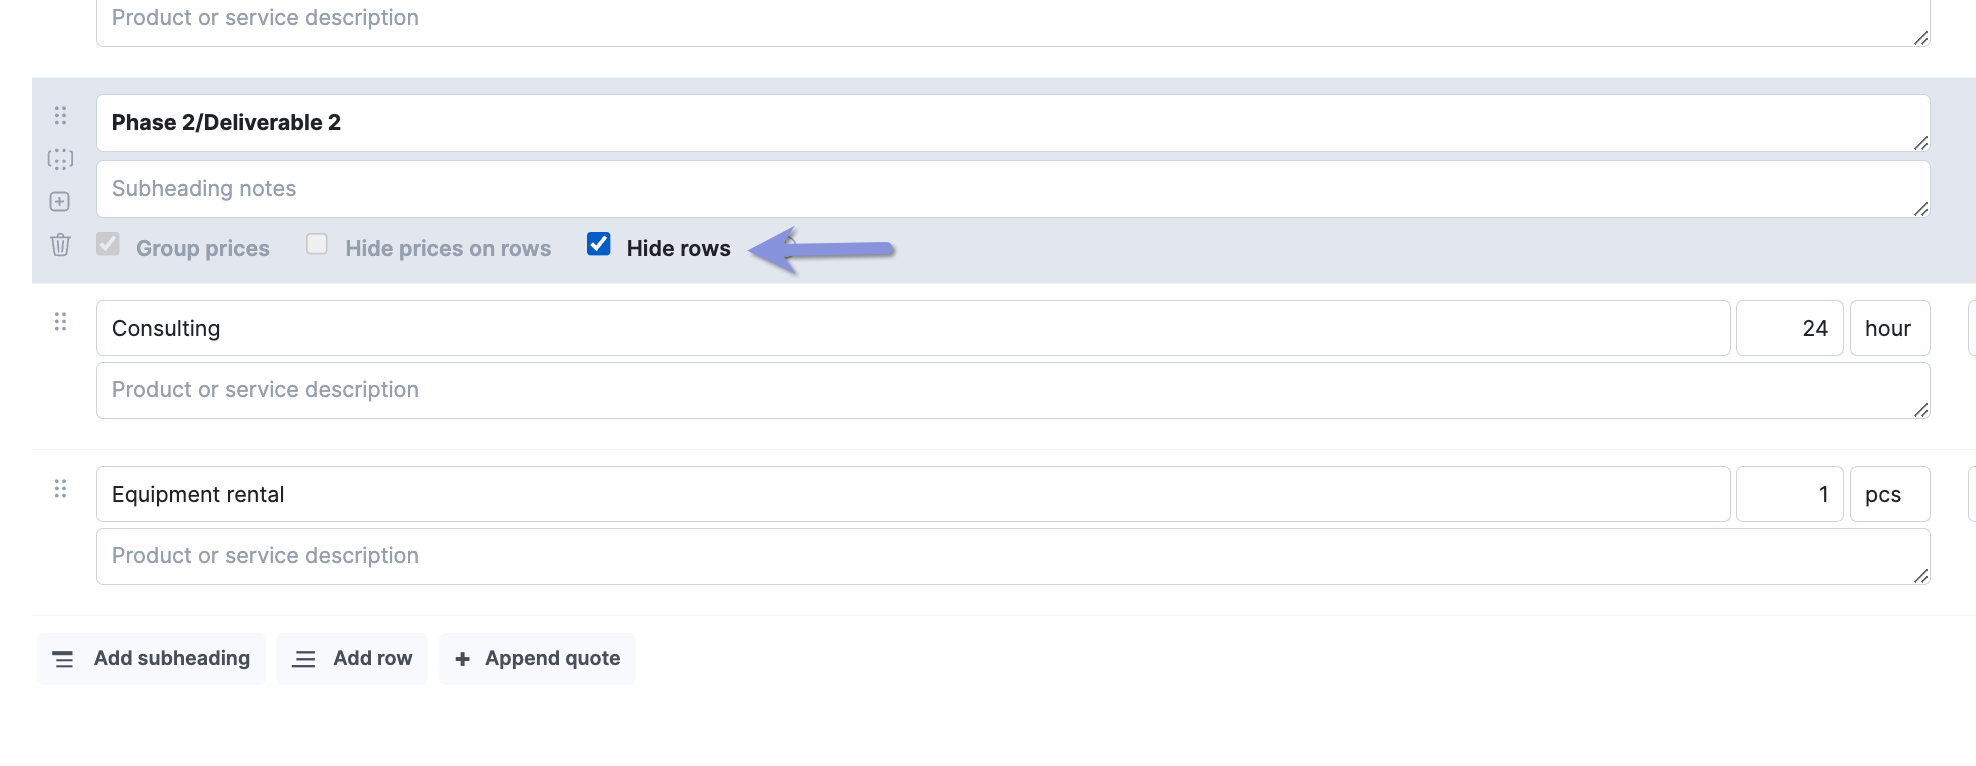
Top Tip
If your quote contains detailed service information that’s only relevant to your internal team, use subheadings to hide those details and only show the high-level info to your client.
3. Estimate durations for each phase, service, and task
You need accurate time estimates to create a feasible timeline that works for both your team and clients.
Instead of working off your best guesses, consider these factors when setting deadlines:
- Historical data: Review past project timelines to gauge how long similar tasks or phases typically take. And use this to info shape your time estimates.
- Team input: Ask team members about how much time is reasonable to complete certain tasks. Since they’re the ones doing the work, they can offer valuable insights into task complexities and potential challenges you might not have considered.
- Resource availability: Check your team’s schedule (and freelancer schedules) as well as their utilization rates. If everyone is pretty slammed, you’ll need to build in more time.
- Cost estimates: Consider your budget, labor costs, bills, and expenses. These factors influence your project priorities as well as your staffing decisions.
After evaluating those different factors, you’re in a solid position to list out how long different work activities should take. For example, in a market research project, you might estimate the following:
| Level of breakdown | Item | Estimated duration |
|---|---|---|
| Phase | Research Planning | Two weeks |
| Service | Data Collection | One week |
| Task | Develop survey | Three days |
| Task | Recruit participants | Two days |
Use Scoro to quickly add time frames for each phase, service, or line item when creating your quote.
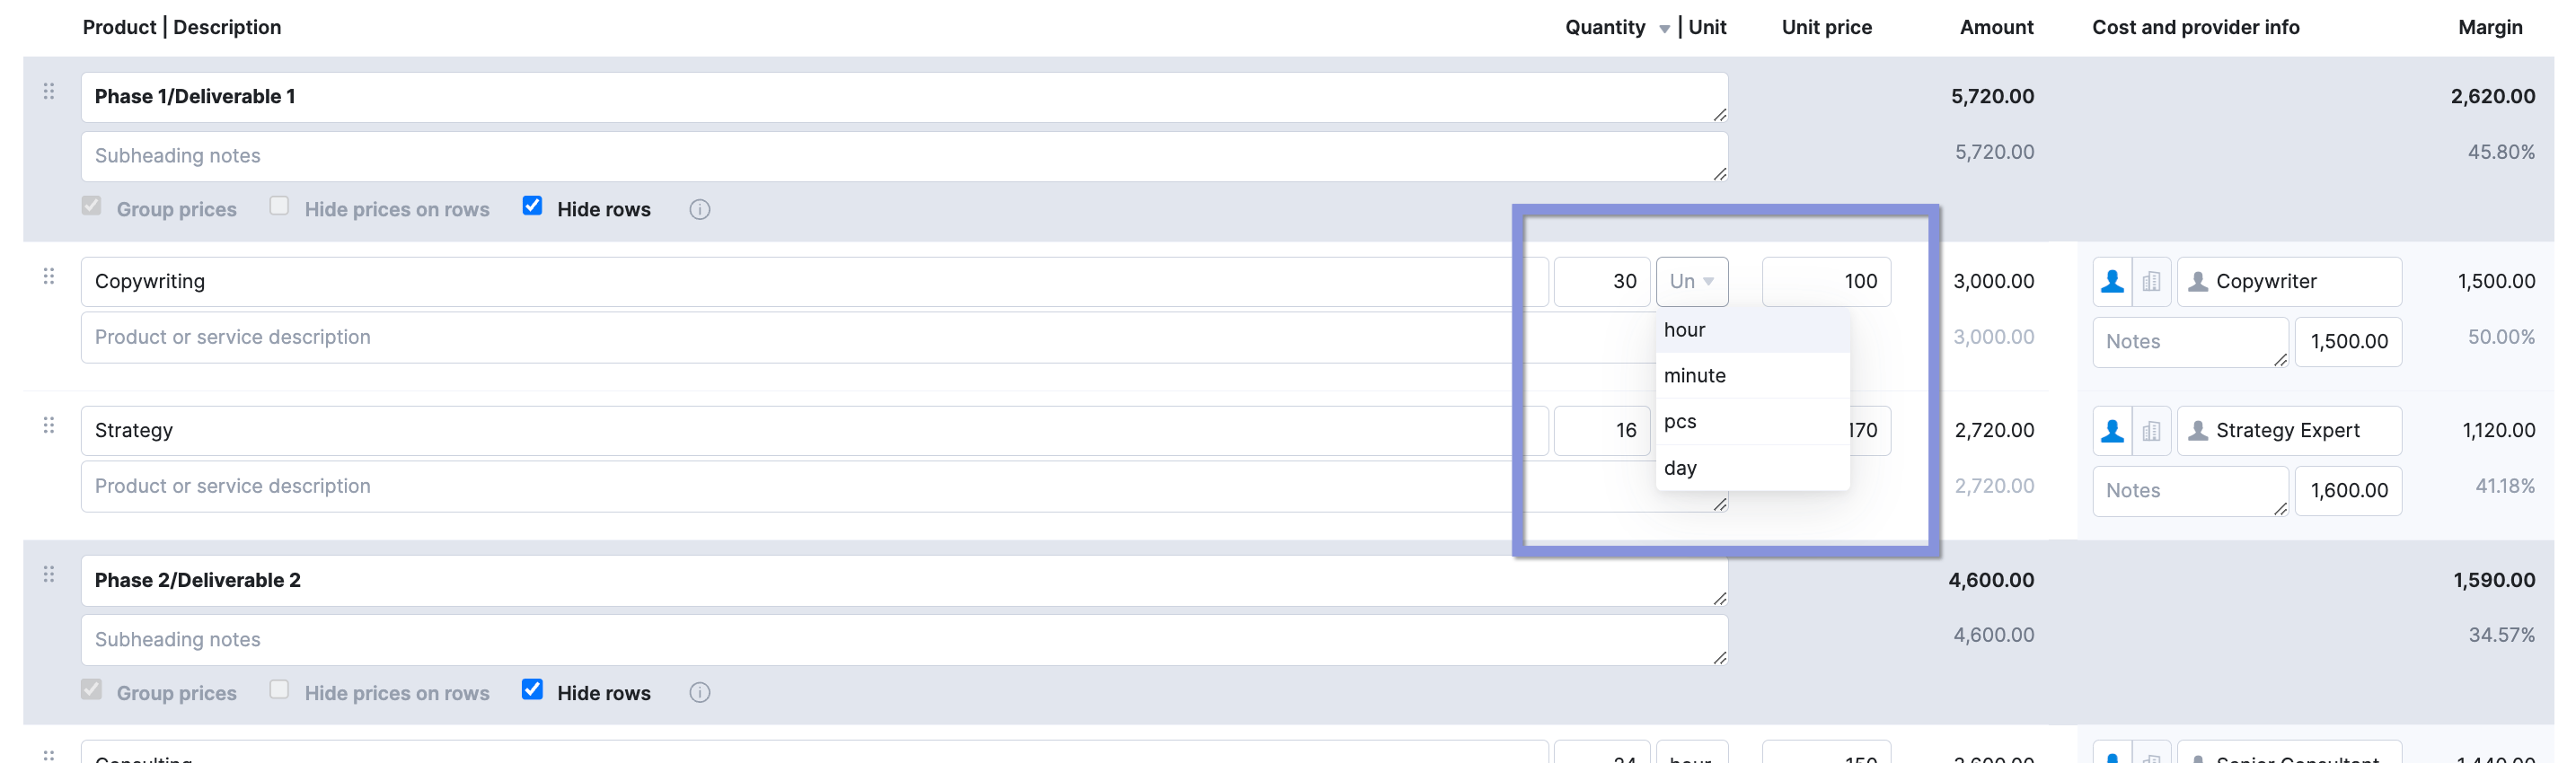
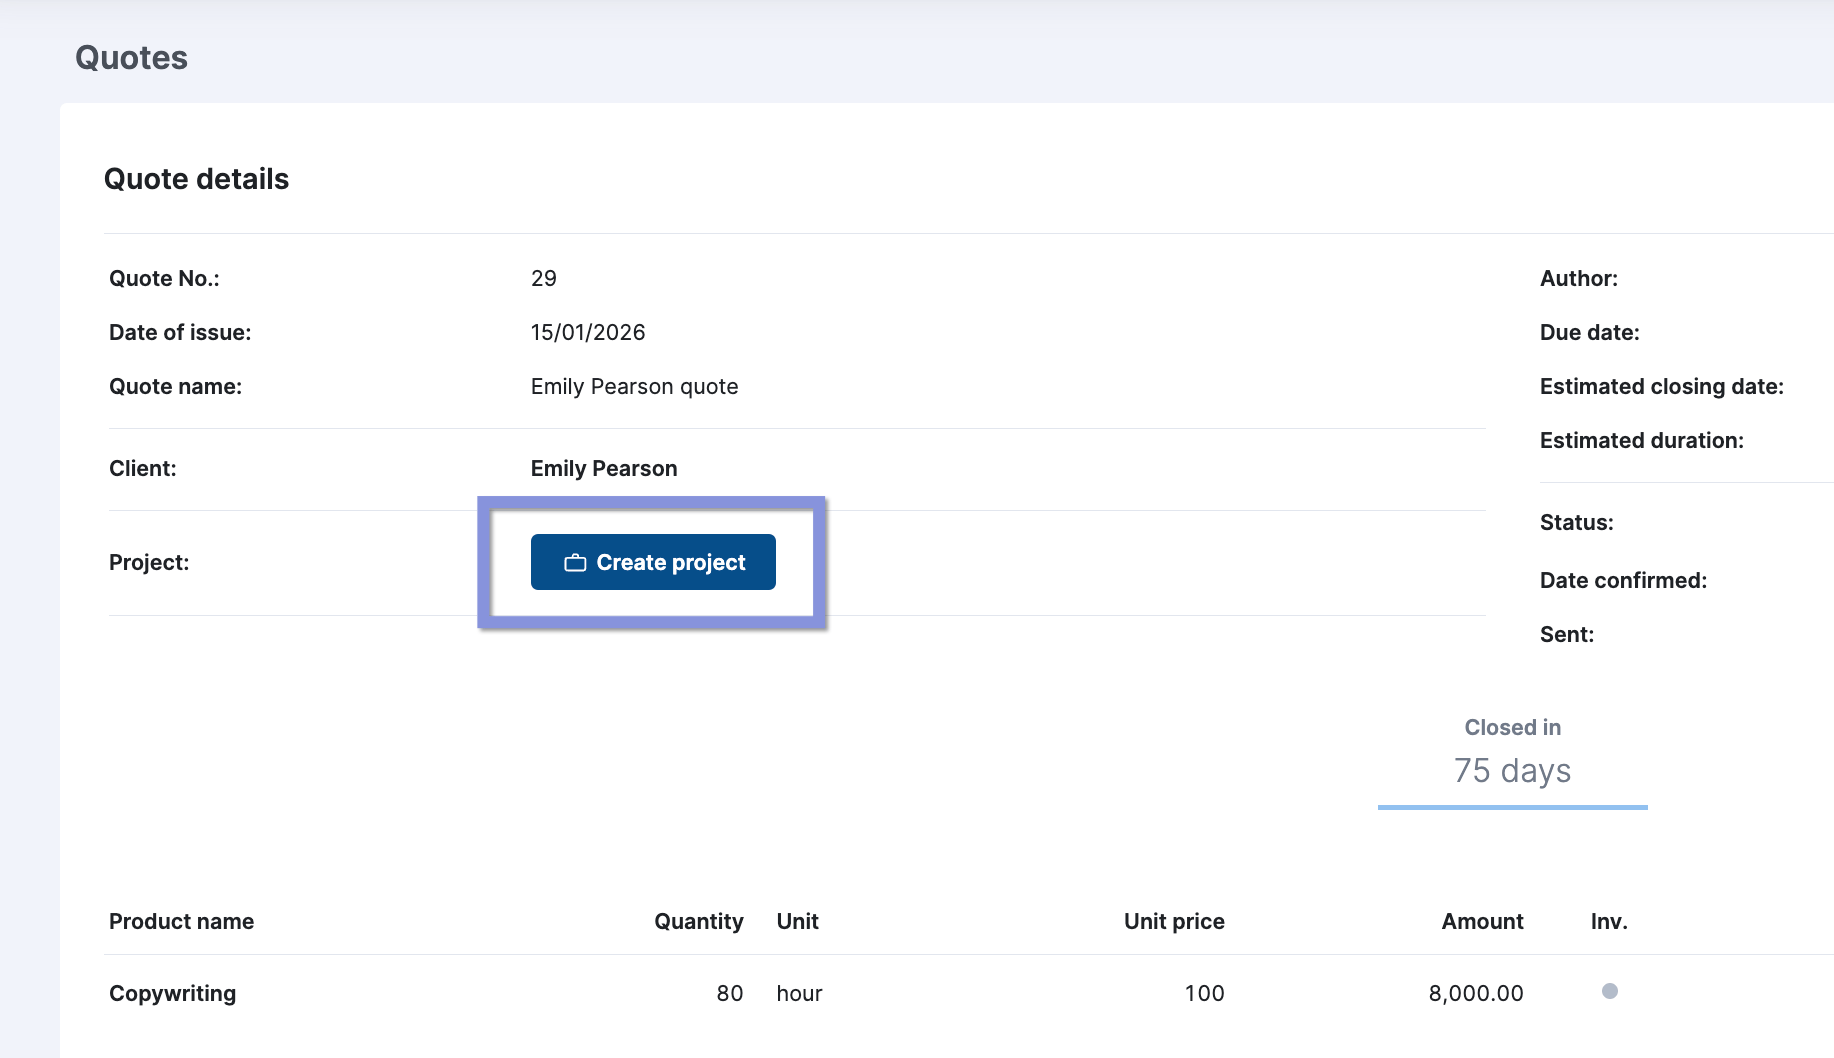
Then, click the “Create project” button to convert the quote into your initial project plan.
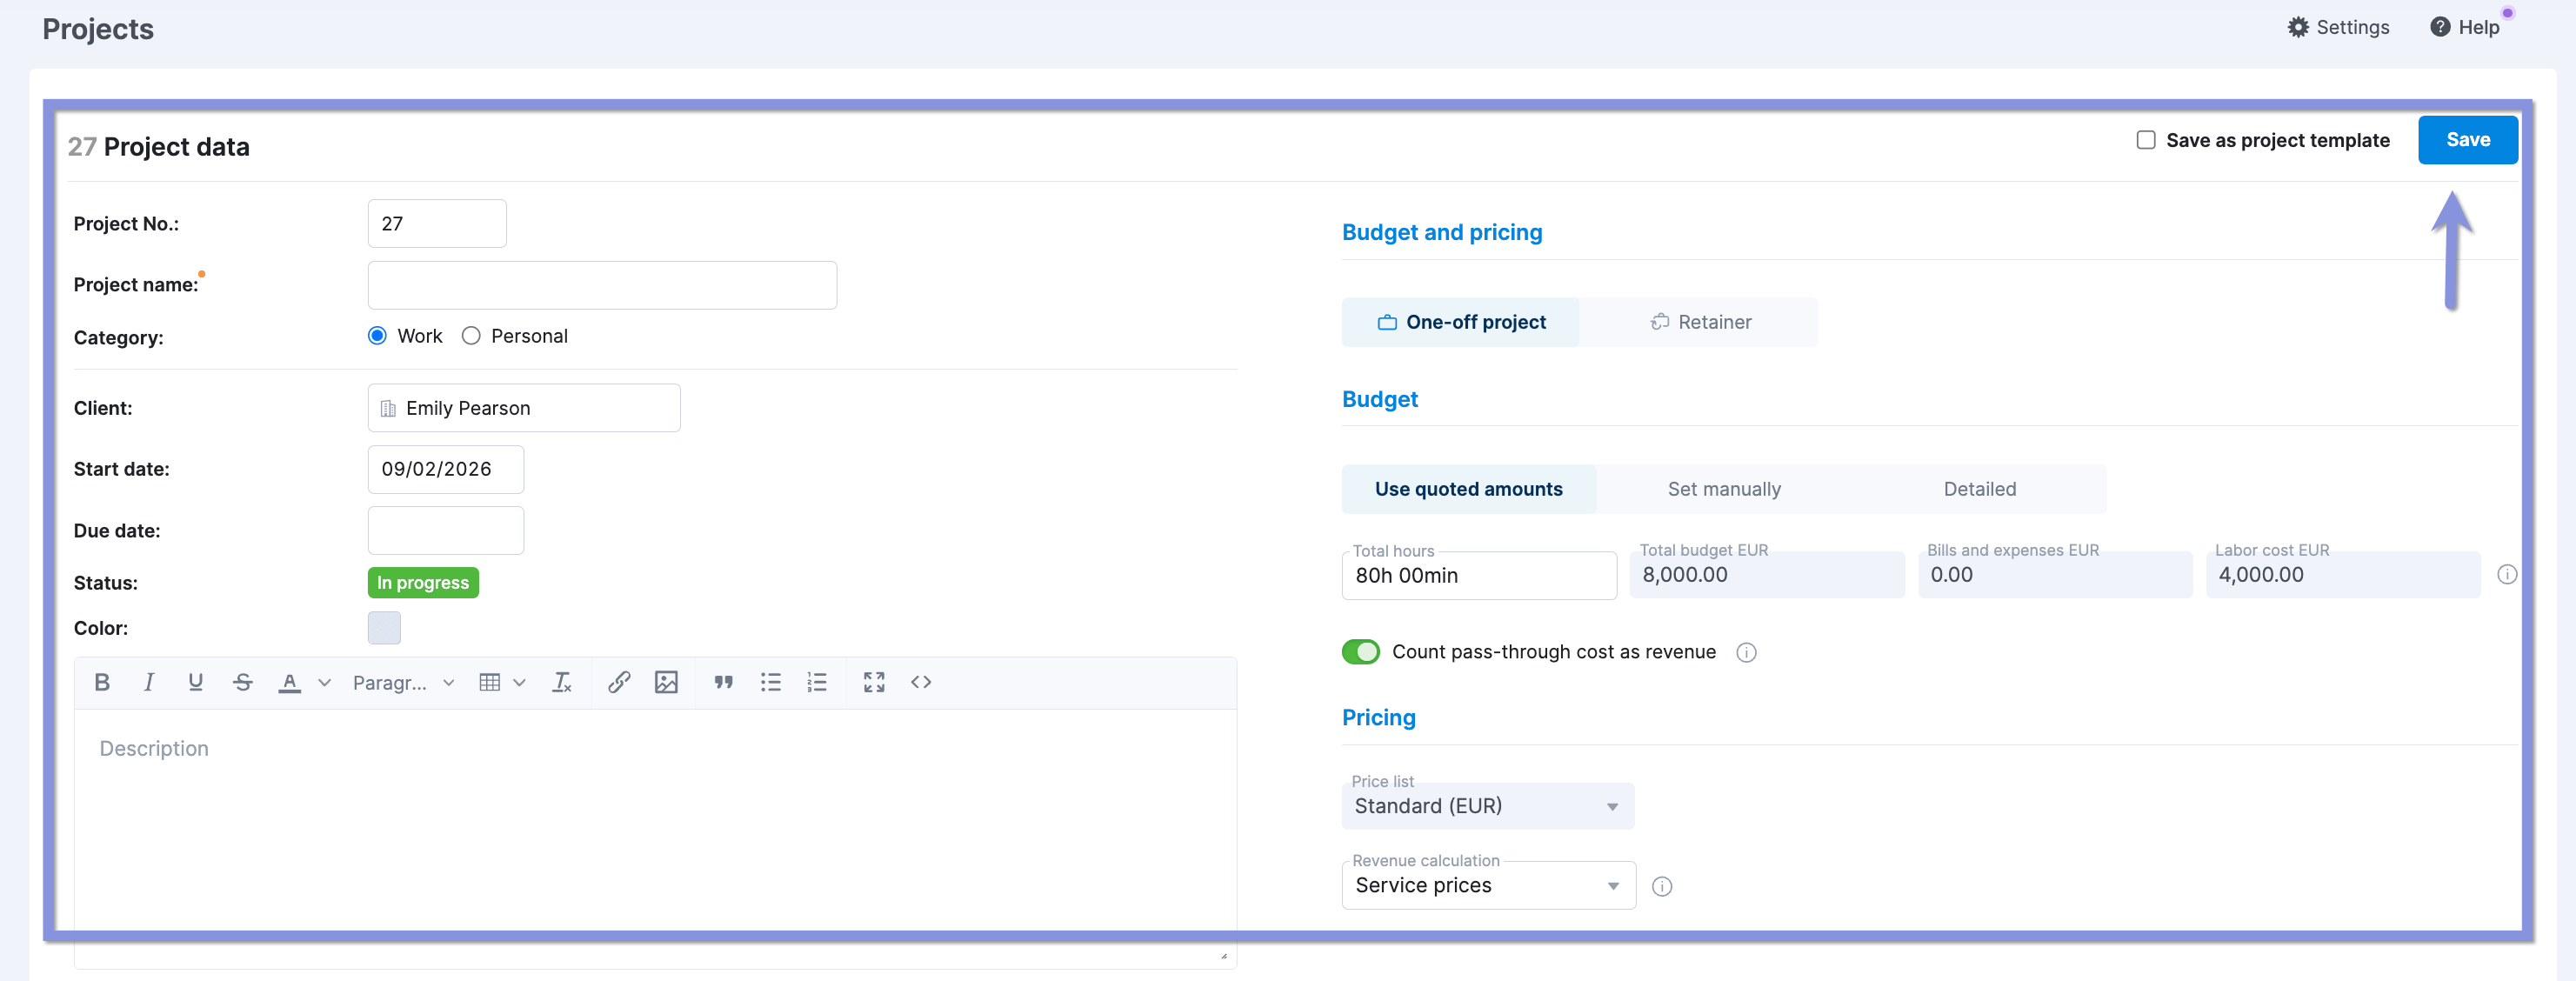
Next, fill out the project details and click “Save” when done.
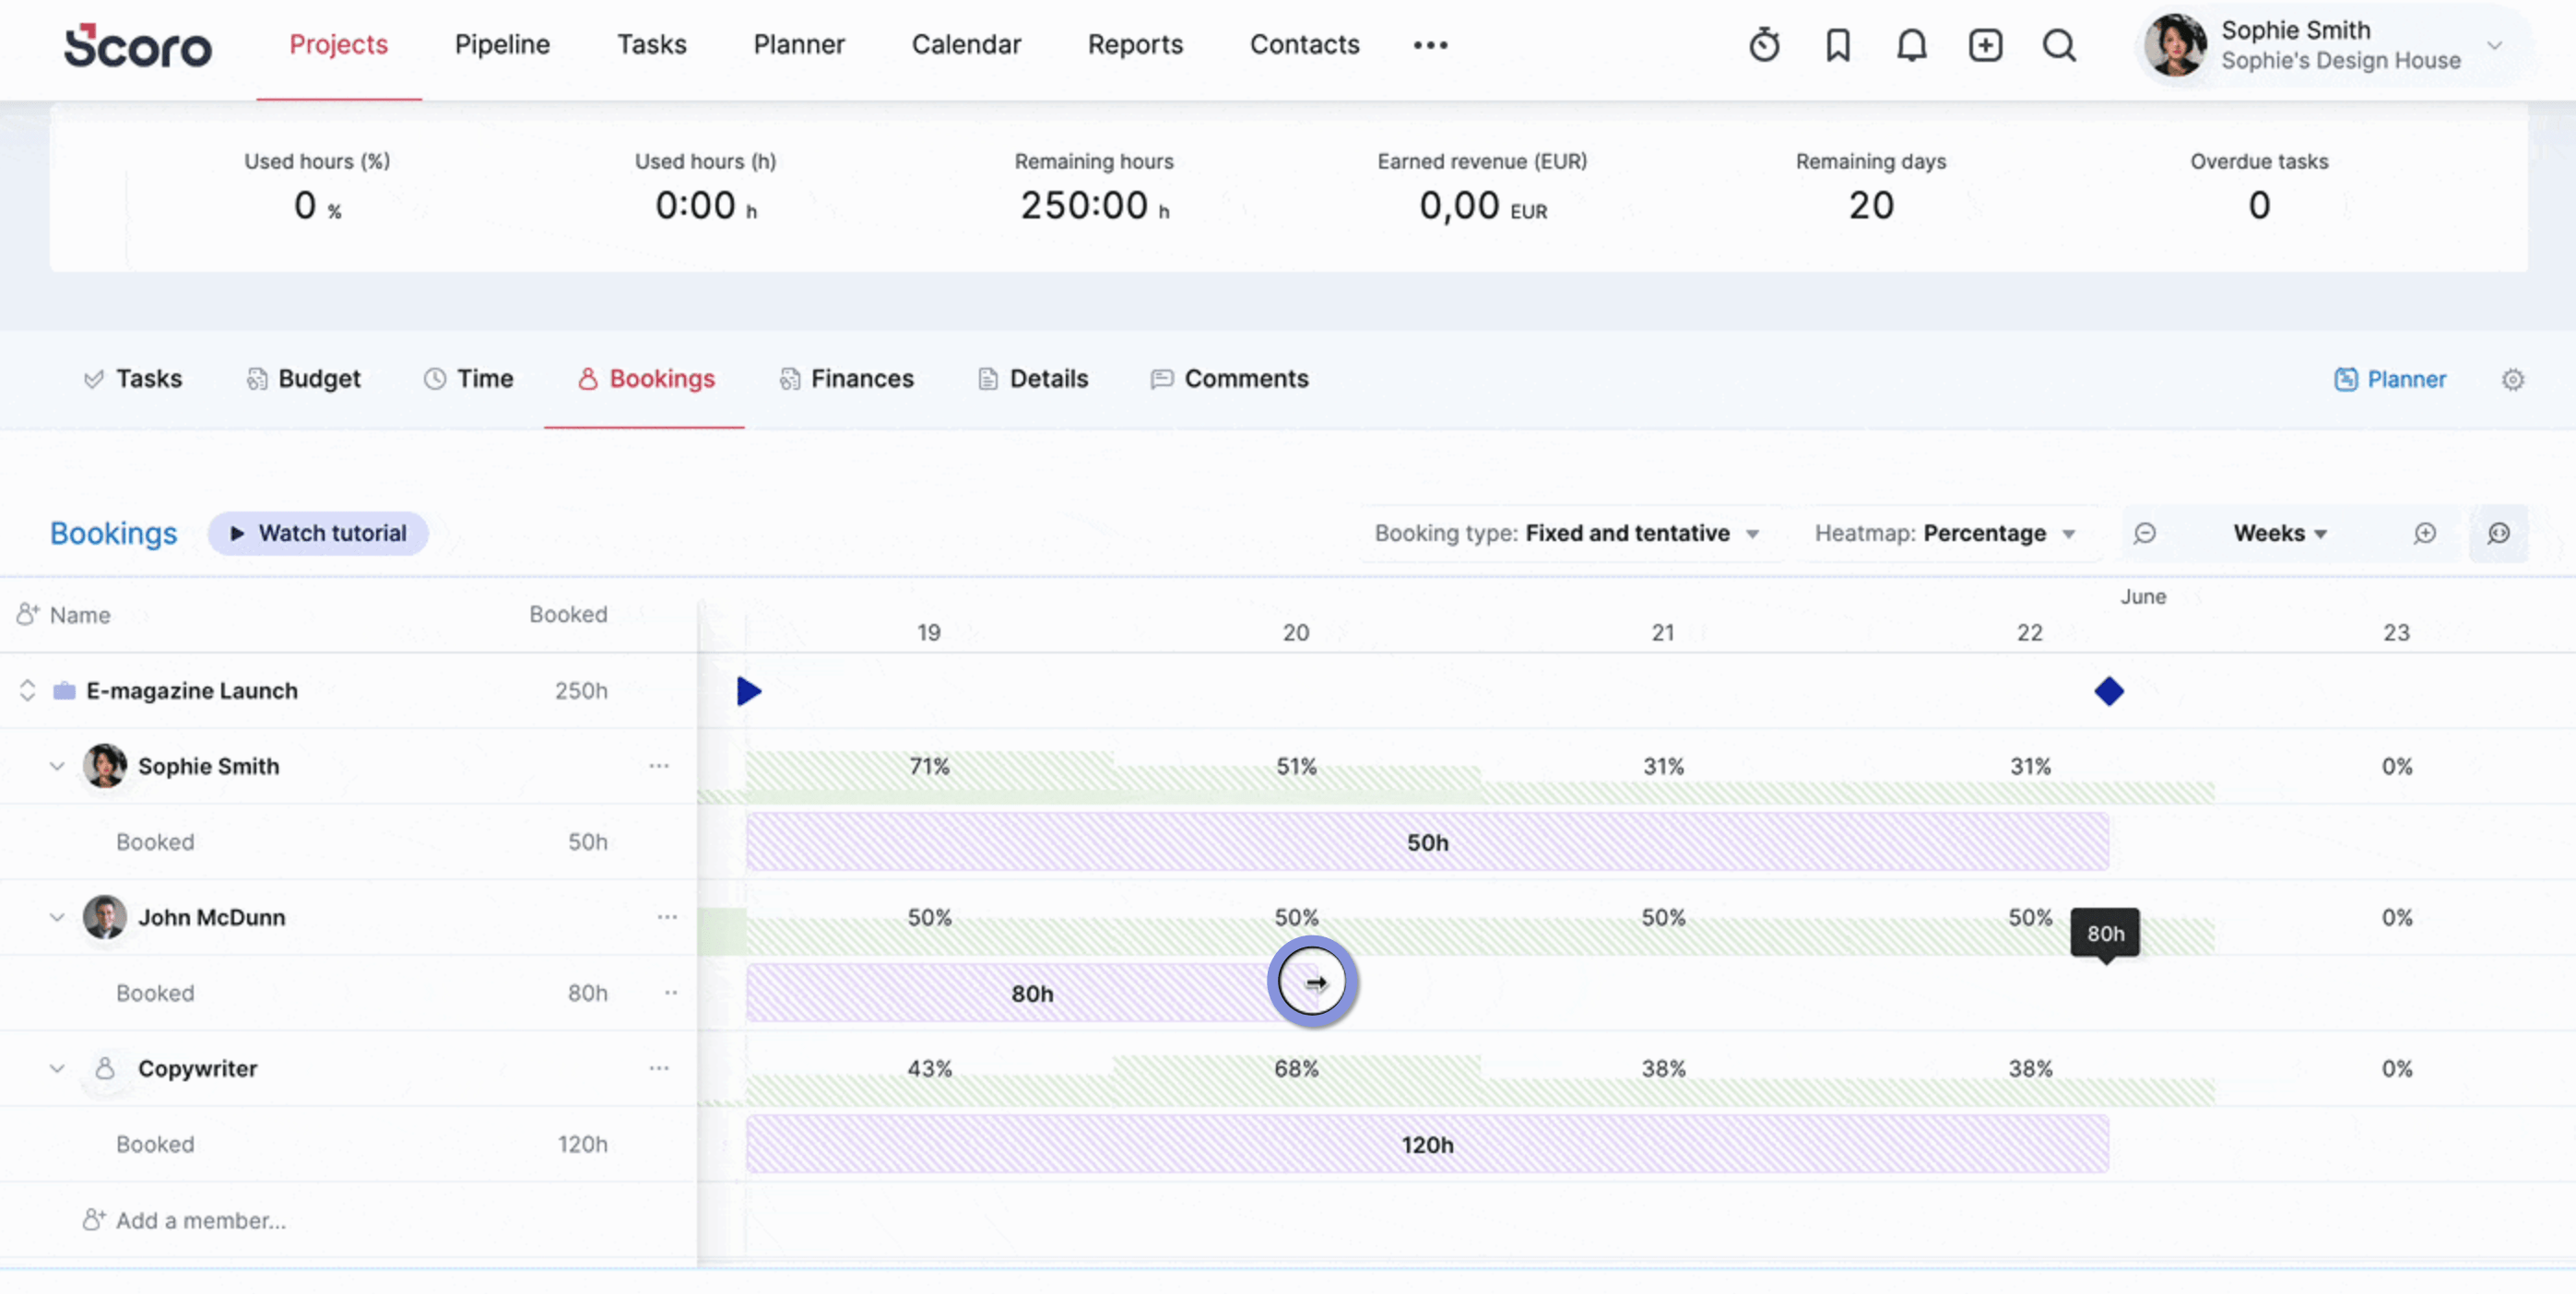
On the next window, click the “Bookings” tab. Here, you’ll see a calendar with tentatively booked time based on the estimated durations you put in the quote for each phase, service, task, and roles.
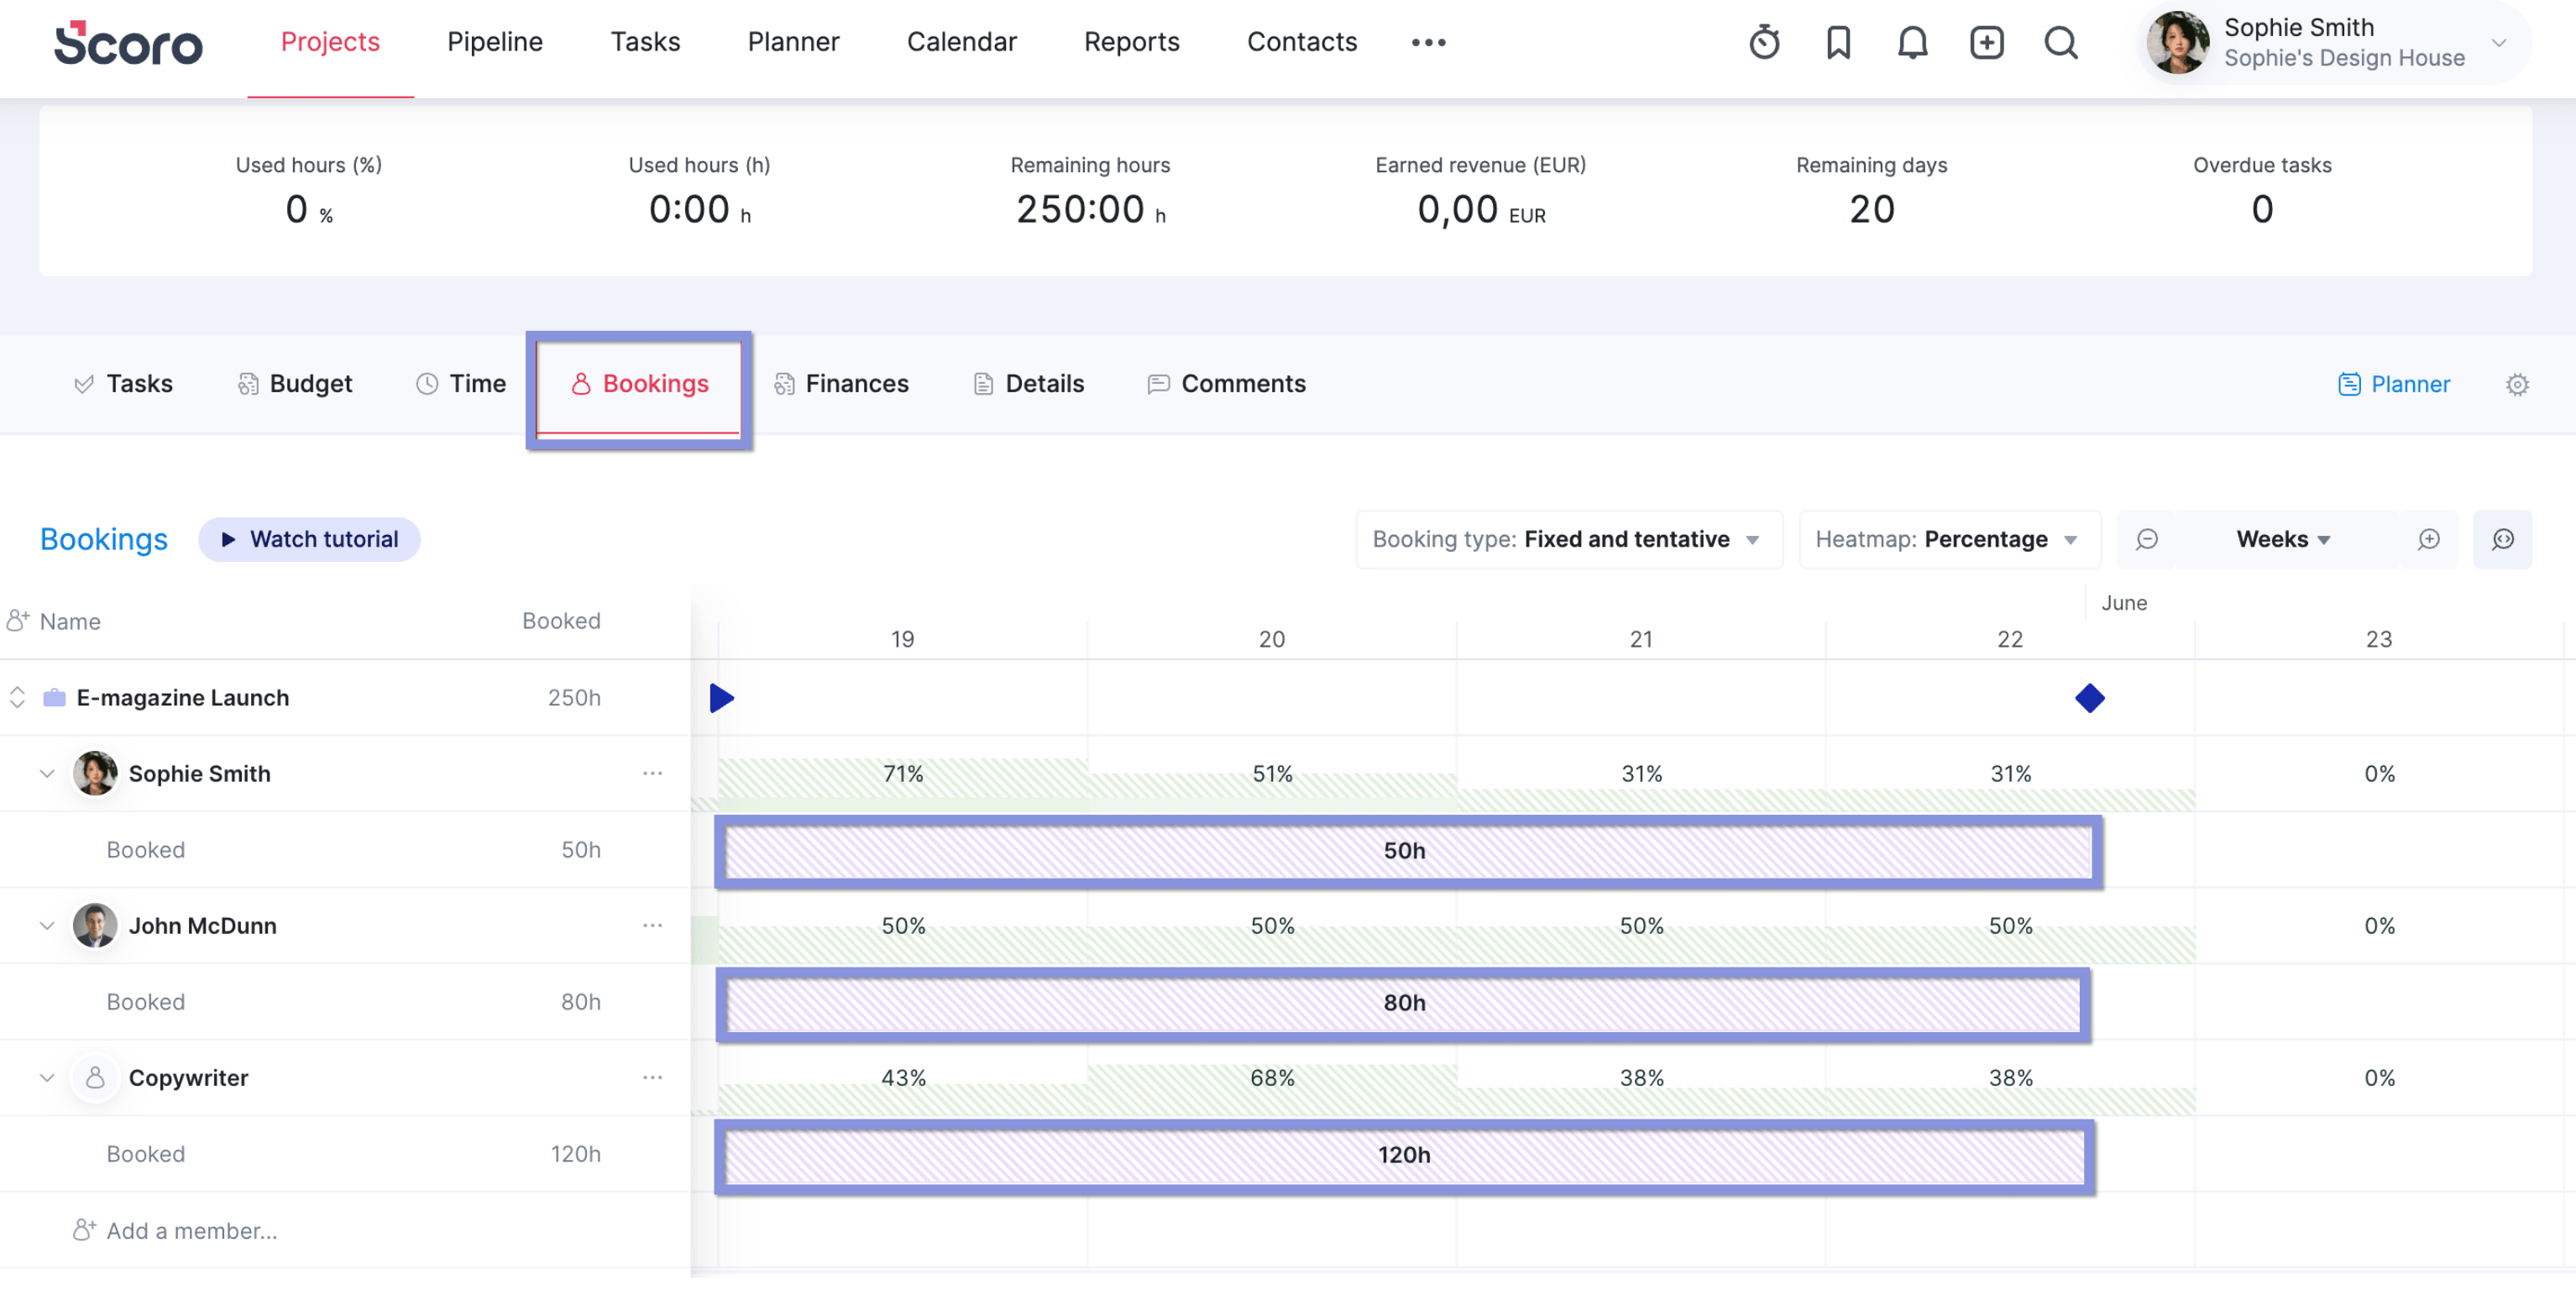
Review the schedule to assign specific team members and make any necessary changes to timeframes by dragging and dropping the bookings.
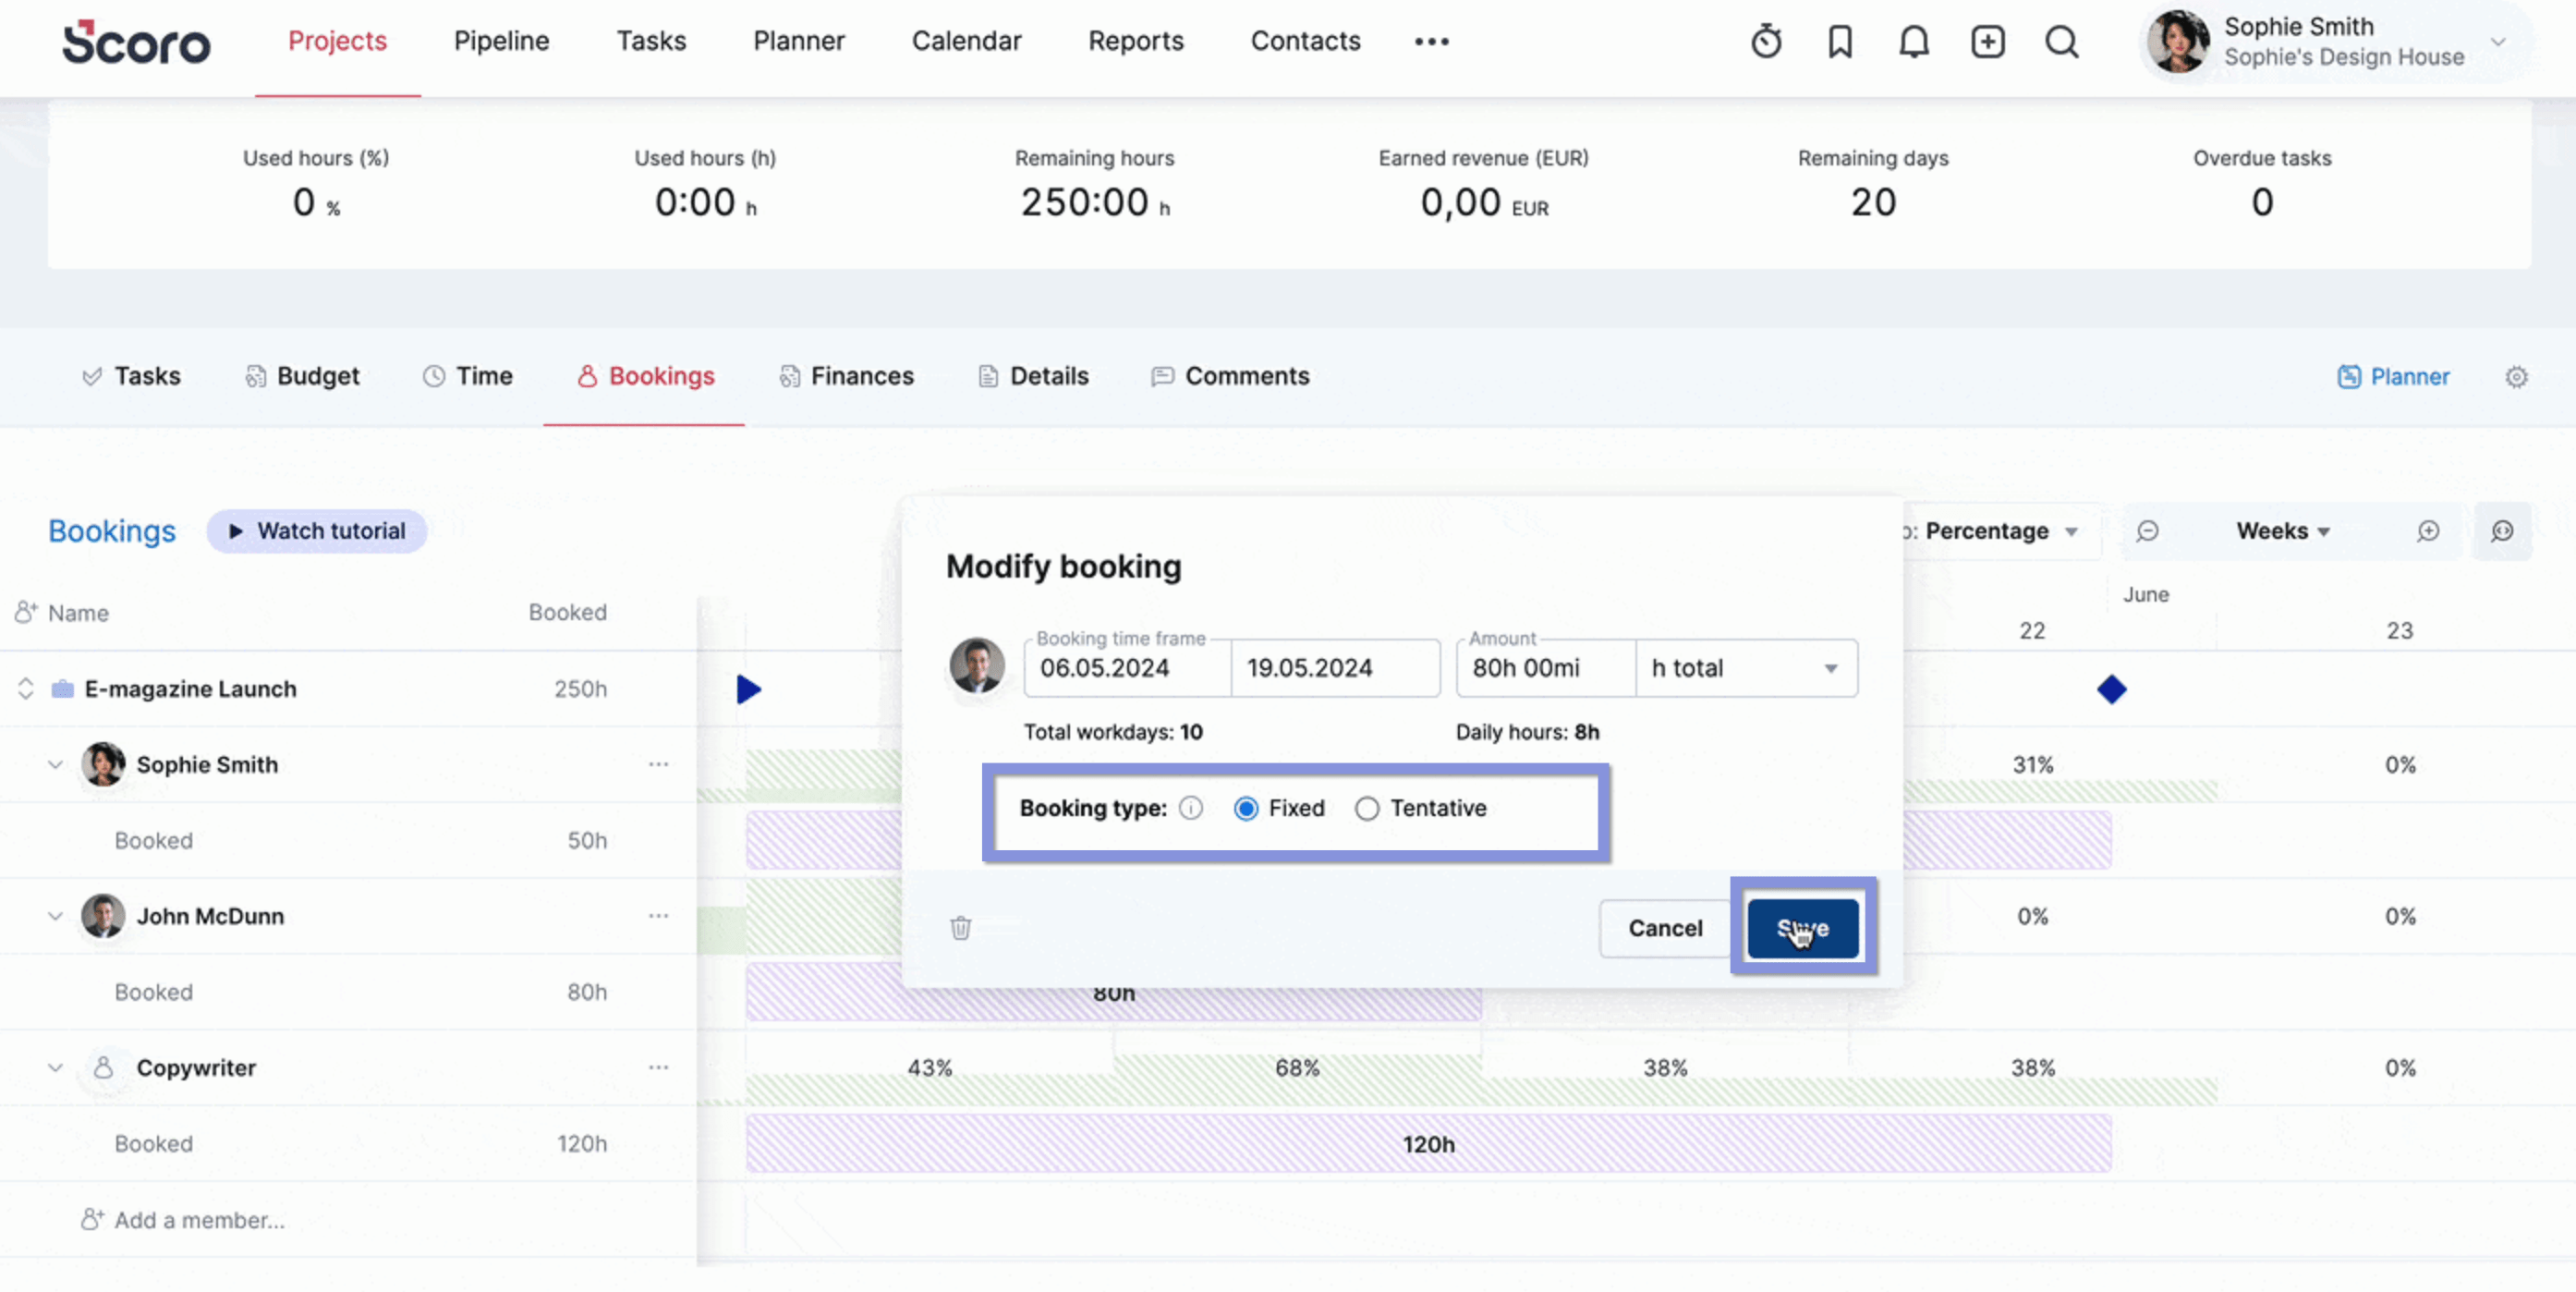
To convert the tentative booking into a fixed one, simply click the booking which will prompt the “Modify booking” window. Check the box for “Fixed” and click “Save.”
4. Map out dependencies
Dependencies determine the order of tasks. Listing them out before the project starts makes sure the project steps flow logically. And prevents bottlenecks.
Start by reviewing your task list to see which tasks are connected to others. Ask yourself if each one requires certain input, resources, or another task to be finished before it can start or end.
There are four main types of dependencies:
- Finish-to-start: Task A must be finished before B can be started
- Example: The survey design must be completed before data collection can start
- Start-to-start: Task A must be started before task B can start
- Data analysis can start once a portion of data collection is complete
- Finish-to-finish: Task A must be finished before task B can be finished
- Example: Data analysis has to finish before stakeholder reporting can finish
- Start-to-finish: Task A must be started before task B can be finished
- Example: The survey must be started before the final report can be completed
Scoro’s “Back-to-back phases” feature lets you easily plot out these dependencies. You can turn this on or off within the same view as your project details in the previews step.
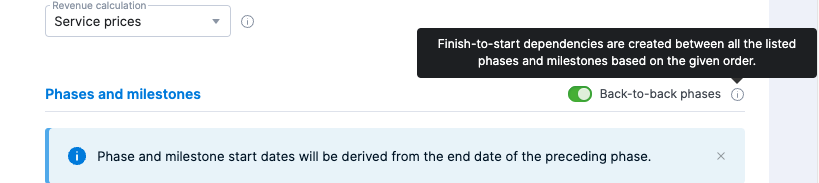
When switched on, it automatically creates finish-to-start dependencies between project phases and milestones to set up a waterfall project structure.
To adjust them, switch the button off and manually define each phase’s start day and milestones.
Since a phase acts as an umbrella for the tasks under it, when you move the whole phase, all related (not done) tasks and time entries move along with it.
To add task dependencies, go to the Gantt chart. Click on the handle on the first task (either at the start or end) and drag it to the other task (either at the start or end).
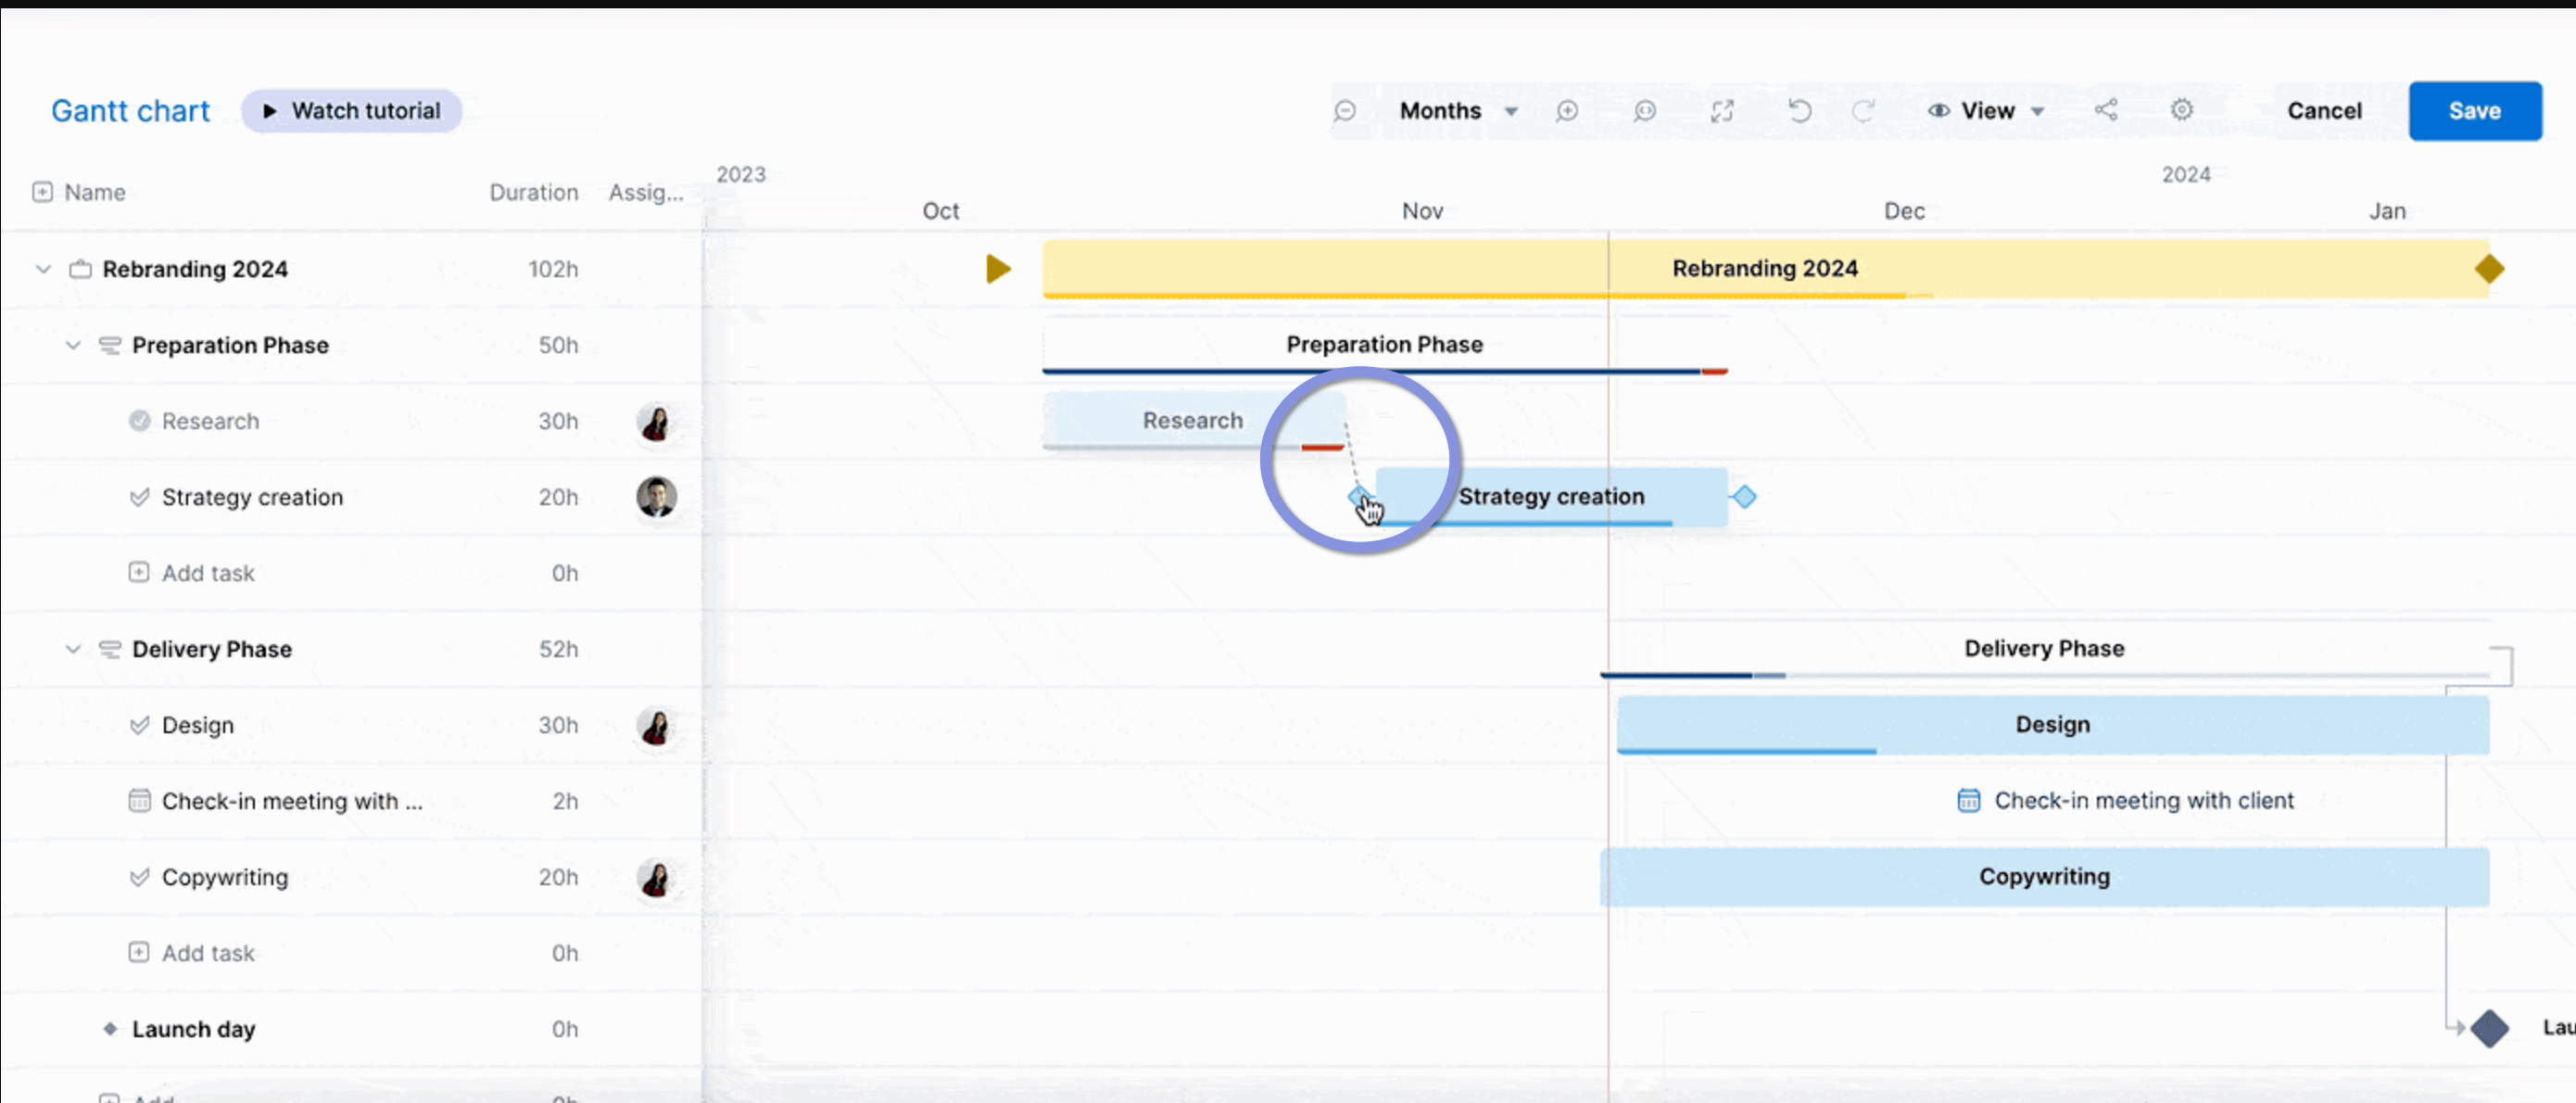
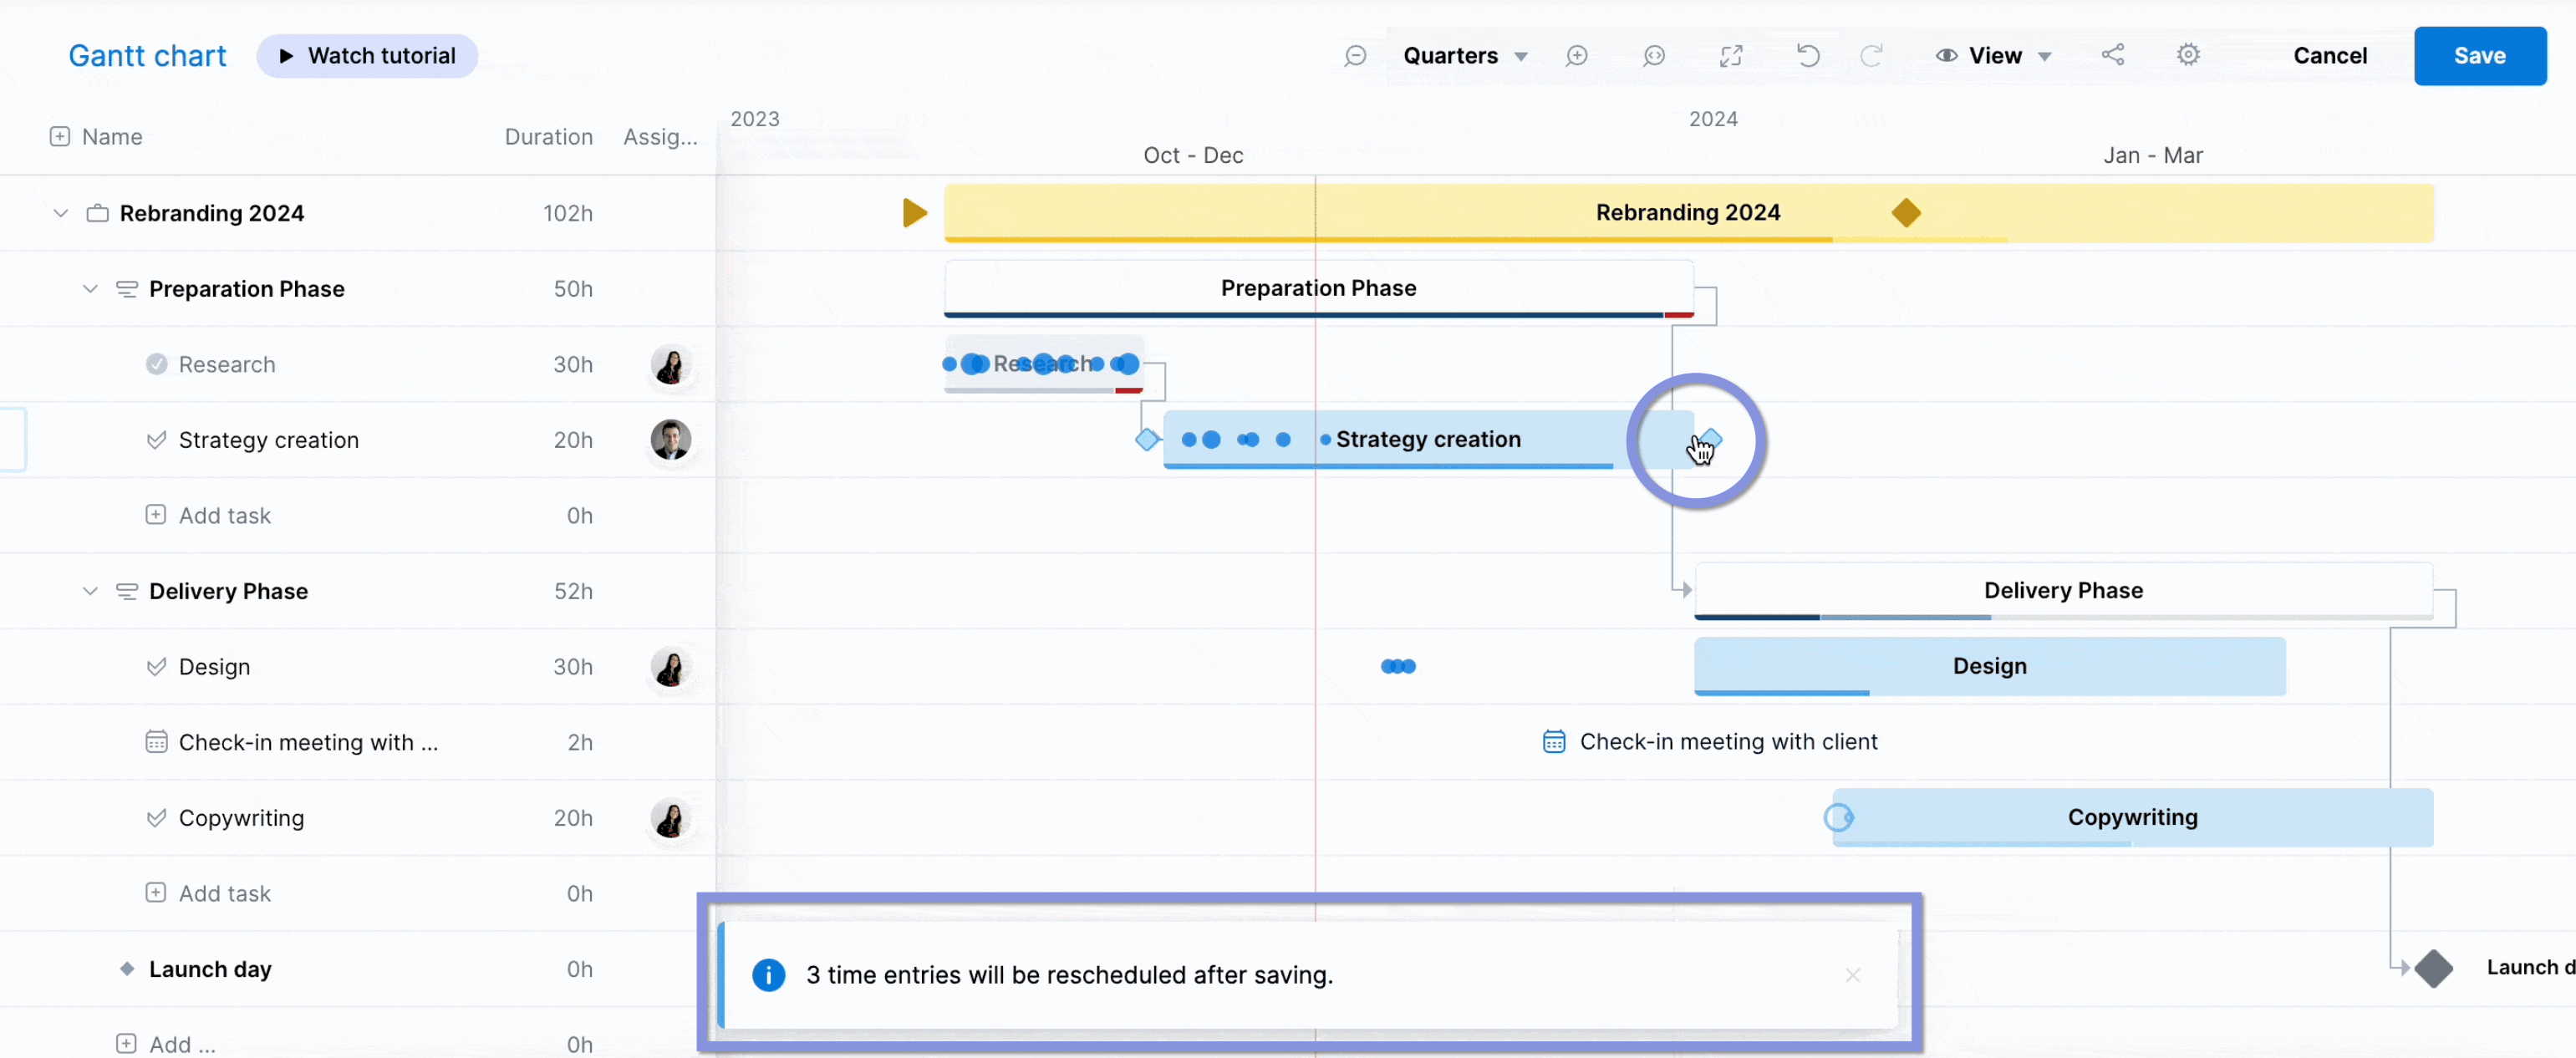
After making changes to either phases or individual tasks, Scoro automatically reschedules all dependent tasks based on your team members’ current utilization and next available slots.
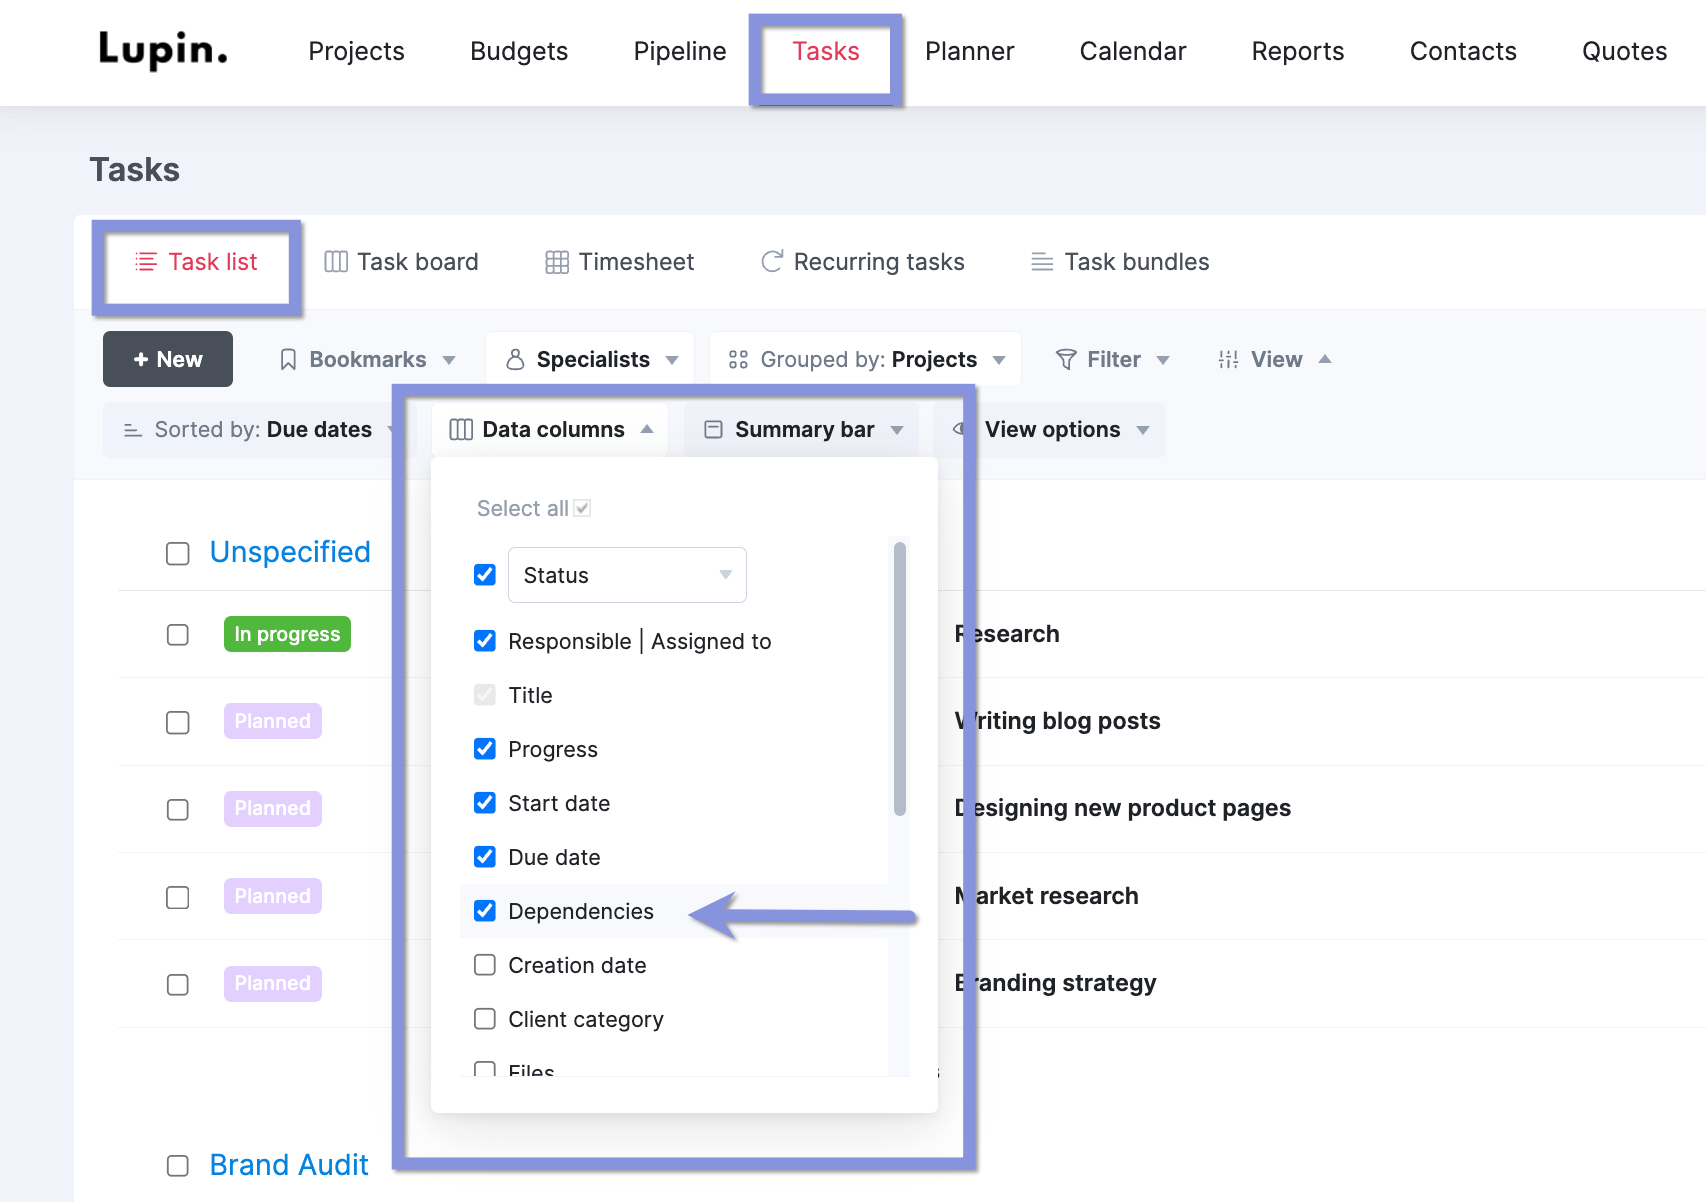
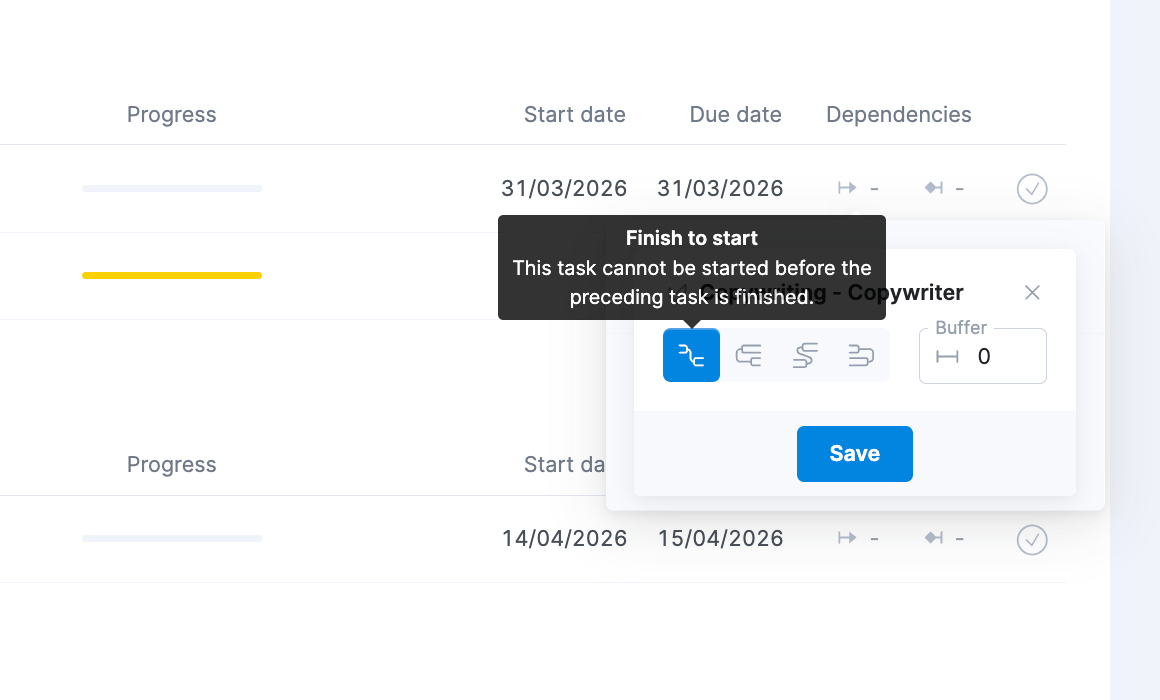
You can also adjust dependencies in the task list view.
Click “View” → “Data columns” → Dependencies.”
Add new dependencies by clicking on the Predecessor (the preceding task) or Successor (the following task) icon on the task line and selecting a suitable task from the dropdown list.
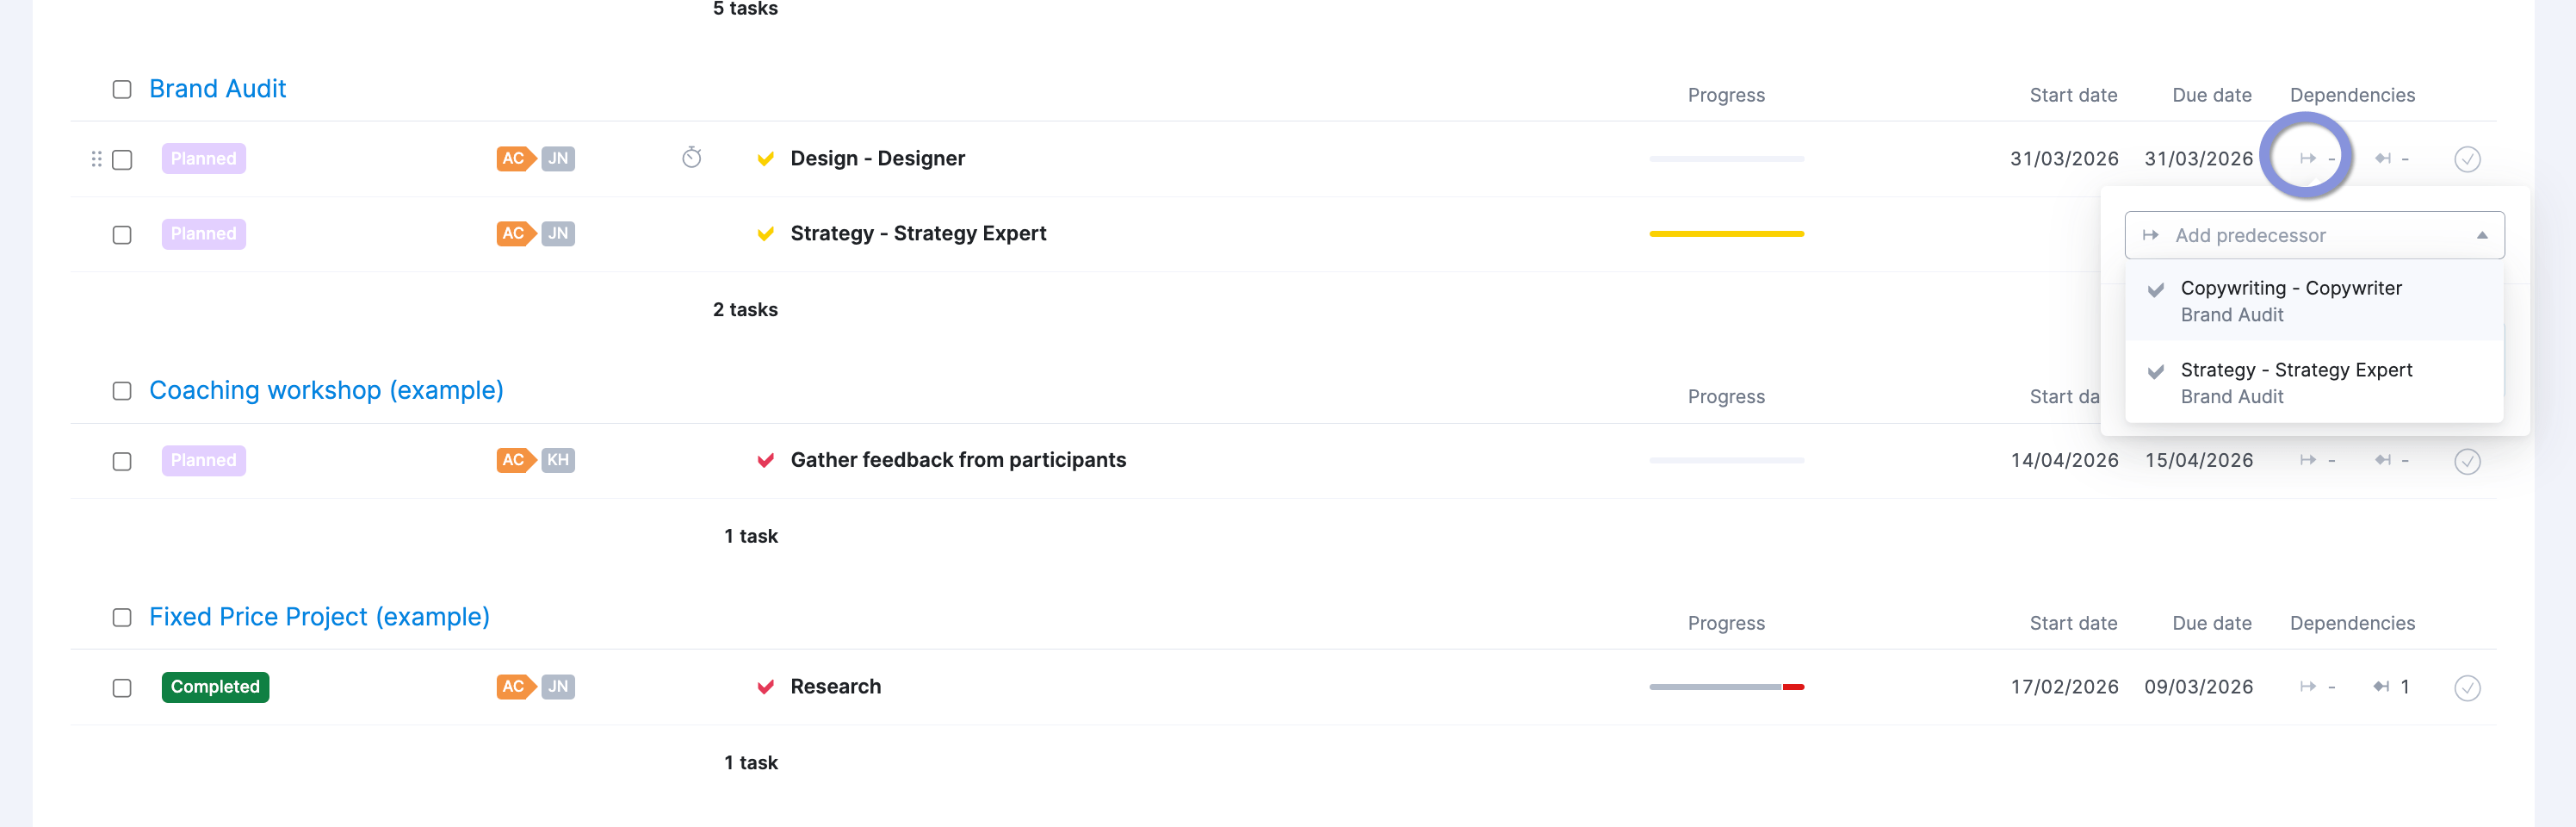
After selecting the task, you can choose the type of dependency like start-to-finish or finish-to-start.
5. Put your project timeline together
Now, it’s time to implement one of the four options we initially discussed within project management software to build your timeline.
We’ll use our Gantt chart as an example.
If you use the quote-to-project conversion feature, Scoro will automatically generate an initial Gantt chart based on your quote.
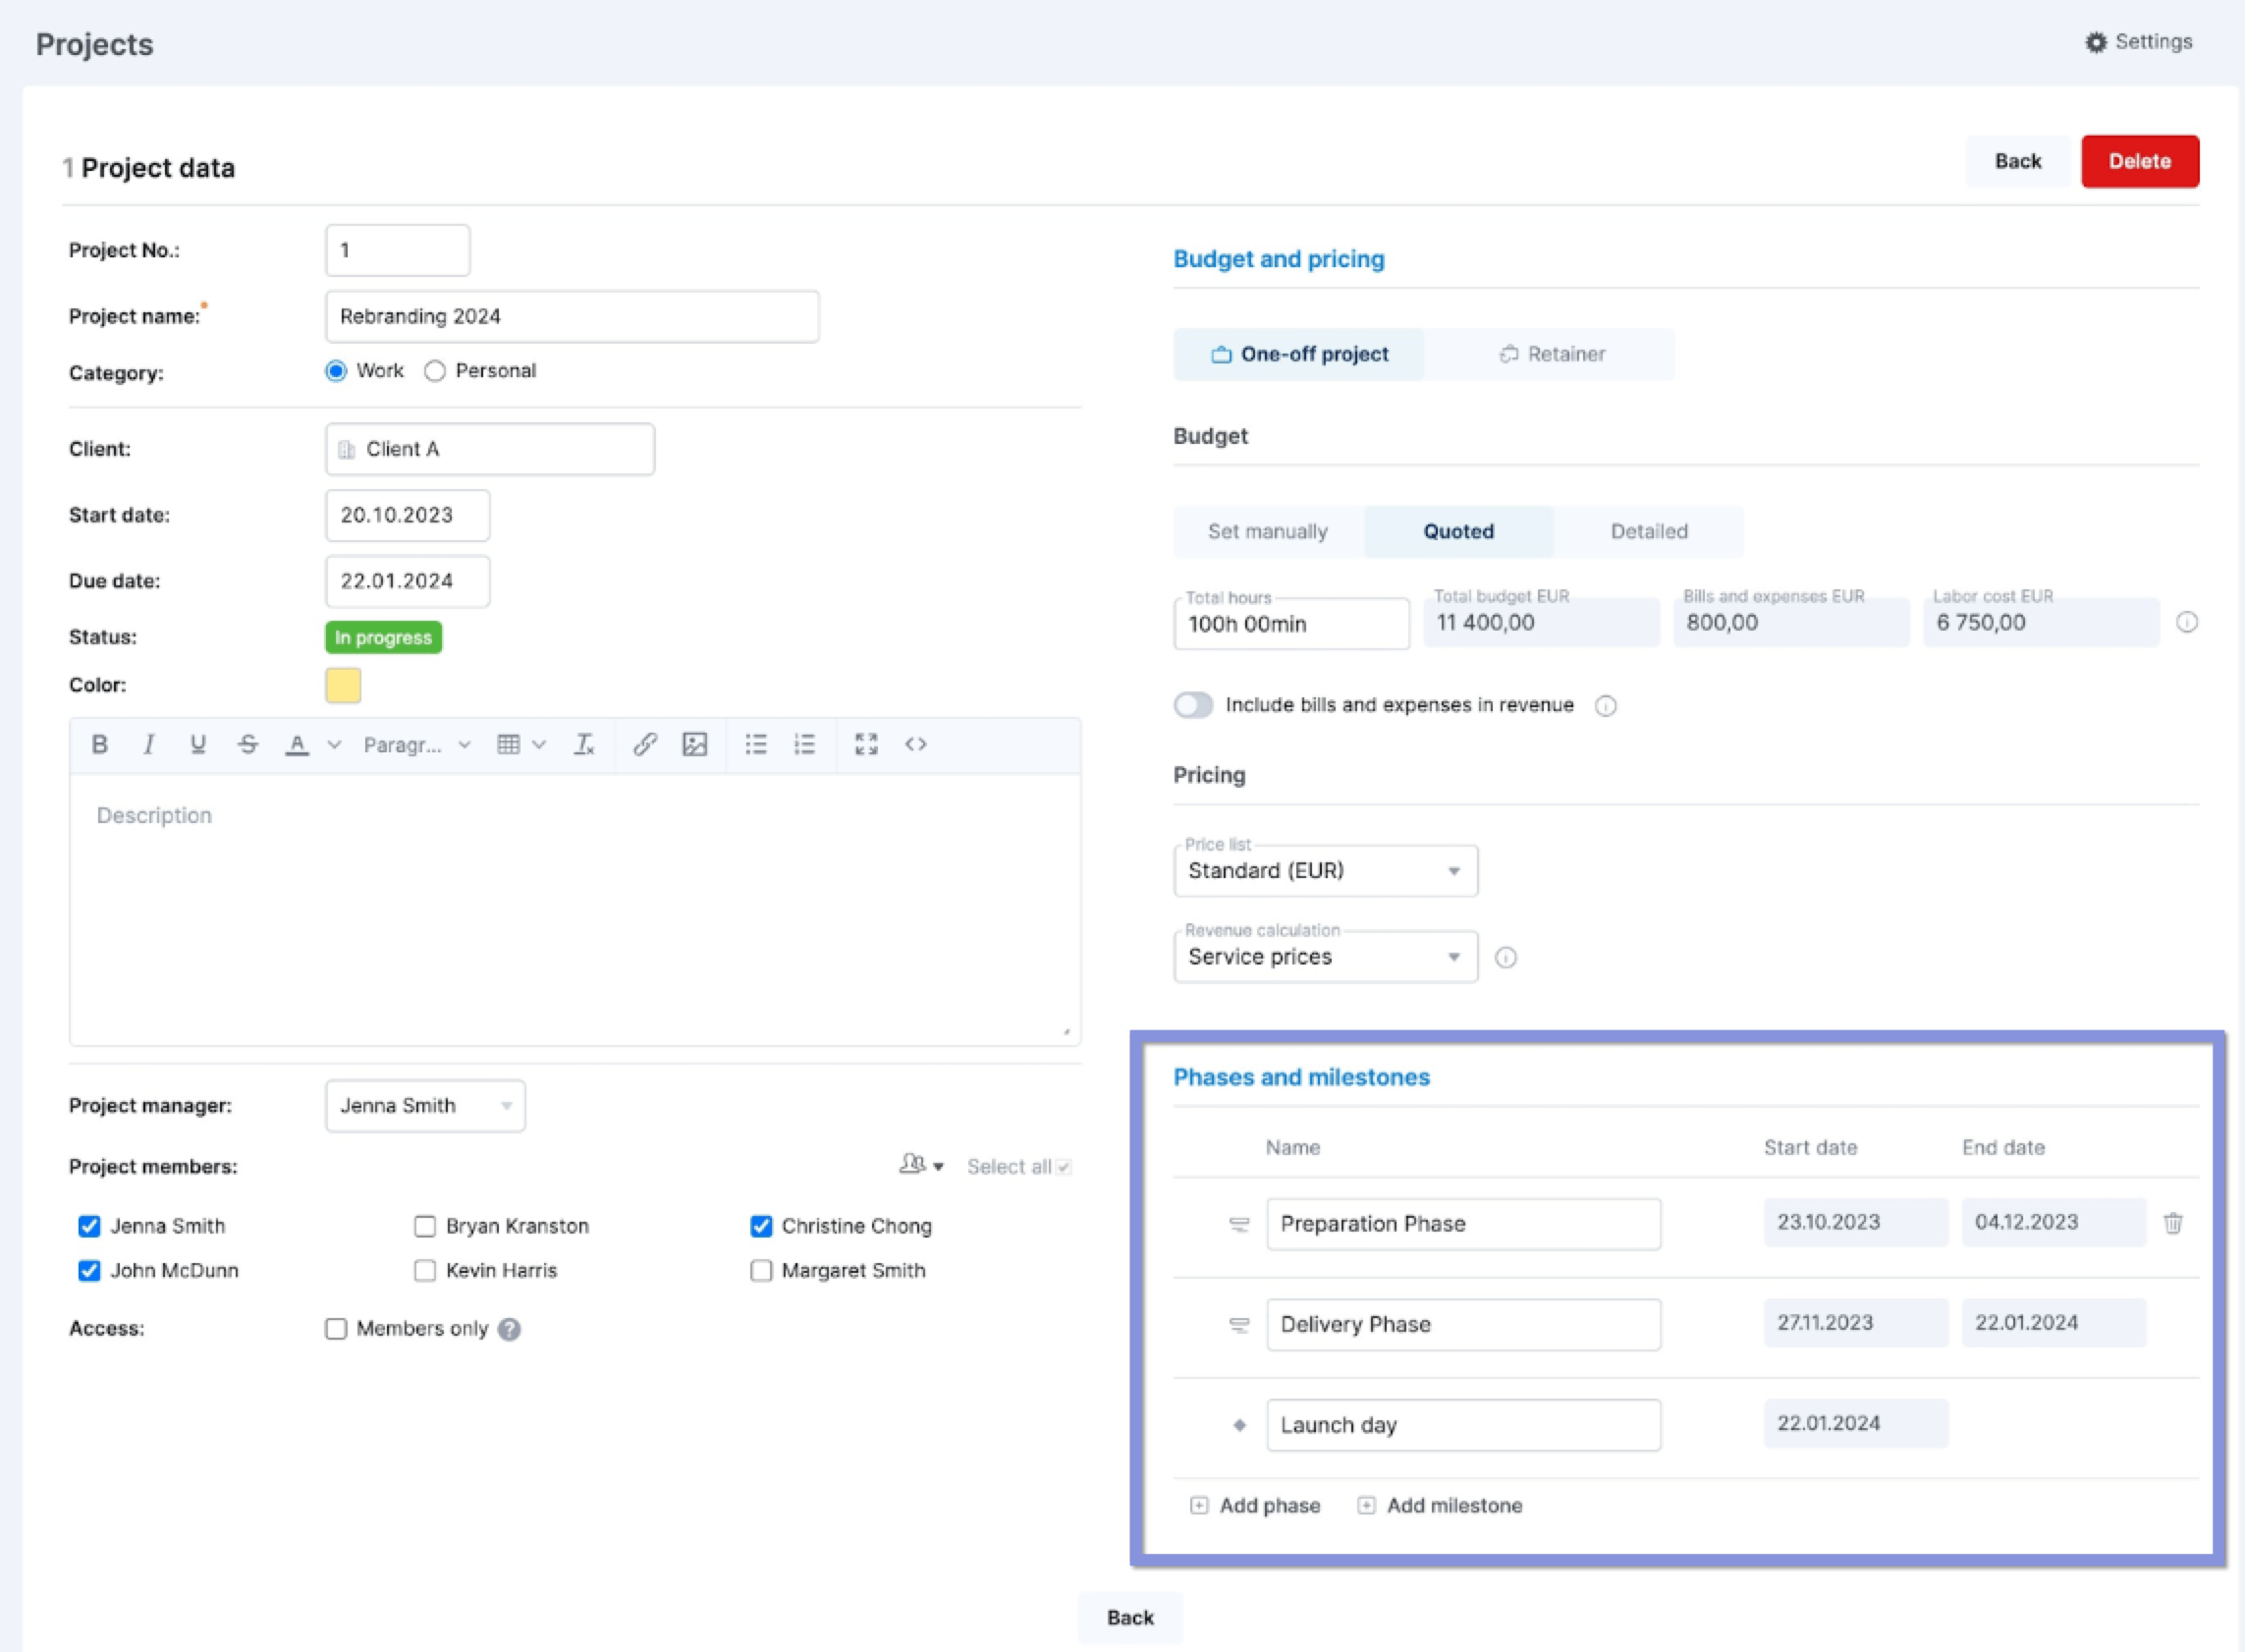
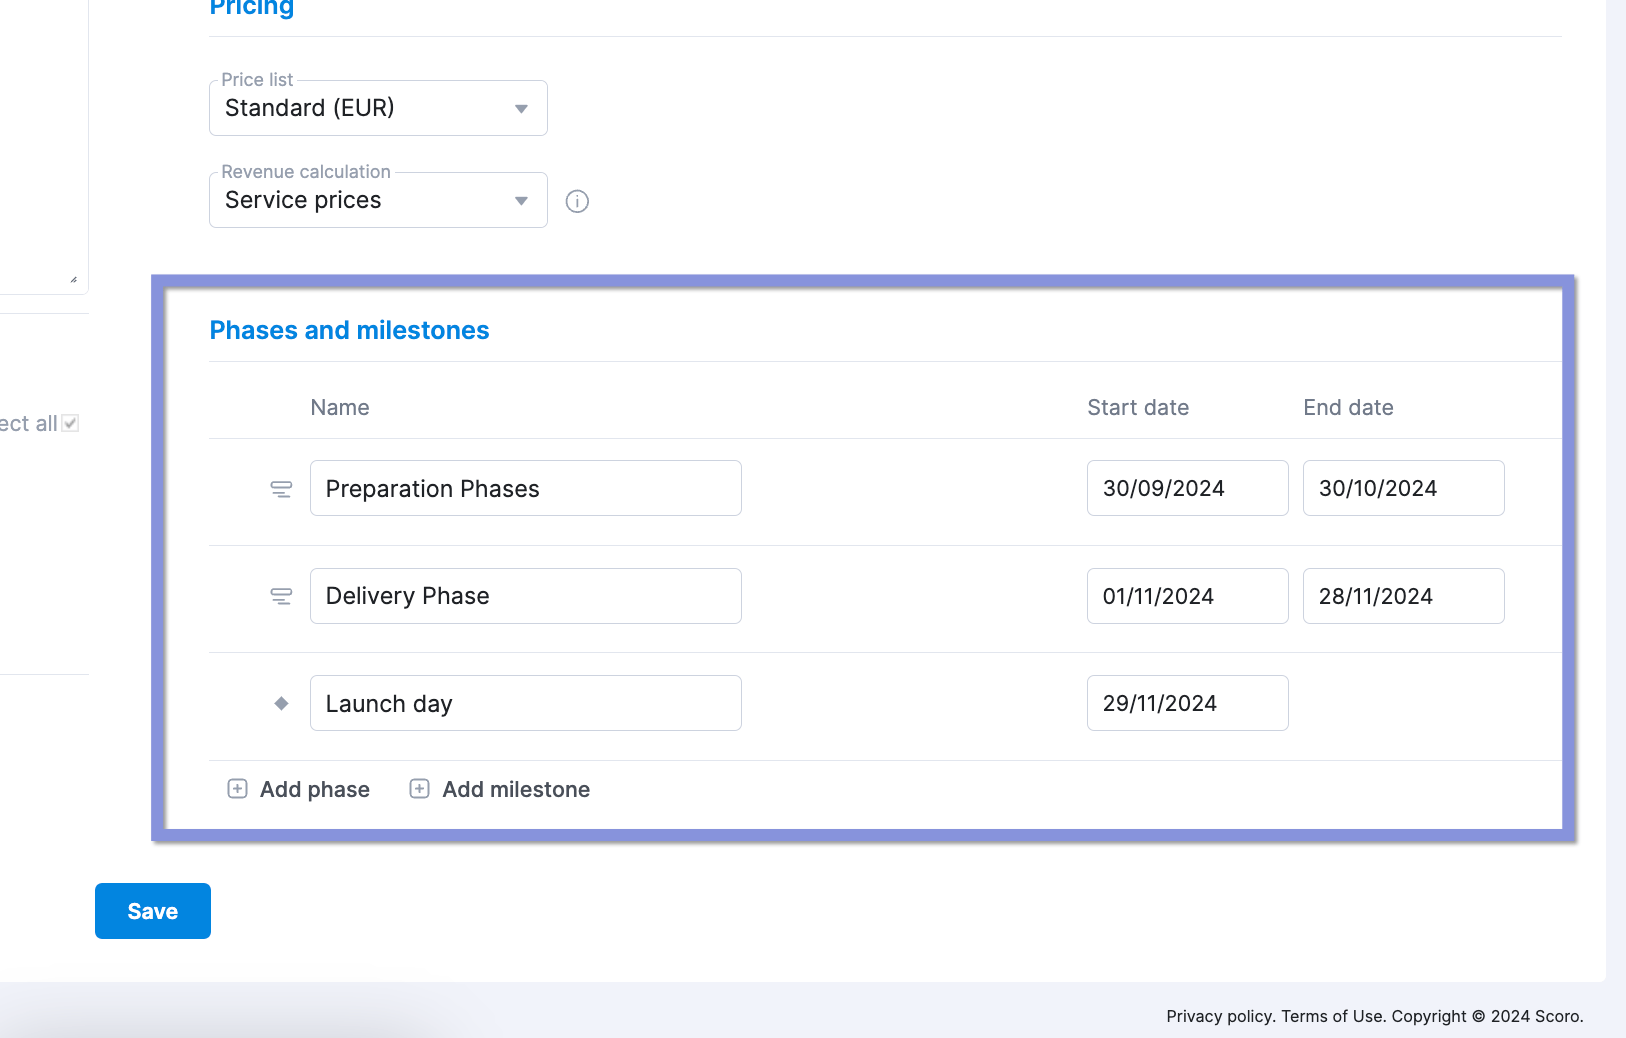
But first, it’ll take you to the “Project data” view to fill out project details, including its name, due date, and team members.

For each phase, set start and due dates. You can also add additional phases or milestones at this stage.
This automatic generation saves time and ensures consistency between your proposal and project plan.
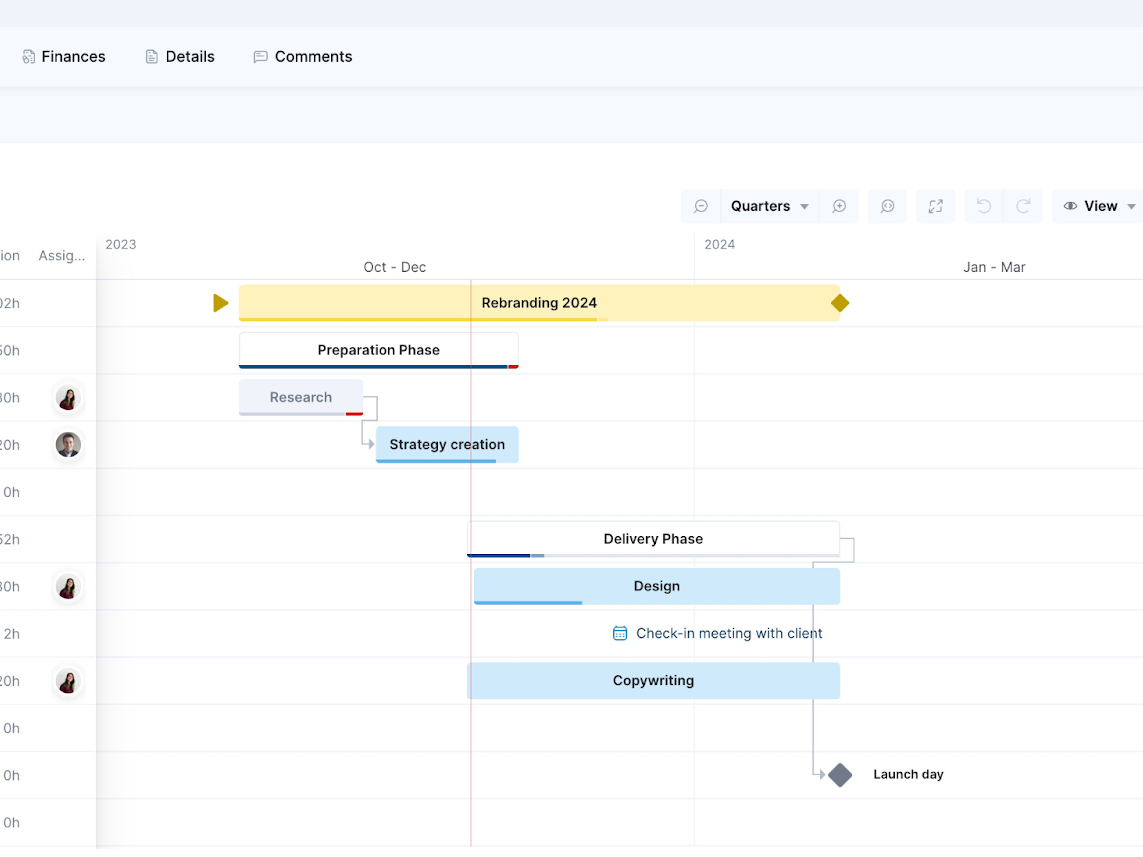
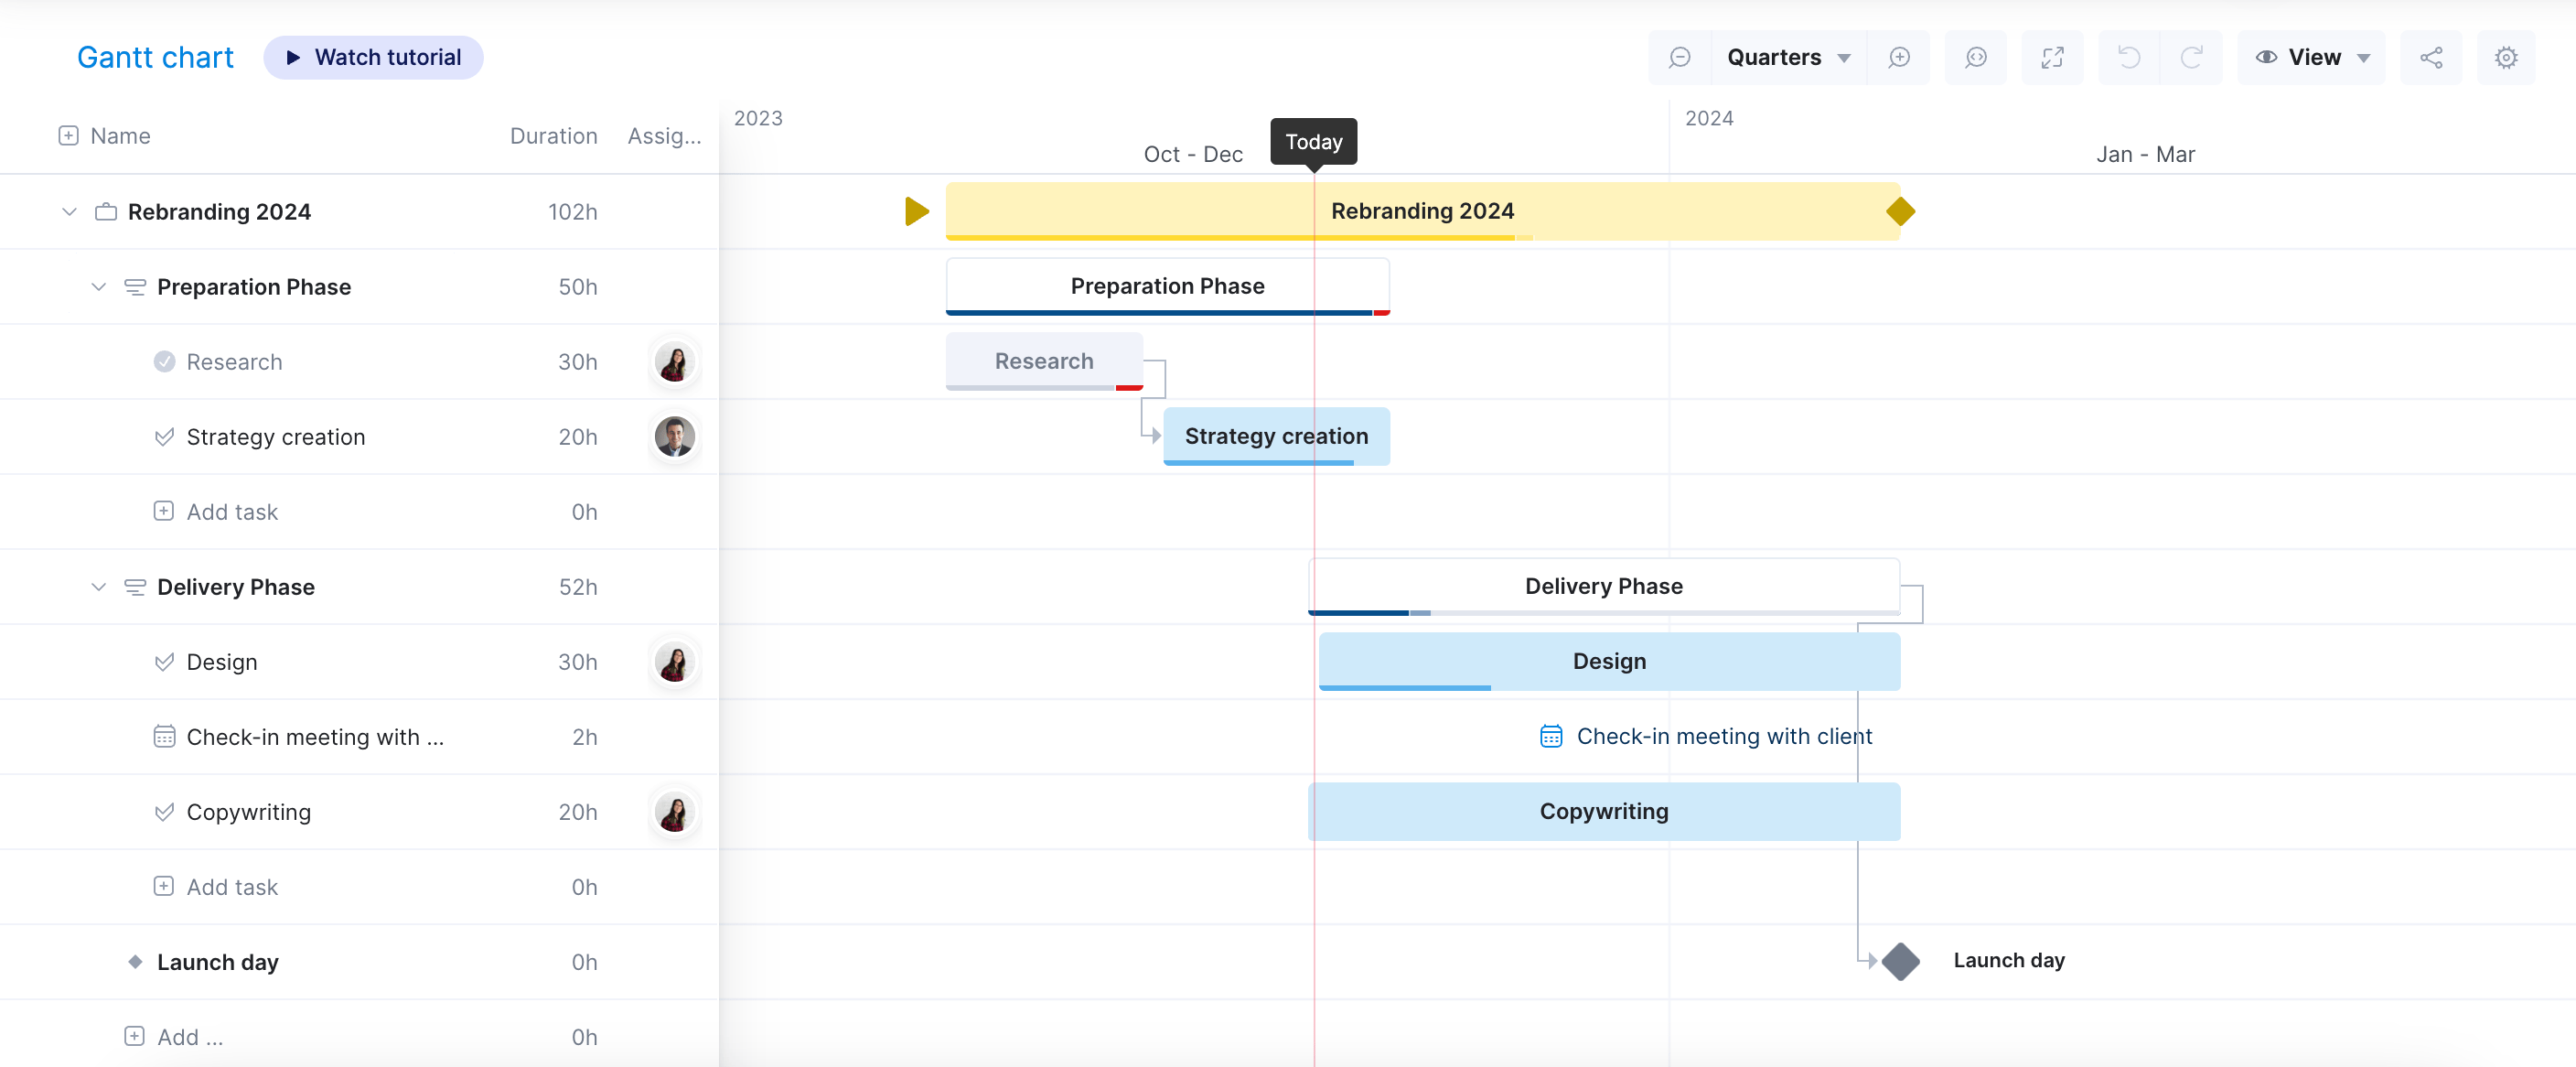
Here’s what a Gantt chart looks like with phases and milestones in place.
If you’re not starting from a quote, go to the “Tasks” section of a project and select the “Gantt” view.
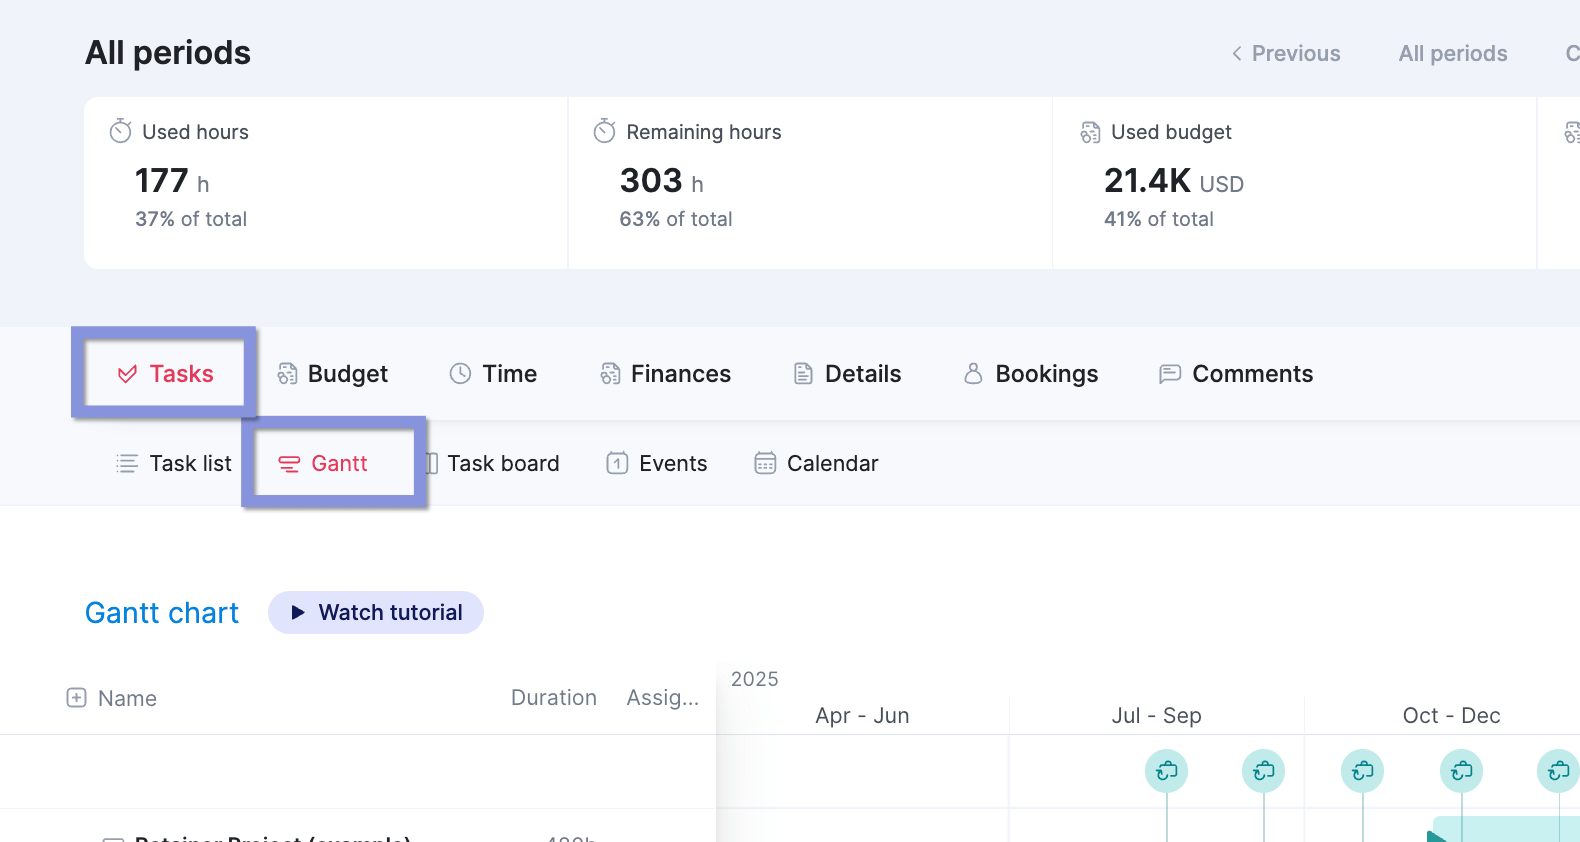
If you didn’t add project phases while creating the project, you can do so now by clicking the “Add phase” button and then adding the relevant tasks under each phase.
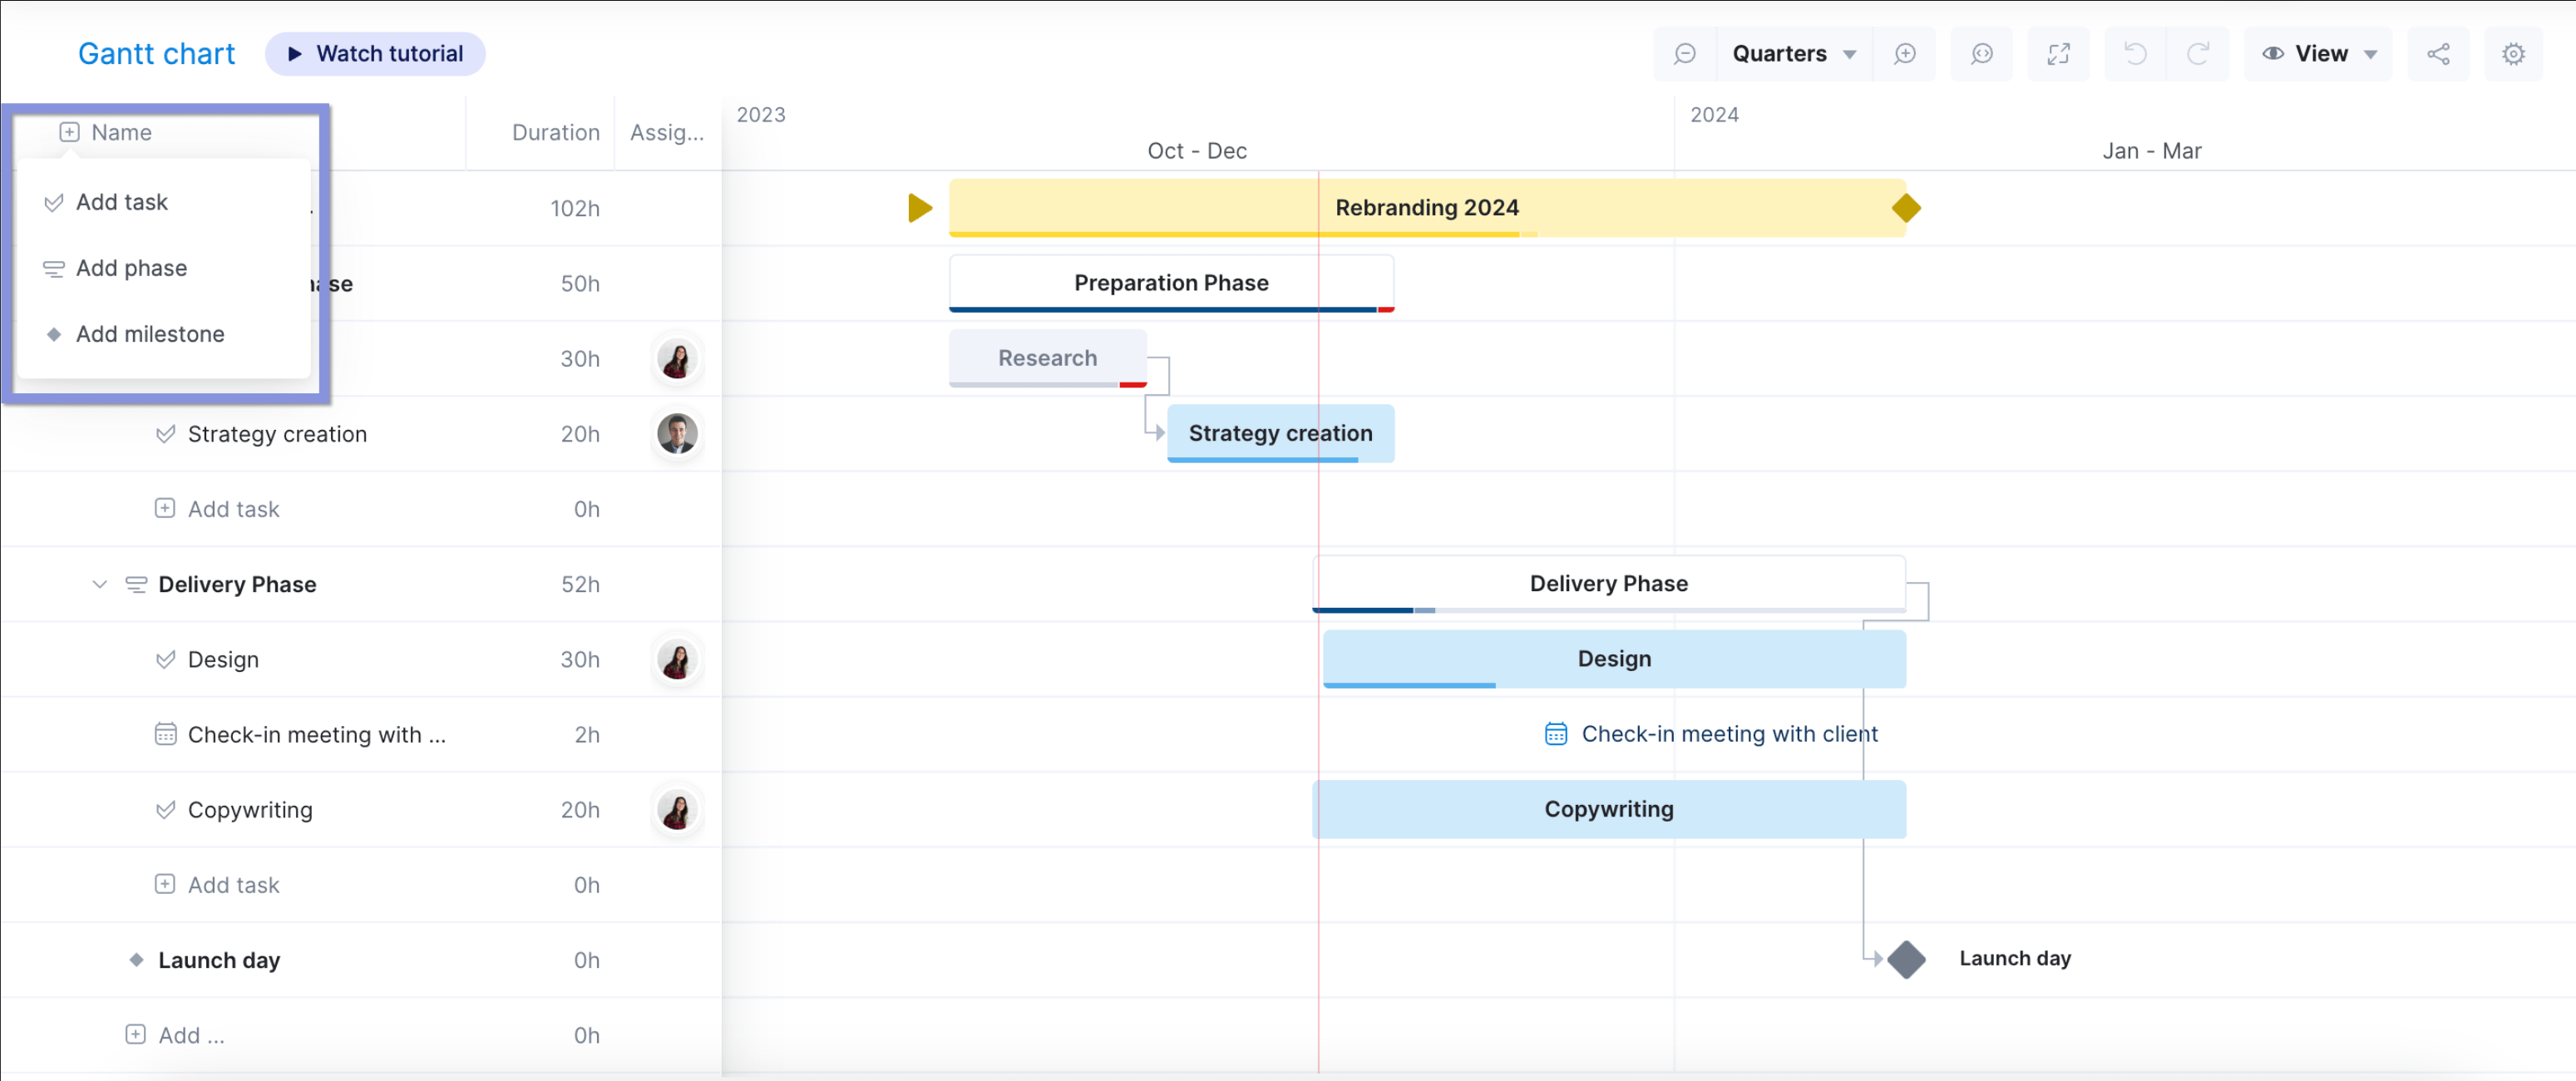
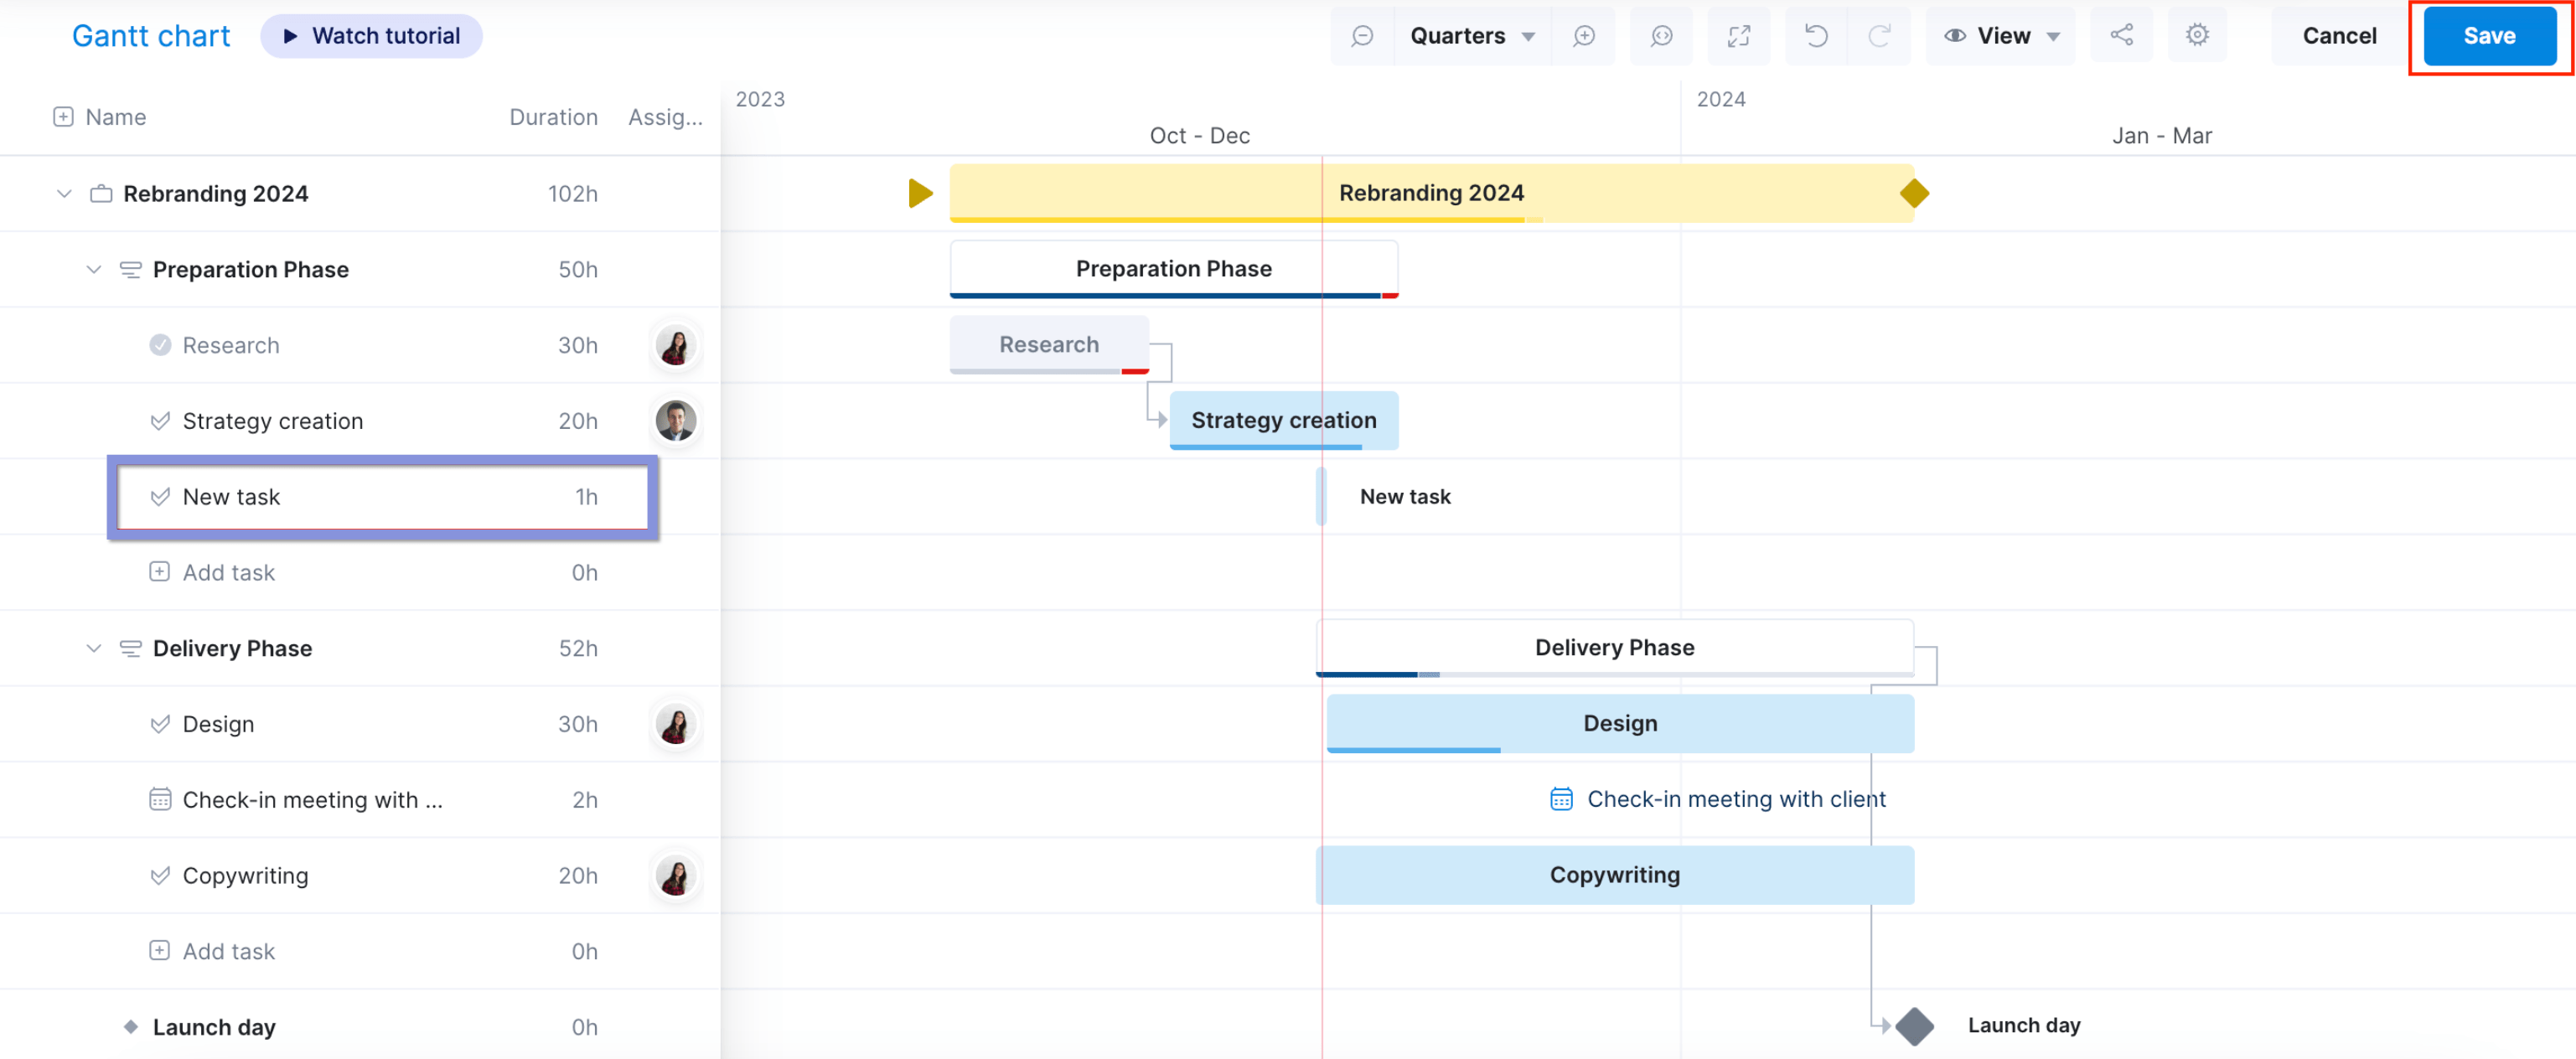
Use the left-hand panel to manually add tasks. Drag and drop them into the appropriate phases.
6. Review the timeline with key stakeholders
Sharing your project timeline with your team and clients helps everyone get on the same page from the start. And gives both groups the chance to share valuable input that can refine your plan.
To send a Gantt chart to a client, use Scoro’s “Share chart” button in the upper right corner of your Gantt chart view.
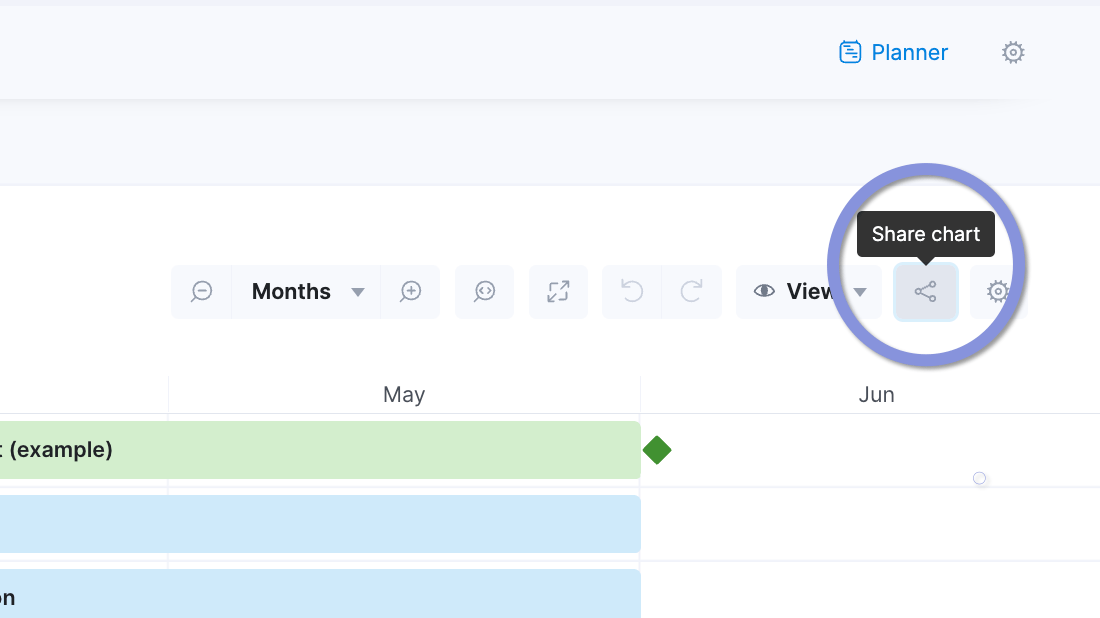
Here, you’ll get a unique link that lets clients see an overview of your timeline—one that doesn’t show sensitive data that only your team needs to access.
To reflect recent changes, click the “Update snapshot” button to make sure your clients have the latest project details.
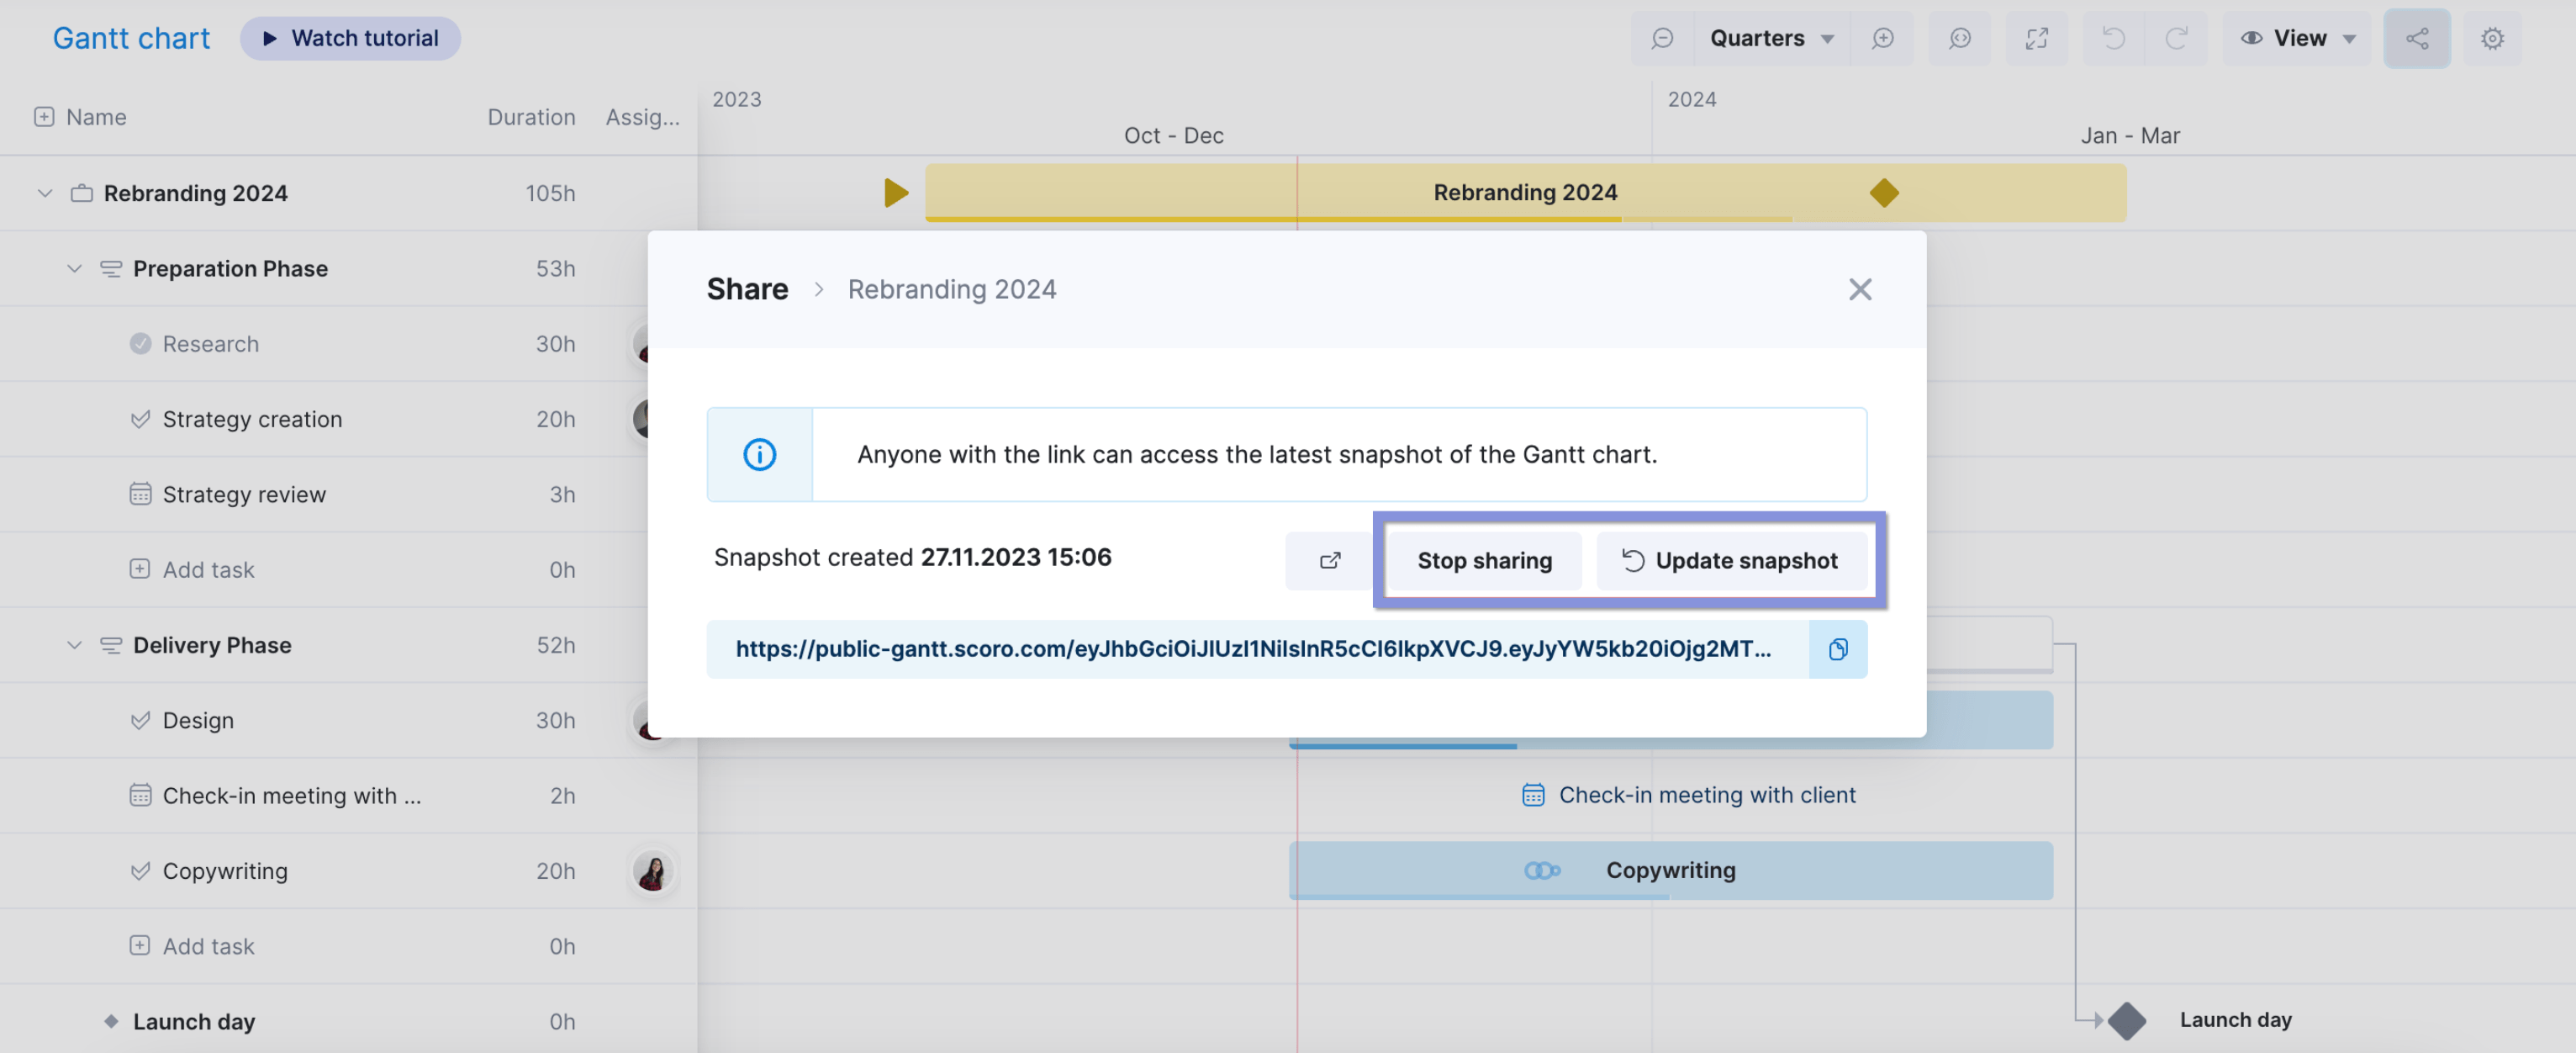
Note: You can pause external access to the Gantt chart at any time with the “Stop sharing” button, ensuring you control what information is visible to external stakeholders during internal-only phases (e.g., strategy planning or budget reviews).
7. Monitor and adjust your timeline as the project progresses
Projects are dynamic—so your timeline should be, too. Regular reviews let you quickly catch and respond to deviations from your initial plan, helping you keep your project on track even as things change.
Use Scoro’s Gantt chart to stay on top of your timeline and adjust tasks as needed.
On the chart, you’ll see a red line that indicates the current date, letting you quickly see if tasks are on schedule. Completed tasks are greyed out with an arrow to show the progression between tasks. And red bars show overdue tasks—and how far behind schedule they are.
To check the time spent on a task and how much time it has left, just hover over the bar.
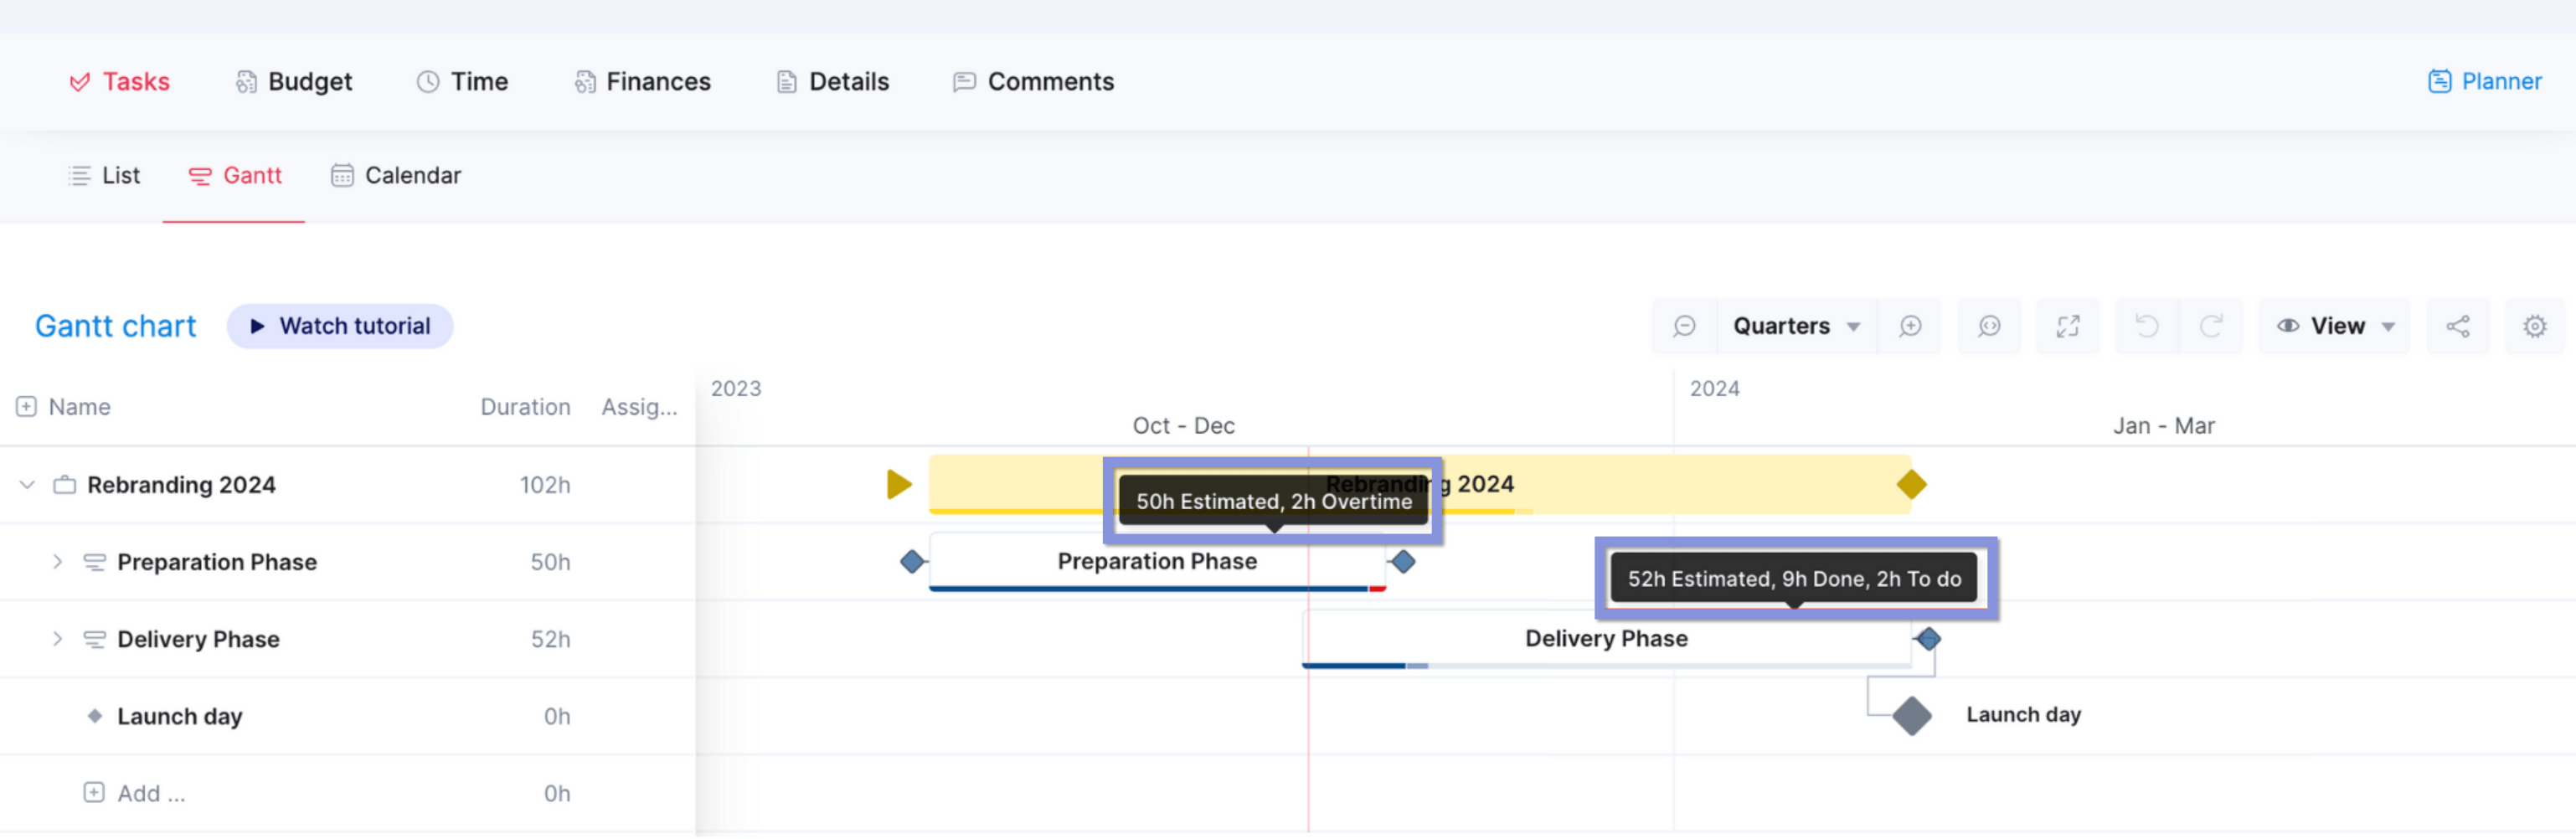
Use all this data to proactively address challenges before they jeopardize the project. And as you change deadlines and shift work around to reflect changing requirements, Scoro will automatically reschedule any dependent tasks to keep those workflows in order.
Project timeline best practices
These best practices complement the step-by-step process we just laid out, helping you create timelines that can withstand changes, keep your team on track, and protect your profit margins.
1. Use reverse planning
When listing out deliverables during scope planning, start with the final ones and work backward to identify the steps needed to produce them.
Often referred to as reverse planning or backward planning, this approach clarifies your critical path early on. And helps you set realistic milestones that connect back to the big-picture project goals.
Let’s consider reverse planning for a website redesign project:
- Define the end product or service: A fully functional, responsive website launched by September 1
- Identify major milestones in reverse chronological order:
- Final testing and launch
- Content migration
- Development
- Design approval
- User research and wireframing
- Project kickoff and planning
Working backwards from the launch date guides you in allocating enough time to each phase. And lets you foresee dependencies early on, such as needing design approval before beginning development.
No plan is completely foolproof—unexpected challenges like sick days and task complications happen. The key is to remain flexible. Be prepared for timeline tweaks as you flesh out the details of each phase and move through the project.
2. Wait to assign specific dates
Tempted to assign dates immediately? While well-intentioned, that approach often leads to unrealistic expectations and unnecessary stress.
It doesn’t account for task dependencies, resource availability, or potential unforeseen challenges that may arise during the project.
Assign dates after you get a clear picture of task durations and dependencies. This will help you create a more realistic timeline that accounts for the natural flow of work and potential bottlenecks.
This pause also gives you time to factor in employee resource utilization, ensuring they have enough bandwidth to take on tasks based on their schedules and skill levels.
3. Use the bottom-up approach when estimating timelines
While the phase-service-task breakdown is often sufficient for many projects, the bottom-up approach is handy for complex or unfamiliar projects.
This involves starting with the smallest units of work—individual tasks—and building up to the overall project timeline.
Here’s how to implement it:
- Break down the project into the smallest possible tasks
- Estimate the duration of each individual task
- Add up these estimates to determine the duration of larger project phases
- Sum up all phase durations to arrive at the overall project timeline
By considering each task individually, you’re less likely to underestimate how much time your team realistically needs to finish them all. You can also easily identify dependencies that might not have been as apparent with a more macro overview.
4. Build in buffer time
Incorporating extra time into your schedule helps you create a safety net to absorb unexpected delays and last-minute changes.
There are four ways to build buffer time into your timeline:
- Task-level buffers: Add a small buffer (e.g., 10-20%) to individual task estimates. This helps absorb minor setbacks or underestimations.
- Phase-level buffers: Include larger buffers (like 15-25%) between major project phases. This allows for smoother transitions and provides flexibility if earlier phases overrun.
- Critical path buffer: Add extra time to tasks on the critical path. These tasks directly impact the project completion date, so making sure they have enough time to be completed is crucial.
- End-of-project buffer: Include a general buffer at the end of the project to account for any accumulated delays or final adjustments.
Scoro makes it easy to apply these buffer strategies, particularly for task dependencies. In addition to setting dependencies in the Gantt chart, you can manage them in the “Task list” view.
Just add how many buffer days you need by clicking the icon in the image below:

Use positive numbers for lag time (a buffer before the next task starts) or negative numbers for lead time (when there’s overlap between tasks).
For example, enter “5” to set a buffer of five days after a task. Or enter “-3 ” to allow the next task to start three days before the current one finishes.
This flexibility in managing dependencies and buffer times lets you create more resilient timelines that can adapt to changes without getting completely derailed..
Top Tip
When talking to clients, make sure they know why you’re using buffers. Without them, there’s a greater risk of delays. And just because they’re included doesn’t mean they’ll all be utilized—some activities might finish early.
5. Learn from each project
After completing a project, thoroughly review its timeline.
This retrospective analysis is a valuable opportunity to identify areas for improvement, recognize successful strategies, and refine your timeline creation process for future projects.
Here’s how to conduct an effective post-project timeline review:
- Compare planned vs. actual timelines: Identify tasks or phases that took longer or shorter than expected.
- Examine buffer use: See if you needed more or less buffer time.
- Analyze dependencies: Review the flow of task dependencies. And identify any unforeseen ones that came up during the project.
- Assess resource allocations: Evaluate the accuracy of resource availability estimates. Identify any bottlenecks as well as overutilized and underutilized team members.
- Review stakeholder feedback: Gather input from team members and clients about timeline-related challenges. Flag any communication issues related to timeline updates or changes.
Scoro’s “Project timeline” feature streamlines this review process.
Go to the “Projects” tab. Click on “Project list.“
Then select Filters -> Status: Active projects -> Completed to display completed projects.
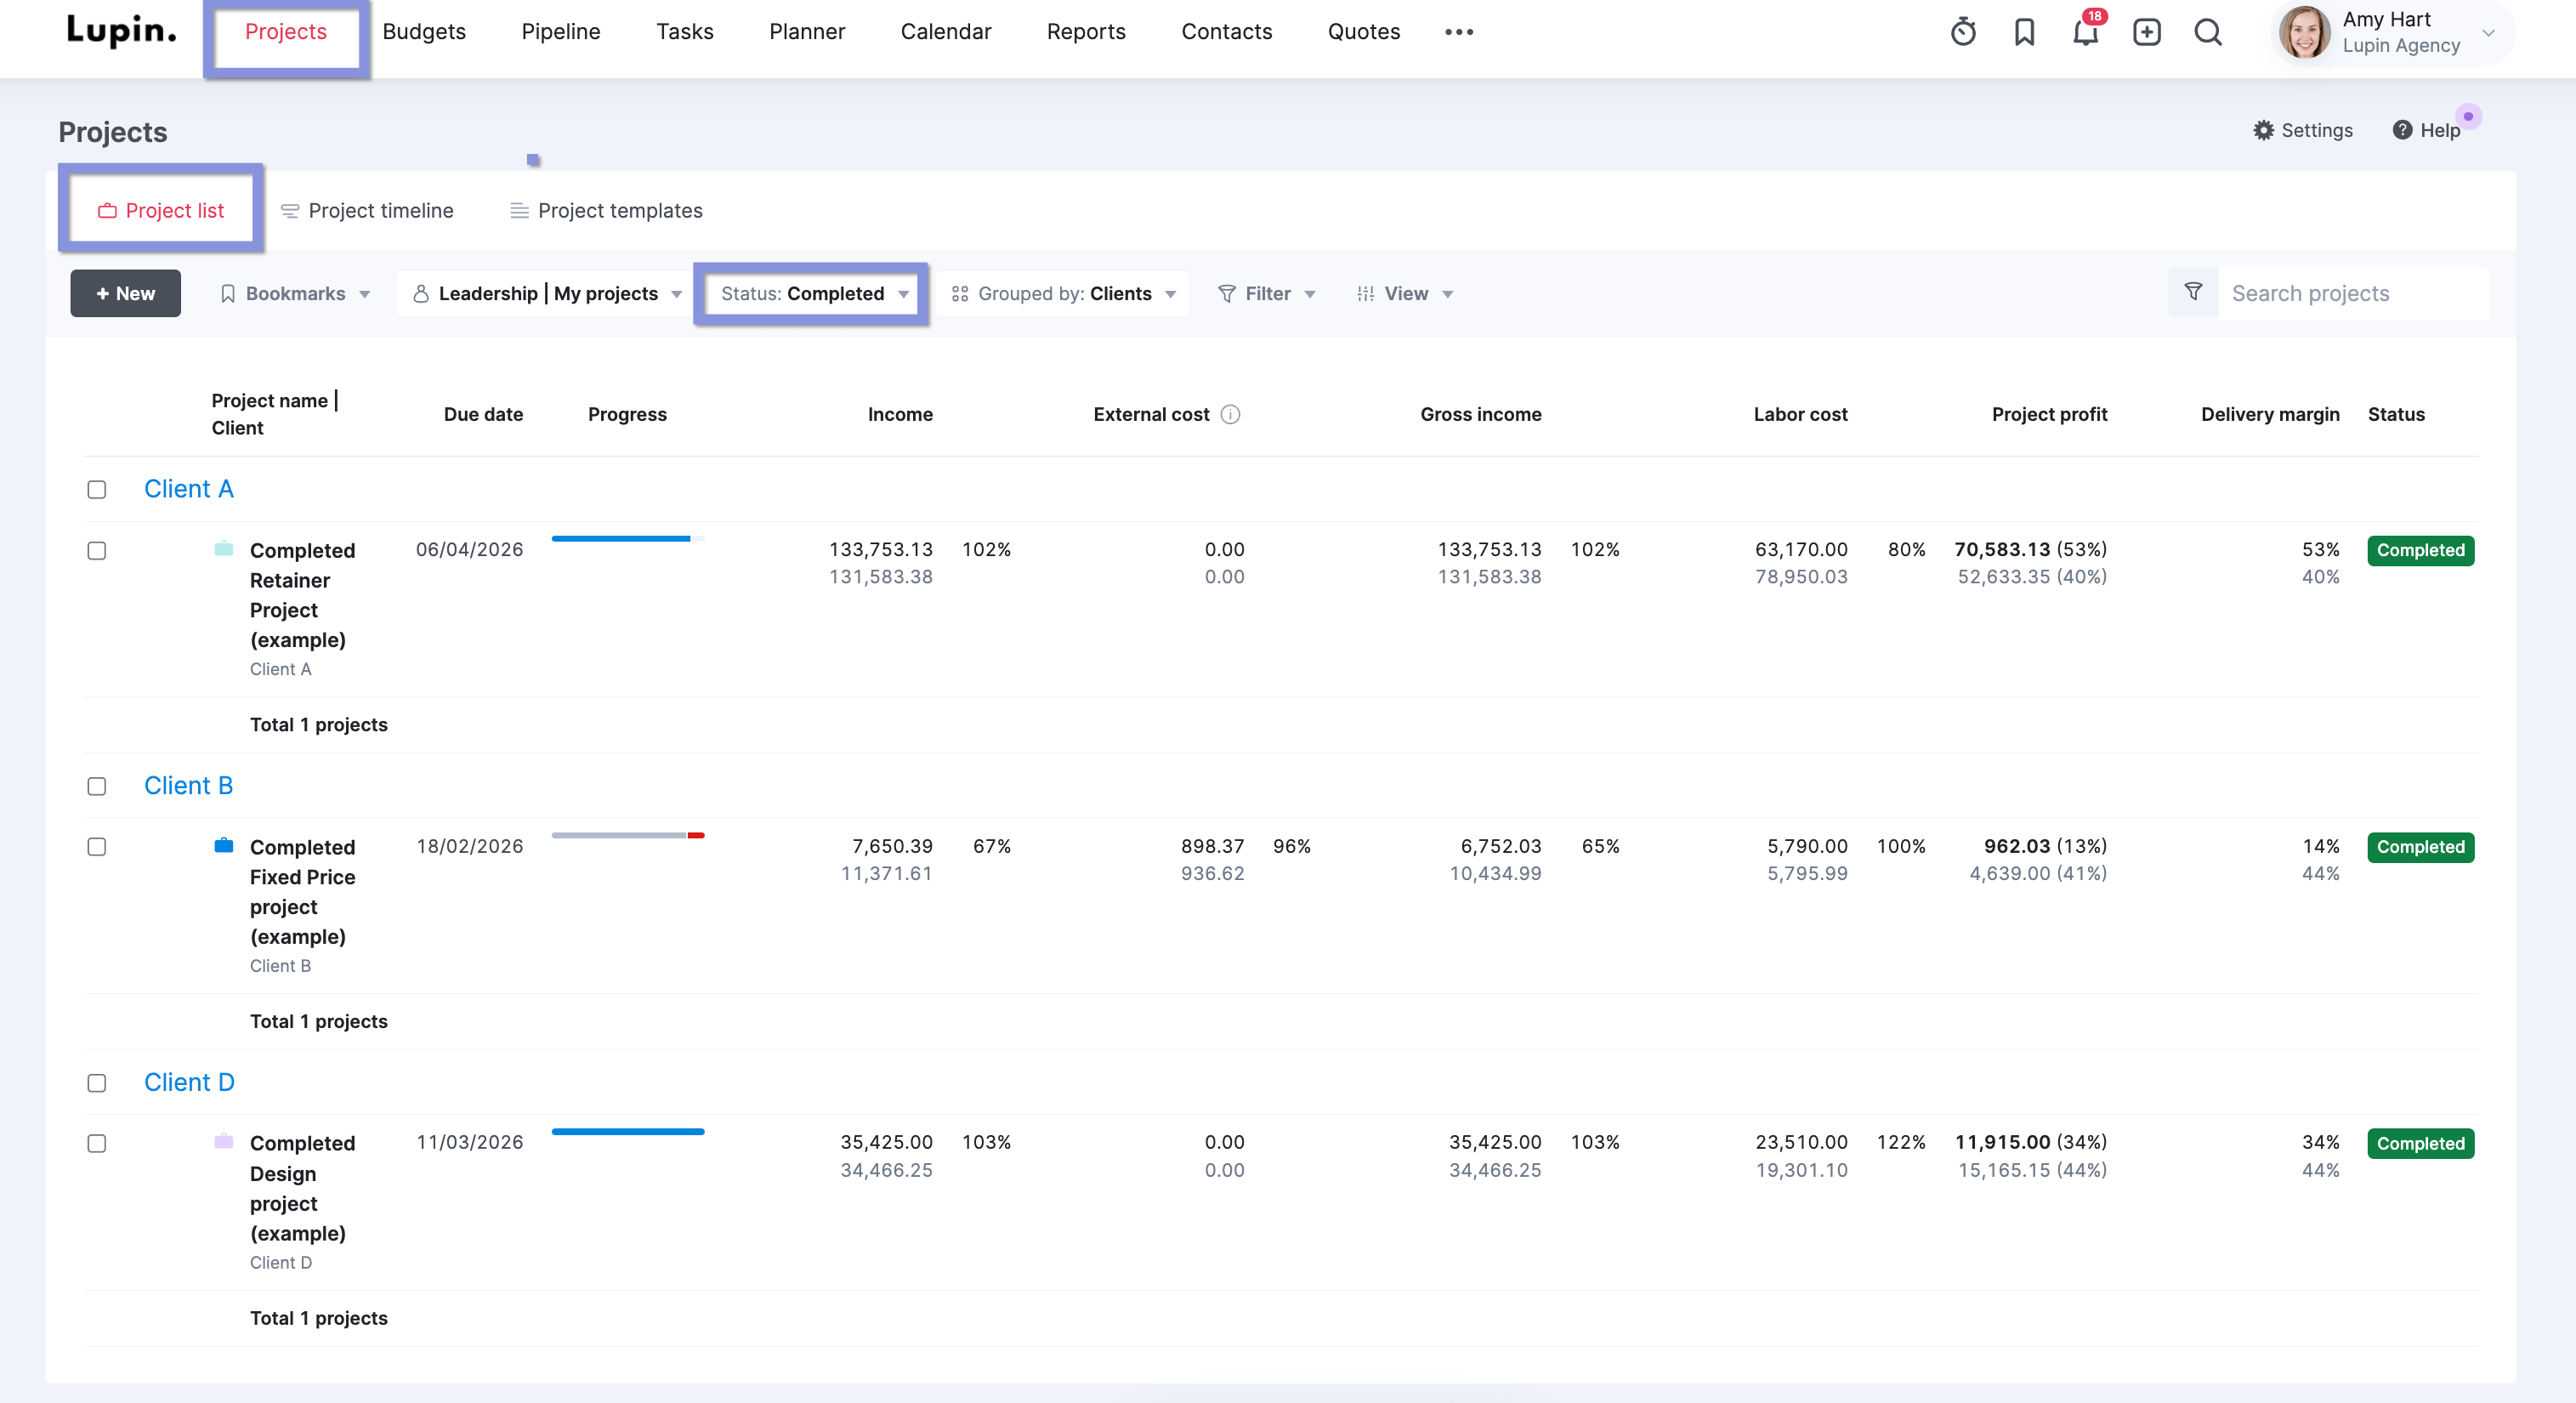
In the Gantt chart view, you can clearly see which tasks took longer than expected.
Use this valuable information to:
- Spot areas for improvement
- Identify strategies that worked well
- Fine-tune your future project timelines
By regularly reflecting on your timelines, you’ll continuously improve your project planning and execution.

Elevate your project management with clear timelines
With detailed timelines, it’s much easier for your team to clearly understand their responsibilities, meet deadlines, and deliver high-quality results—all while avoiding burnout and maximizing productivity.
Manage your timelines and entire project portfolio in one spot with Scoro. From initial planning through final delivery, our comprehensive platform gives you the real-time insights and control you need to execute profitable projects that impress both clients and management.
Explore Scoro’s Gantt chart and project management tools with a free trial.